
Fortunately, there is a very easy fix to permanently store login data of attached NAS drives
Storing the login information for network drives and folders
Ever since Windows Vista, adding network drives became very easy, but for some reason (Microsoft says it’s for security reasons), the login information needs to be re-entered every time on boot, even if you check the “Remember my credentials” option. Fortunately, fixing that is very easy – you just need to know where and what to do :-).
How to permanently save the login credentials for network locations in Windows
If you have one or more network attached drives or folders that are always connected (i.e. they show up in My Computer), it may be a drag having to enter the login details every time you power on your computer. The “Remember my credentials” option is meant to save the details temporarily for one session – that’s the official explanation from Microsoft.

If you want to save the login information permanently so that your network attached locations are connected and logged into right away on boot, you need to go through a short but fairly obscure (for the average user) procedure. So, here’s what you have to do:
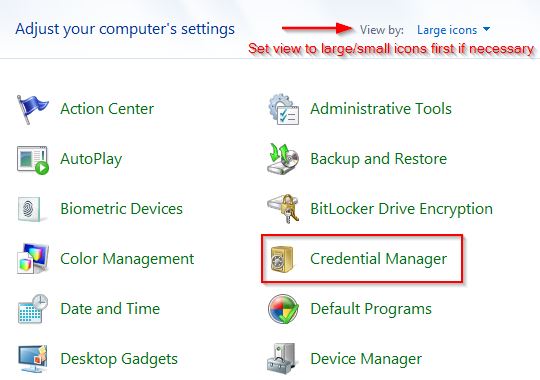
1. Step Open Windows’ Credential Manager either from the Control Panel or by typing “Credential Manager” in the search field of the Start Menu.
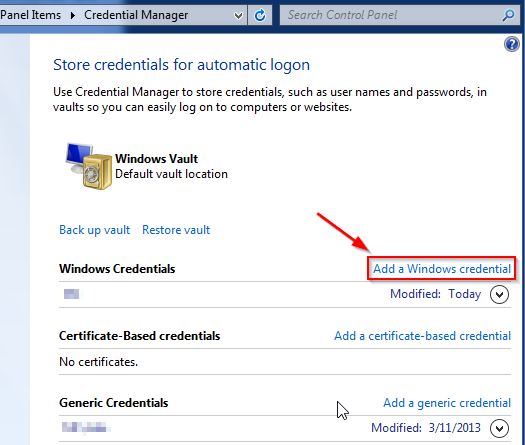
2. Step This is where you need to store the login credentials for any network locations. One credential per network computer/device is enough – i.e. if you have three network drives attached from the same network computer, you’ll only enter the credential for one drive, not all three. The others will inherit the details automatically. For computers running Windows, you need to select “Add a Windows credential” (in rare cases and for non-Windows machines, you may need to use the “Add a generic credential” option).
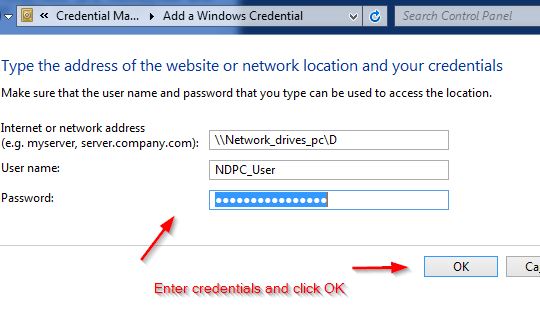
3. Step On the next screen, you need to provide the address, username and password. You must use the location of a specific drive, not just the computer name! For example, I have a network drive on a LAN connected PC named “Network_drives_pc” that uses the letter “D” for access. I’ll type “\\Network_drives_pc\D” in the address field (you may want to check that it’s indeed accessible via Explorer first). Any subsequent drives from this computer will use this credential, too.
If you entered everything correctly, the new credential will now appear in the Windows Credentials list in Credential Manager with Enterprise Persistence – that means success! Now your network drives and folders should be ready for use as soon as you start your computer and log on.
Conclusion
It’s very easy to save the credentials for network locations, as you can see – if you have folders or drives that need to be attached permanently and are tired of entering the credentials every single time, just perform the procedure above.