This is the definite guide to fixing VPN connections errors including the most annoying errors 789, 791 and other common problems.
IMPORTANT: Use OpenVPN – Avoid L2TP, PPTP
In order to avoid problems permanently, you will need a VPN provider that supports OpenVPN. StrongVPN is one of the best VPN providers, but there are others like VyperVPN that I am currently evaluating. I will post a little bit about that during the next weeks.
Windows 8.1 seems to have major issues with L2TP and PPTP connections and you will frequently run into errors 789, 791 spontaneously. If you don’t want to go through all the steps below every time, you should make the switch to OpenVPN now.
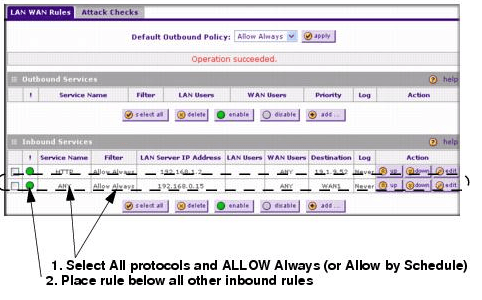
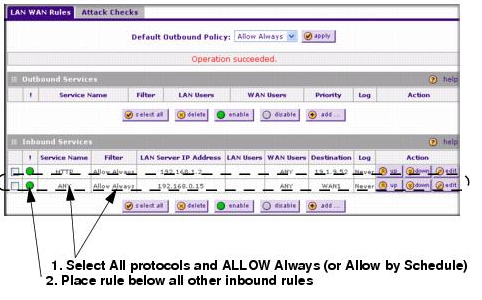
Troubleshooting Step 1: NAT Firewall Port Forwarding
All modern routers these day use NAT. So, if you are using a router you are behind a NAT firewall. In order to connect via VPN you need to learn all there is about port forwarding. But don’t shy away, this is really easy.
IMPORTANT: Before proceeding, grab your router manual or download it online, because you will need it for the next steps to do some port forwarding
1. Step Open your router configuration by entering 192.168.1.1 or 192.168.2.1 or 192.168.0.1 into your address bar. This depends on your router and you should find the IP in your router manual or online! Most US routers use 192.168.1.1, like ASUS routers for example. CISCO probably also use this IP.
2. Step Find the section “port forwarding” – if you cant find it, check your router manual.
3. Step Most routers have the option “exposed host”. Turn it on for testing purposes. If that already works to connect via VPN, simply add all VPN ports and forward them to your PC (to your local IP, e.g. 192.168.2.39)
- TCP Port 1723
- UDP 500
- UDP 4500
- TCP 4500
Important: If exposed host works but the ports above are not sufficient, google other ports or try allowing a certain range of ports.
Troubleshooting Step 2: TAP Adapters
The most common problem with OpenVPN and L2TP/IPSEC is the TAP adapter and WAN-Miniports
1. Step Right-click on the network icon in your tray and click Open Network and Sharing Center
2. Step In the sidebar, click on Change adapter settings
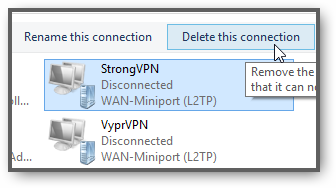
3. Step Select the TAP adapters and all other WAN-Miniport adapters and click the button on the top bar that appears: Delete this connection
4. Step Re-install the TAP adapter, either using the program you are using to connect to your VPN provider or manually.
Troubleshooting Step 3: Removing TAP via Device Manager
Alright, we just tried deleting TAP adapters via the Network panel, but the device manager may be a better choice to completely remove it. Remove the adapter labeled V9 or similar.
1. Step Hit CTRL + F and search for “Device Manager”
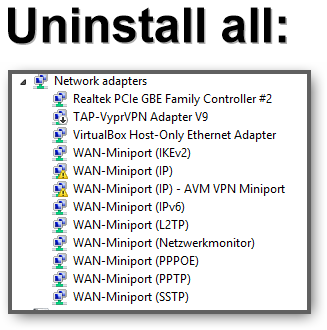
2. Step Uncollapse Network adapters
3. Step Uninstall all TAP adapters via the device manager
Troubleshooting Step 4 Last Resort: Removing TAP via Registry
Still no dice? Alright, let’s proceed!
1. Step Open an elevated registry editor
2. Step Go to HKEY_LOCAL_MACHINE
3. Step Uncollapse SYSTEM, CurrentControlSet, Enum, ROOT, NET
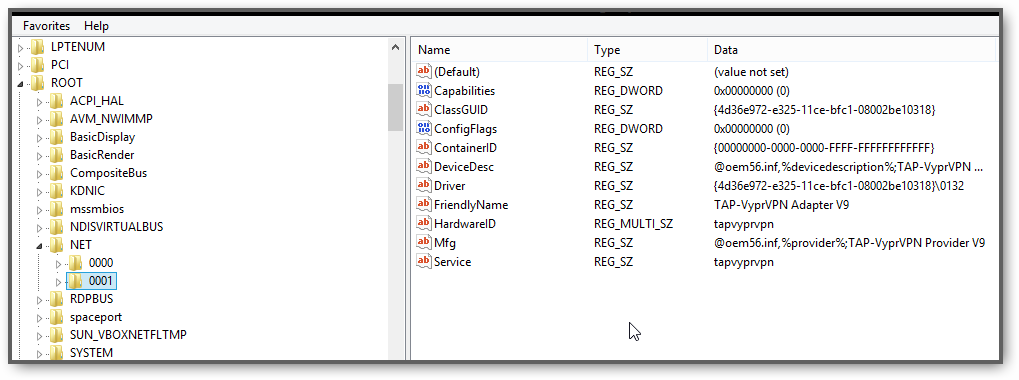
4. Step Right-click on NET and select Export. Store it in a save location as backup.reg
5. Step Finally, right-click on the NET folder again and select DELETE
6. Step You may loose internet access now. Reboot your system or this wont work
7. Step Voilà, OpenVPN works flawlessy again after going through all 3 troubleshooting steps above
Cannot Delete NET – Error While Deleting Key
Wait, If you are getting the error Cannot delete NET, download RunasSystem from Sourceforge and enter C:\Windows\regedit.exe into the address bar and hit Enter.

(Picture: Cannot delete NET – error while deleting key)
Now delete the registry key and reboot.
Conclusion And Related Articles: Fixing Error 809 and 720
I’ve previously written an article about fixing error 809 and 720 and another guide how to set up a VPN connection on Windows 8 properly. Both guides may come in handy if you are still experiencing problems.
Again, my best advice is to make the switch to OpenVPN now. OpenVPN works flawlessly behind the most annoying NAT firewalls and corporate firewalls.