If you want to change the mouse speed in Windows 7, here’s a quick guide that will show you how to increase/decrease the double-click speed and/or the pointer speed.
There are so many ways that you can customize your mouse for a better performance. If you have slow fingers, you can even set the double click speed to slower than the average speed if you want to. Read on to find out how.
1) Click on the ‘Start’ button. Then click on ‘Control Panel’ menu on the right column of the menu.

2) As the control panel loads up, look for the ‘Search’ text box at the top right hand corner of the screen.
3) Proceed to enter the word ‘mouse’ (with no quotation marks).
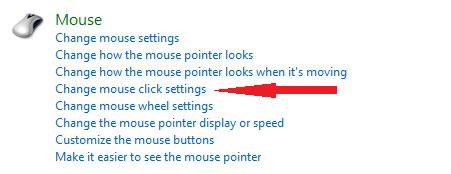
4) You will see a list of options for Mouse. Find one that says ‘Change Mouse Click Settings’.
Change Double-Click Speed
5) The ‘Mouse Properties’ panel will then appear. Open up the ‘Buttons’ tab panel.

6) Find the heading that says ’Double Click Speed’. Slide the bar towards Slow or Fast depending on your preferences.
7) Click on ‘Apply’ after you have done the adjustments that you needed.
8) Test the double click speed of your mouse, and if you are still unsatisfied with the speed of your double clicks, do repeat from the first step to adjust it.
Change Mouse Pointer Speed
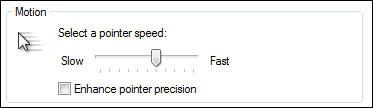
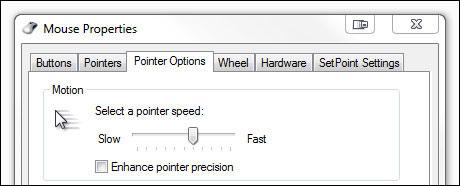
9) To change the actual mouse pointer speed, go to the tab Pointer Options at the top
10) Change the pointer speed by one – two bars and then try the mouse speed after clicking on Apply.
11) You might want to check the option “Enhance Pointer Precision”
Knowing how to change the speed of your mouse is very useful, especially if your fingers are not fast enough to do a double click without it ending up as a single click. Now you can customize it to fit your finger’s speed!

