If you have a new router that you want to set up, you might want to know how to change your IP settings in Windows 7 properly or how to configure DHCP. Here’s how.
![]()
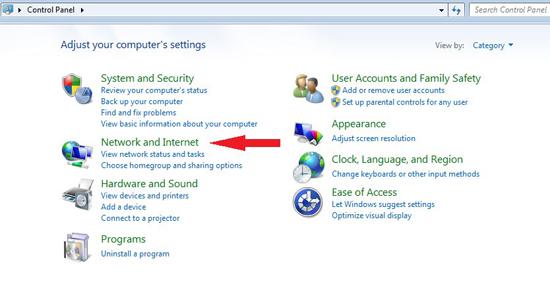
1) Click on ‘Start’ button and navigate to the ‘Control Panel’ menu item.

2) When the ‘Control Panel’ pops up, click on ‘Network and Internet’.
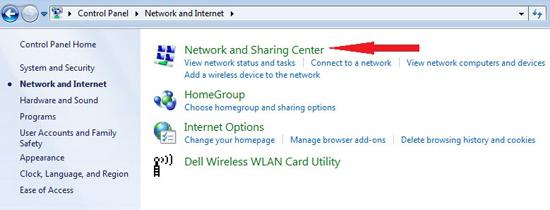
3) Then, in the ‘Network and Internet’ panel, find the ‘Network and Sharing Center’ link and click on that.
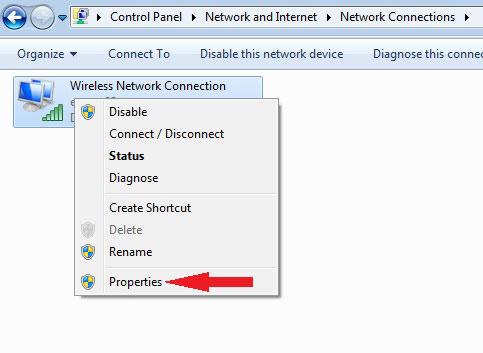
4) Find the‘Change adapter settings’ menu item on the left hand side of the menu. Click on the link.

5) You will see the list of network profiles that you have. Click on the one that you wanted to change, right click on it, and select “Properties”.
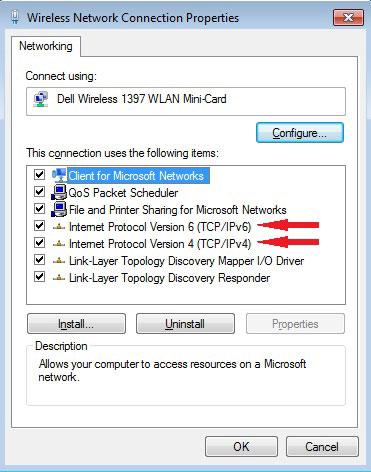
6) Click on the “Networking” tab. Double click on either Internet Protocol Version 4 (TCP/IPv4) or Internet Protocol Version 6 (TCP/IPv6). To change settings for IPv4 IP address, follow Step 4 and skip Step 5. To change settings for IPv6 IP address, go right to Step 5.
7) To automatically obtain IP settings using the DHCP, click “Obtain an IP address automatically” and select OK. To use a specified IP address, click “Use the following IP address“. Then, in the IP address, Subnet mask and Default gateway boxes, key in the IP addresses.
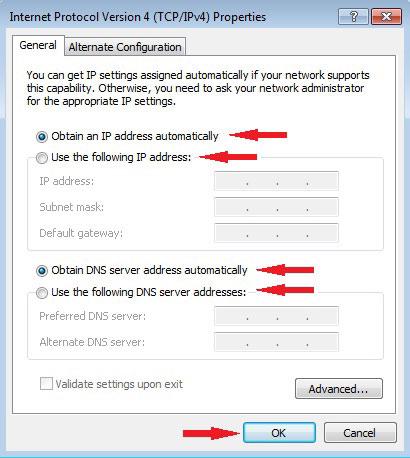
IMPORTANT: Check your router manual for instructions what to add as a default gateway. For the IP address enter the address of the default gateway but replace the last number with any number between 1 and 255.
IP Address. Usually 192.168.2.x – Replace x with a number between 1 and 255. If your router is using another default gateway you have to enter a different address here. Check your router manual and settings.
Subnet mask: Usually 255.255.255.0
Default Gateway: Enter the main address of your router. In most cases it is 192.168.2.1, but this depends on your router! Check the manual for the default gateway.
8) To automatically obtain IP settings using DHCP, click “Obtain an IP address automatically” and select OK. To use a specified IP address, click “Use the following IP address” and key in the IP addresses for the IPv6, the Default Gateway and also the Subway prefix length.
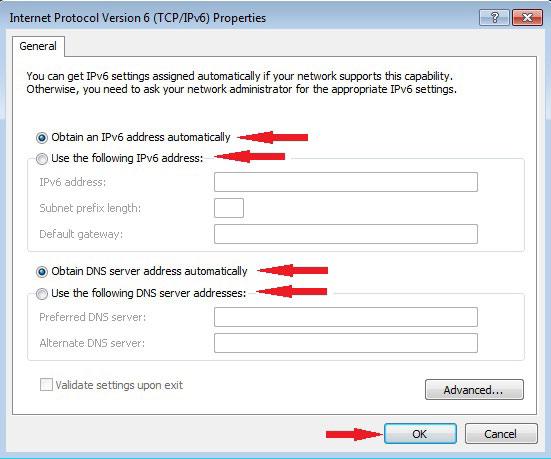
9) To automatically obtain a DNS server address using DHCP, click on “Obtain DNS server address automatically”. To use a specified DNS server address, key in the primary and secondary DNS servers in the “Preferred DNS server” and “Alternate DNS server” boxes respectively.
10) Click on “Advanced” if you want to change any advanced DNS, WINS and IP settings.
11) When you are done with the changes, click on ‘OK’ to save your changes.
If you are not sure about the values to enter for the IP settings, always go with the automatic settings to ensure that there are no errors during your Internet connection.

