If you are tired of the UAC notifications, you can easily disable UAC in Windows 8 using the Control Panel or the UserAccountControlSettings.exe.

Important: This tutorial is only valid if you are using the Windows 8 Developer Preview version. Once we’re approaching Windows 8 beta, this tutorial is considered outdated and requires an update
Disable UAC using the Windows 8 Control Panel
1. Step Disable the Metro Start menu, so you can easily open the traditional Control Panel
2. Step Click on System and Security

3. Step The Action Center field has a hyperlink Change User Account Control settings, click on it

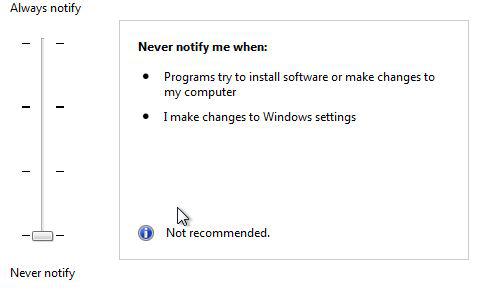
4. Step Move the slider down to disable UAC notifications in Windows 8 completely. This will never prompt you when you make changes to Windows 8 settings or if any programs try to install software on Windows 8. This is not recommended, because it can actively help you to protect your PC from malware. However, certain firewalls like Agnitum’s Outpost Firewall have a proactive security system that can easily recognize changes in files and filesystems, so you might want to disable UAC in some situations.
Disable UAC using the Windows 8 UserAccountControlSettings.exe
1. Step Disable the Metro Start menu, so you can easily use the traditional Start Menu
2. Step Click on Start, then enter into the search bar: UserAccountControlSettings.exe and hit Enter
3. Step Move the slider down to disable UAC notifications
Yes, this does not fully disable UAC in Windows 8, however it disables the annoying UAC notifications. There are various tools that can help you to disable UAC, but I suggest you disable only the notifications and use a proactive system firewall like Outpost Pro.


NOpe not useful still getting the annoying UAC what a pain it’s like Microsoft doesn’t trust us people using software
Hi George, thanks for the feedback – I will check this out. As mentioned above we tested this on an earlier version for developers so this might not work on the final release, however we strongly advise you not to disable the UAC
The UAC is quite handy to identify malware and crapware stuff .. we also recommend to check that the software is signed. If it’s not signed by a publisher it might not be ok to use