If you are selling an old computer and would like to ensure any personal information is deleted a permanent removal is going to be needed.Here’s how!
Permanent Removal Of Files
Many people believe that by emptying the recycle bin or deleting certain files that you fully remove and delete a file from a computer.This is not the case.
Each file when saved takes a certain memory location on a hard drive. When a file is ‘deleted’ it’s attributes are just changed to allow it to be written over in the future. The file itself still exists in the same memory location it always has but you can no longer view it. A new file can now be written over its place but even then you are still able to recover the old file through the use of third party software.

With the everyday use of computers now involving such things as banking and other financial transactions, it is very important to ensure sensitive information is fully deleted. To be able to fully and permanently delete a file from a computer it is advised to use third party software that overwrites this file memory location many times (passes). Using an encrypted algorithm like gutmann method to do this will ensure that file recovery is impossible.
Step by Step How To Permanently Remove a File
While this may sound advanced by following these simple steps anyone can permanently delete a file from memory using software available. You can download file removal software for free such as ‘Eraser’ which we will cover in this guide.
Step 1 -Download and Install File Remover
Download and install your file removal software such as Eraser. Once you have installed the program start it.

This will bring up the Eraser programs interface.
Step 2- Using Eraser To Remove Files
Select Settings from the top menu of Eraser. Under the heading ‘Erase Settings’ you will see ‘Default file erasure method’ select the method tab to bring a drop down menu.
From here you can select the file removal method. Please note that the more ‘passes’ a method has the longer it will take to delete a file.
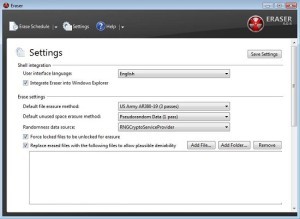
Generally 3 passes will remove a file without recovery, with 7 passes being a very secure removal.
Step 3 – Save Settings For Future Use and Locate File For Removal
Once you have chosen your desired deletion method click ‘Save Settings’. You can now close the Eraser program.
Locate the specific file you wish to remove and right click on it. You will now see a new option of ‘Eraser’ click on this and then select ‘Erase’. This will open a new prompt where you can confirm deletion by selecting ‘Yes’. This will add the file to be deleted (immediately by default) you can view the status of deletion from the Erase Schedule within the Eraser interface.

