Do you want to replace the Explorer.exe? Some Windows 7 themes that you can download on this site will come with a file “explorer.exe”. This is a very important system file, so please be careful, make a backup and follow the instructions closely when you learn how to replace the explorer.exe.

Note: Please do not proceed with this guide if you don’t like tinkering around with your PC or are afraid of breaking your PC. It is a good idea you learn how to restore your PC using sfc.exe should you encounter any problems.
The Methods
The easiest and shortest way to replace the explorer.exe and any other system files is to download a registry hack that will add the option Take Ownership to your right-click context menu.
Download this script: Download TakeOwnership.zip and double-click on the .reg (registry) file to add an option “Take Ownership” to your contextual menu (the right-click menu).
You can then right-click on your system files and take ownership of them. After that, you can rename all files and replace the system file / explorer.exe easily.
There are three methods, one for the beginners and the other for advanced users, click on the links below to start:
Method 1: Change registry path to explorer.exe
The easiest method to replace explorer.exe is to open the registry and then change the path to the explorer.exe.
0. Make sure to know the difference between a 64-bit explorer.exe and a 32-bit explorer.exe. You can’t use a 64-bit explorer.exe on a 32-bit system. Should you have no clue, please read this: What Windows Version do I have? 32 or 64?
1. Step Rename your new explorer.exe to explorer2.exe and copy it into the Windows directory: C:\Windows\
2. Step Open the registry: Click on “Start” and enter regedit into the search field:
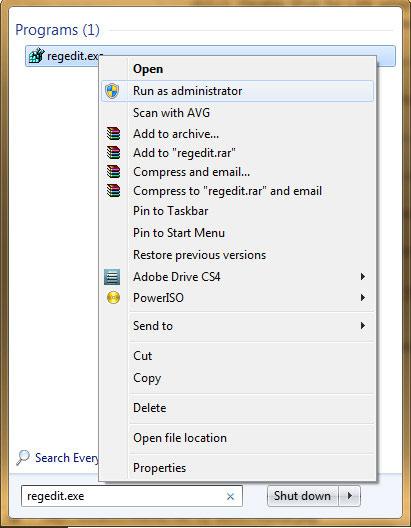
3. Step Right-click on regedit at the top and select “Run as administrator”
4. Step Uncollapse the following path: HKEY_LOCAL_MACHINE>Software>Microsoft>Windows NT>CurrentVersion>Winlogon
5. Step Change explorer.exe to explorer2.exe.
6. Step End the process explorer.exe via the task manager and start a new process by entering “explorer2.exe”.
If 6. is too complicated for you: Reboot or read below for more instructions how to end the process explorer.exe.
Method 2: Take Ownership + Edit Permissions via Interface
Assign Ownership of Explorer.exe
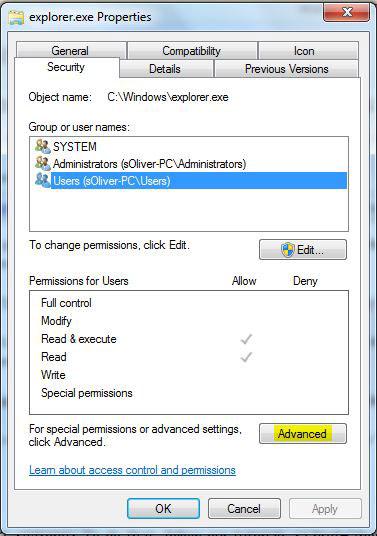
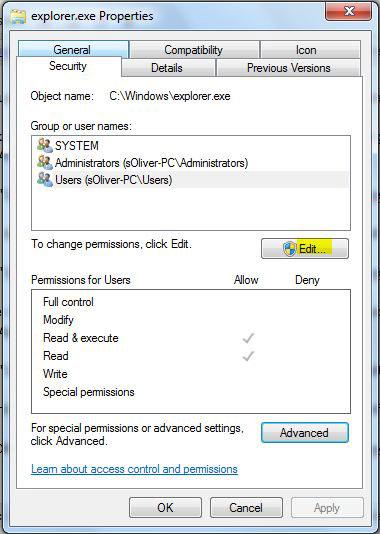
1. Step Right-click on explorer.exe and click on “Properties“. Go to the tab “Security“, click on “Advanced“:
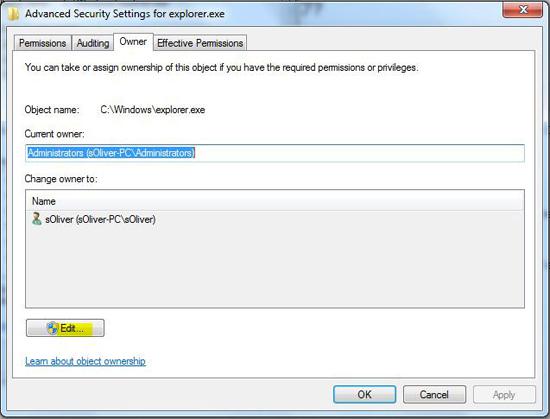
2. Step Go to the tab “Owner” and click on “Edit“:
3. Step Assign the ownership to your administrator account by selecting your “Administrator account” (usually Administrators(username\Administrators)) and click on “Apply“:
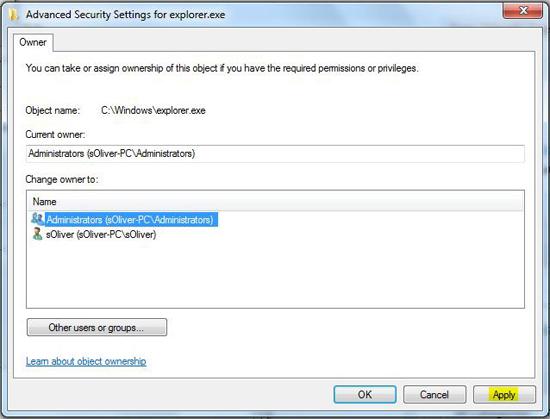
The current owner should now be your administrator account. Confirm that!
Change Permissions of Explorer.exe
4. Step Click on “OK” and you will be back at the security tab of explorer.exe. There click on “Edit”:
5. Step Select your administrator account (usually Administrators(username\Administrators ) and check the option “Full Control“. Click on “Apply“:
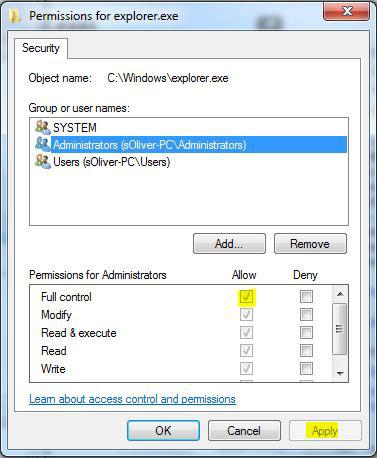
6. Step Now you can rename your explorer.exe to explorer.exe_old and copy your new explorer.exe into the Windows folder.
Restart your PC or restart explorer.exe (instructions below).
Method 3: Take Ownership via Command Prompt
Copy your new explorer.exe to C:\
Take Ownership of new Explorer.exe
Next, we take control of it!
You can either download this script: Download TakeOwnership.zip (it will add the option “take ownership to your context menu) or you can do it manually.
I usually do it manually:
Enter cmd.exe into the search field on the Start menu and right-click on cmd.exe, click on “Run as administrator”.
- Enter cd C:\Windows\
- Enter TAKEOWN /F explorer.exe
Terminate Explorer.exe
Open up the task manager (CTRL+ALT+DEL) and right-click on Explorer.exe and terminate it:

New Task (Run…)
Don’t be shocked, your taskbar will disappear. You can always make it reappear again by launching a new task and entering “explorer.exe”.
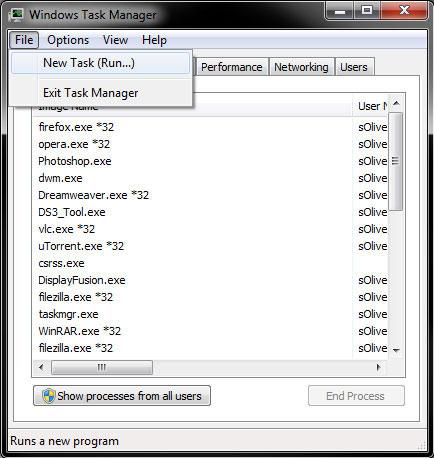
Now click on “New Task” and enter:
- runas /u:Administrator cmd.exe (this will launch cmd.exe as administrator)
You will be prompted for your password, enter it. If it does not work, read this tip:
Tip: If the command prompt immediately closes you did not enter an administrator password. First active the hidden administrator account of Windows 7 and then set a password for that account. Then you are able to open a command prompt via runas /u:Administrator cmd.exe.
If you receive the error: No mapping between account names and security ID’s was done please try another method of this tutorial or try running this after logging into the real admin account.
Take Ownership of old Explorer.exe
5. Step Take ownership of the real explorer.exe and grant permission to administrators to modify it :
- cd C:\Windows\
- TAKEOWN /F explorer.exe
- ICACLS explorer.exe /grant administrators:F
Final Step: Rename and move Explorer.exe
Rename the explorer.exe and paste the new explorer.exe into the Windows folder:
- Enter rename explorer.exe explorer.exe_old
- Enter move C:\explorer.exe C:\windows\
Back in the taskmanager click on “New Task” and enter “explorer.exe”. Voilà, you just replaced your explorer.exe!
Explorer.exe: Class not registered
If you receive the error “Class not registered”, you might want to try this:
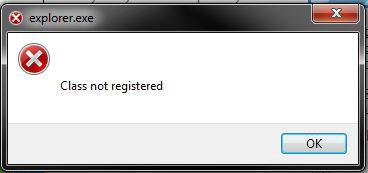
Start > Run > regsvr32 ExplorerFrame.dll
Make sure that ExplorerFrame.dll is a valid DLL
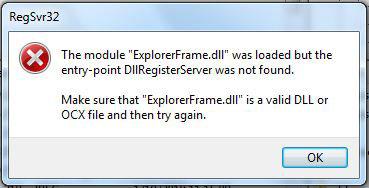
If you receive the error “The module ExplorerFrame.dll was loaded but the entry-point DllRegisterServer was not found. Make sure that ExplorerFrame.dll is a valid DLL or OCX file and then try again”, you are probably trying to launch a 32-bit explorer.exe on a 64-bit system.
Are you running a 64-bit system? Then make sure that your new explorer.exe is a 64-bit file or it won’t work!
Replacing Services.exe
If you are worried you are infected by a virus and that you ought to replace services.exe, I suggest you also run the sfc.exe (system file checker) which can repair all of your system files.
System files such as explorer.exe, services.exe or even shell32.exe are integral parts of your OS, if you modify them incorrectly or a virus replaces them it can have severe consequences. Built-in Windows tools allow you to restore system files without having to install any 3rd-party tools.
Especially services.exe is known for becoming infected and should be inspected. Also all system files outside the System32 files may be considered harmful, e.g. if you find services.exe in C:\somefolder\ then it may very well be a virus.


Dear Oliver,
I am currently running a version of Windows 7 which has far more themes that did the original I was using. I am awaiting my full to be registered version.
I have made a copy of the winsxs folder which has all the current themes.
Would it work to copy it to the next winsxs folder after installation so as to get all these themes in my final installation?
Regards
Allan
Excellent Post! Keep up the good work
hi,
i got the error msg after replacing the explorer.exe (class not registered) and i tried ‘Start > Run > regsvr32 ExplorerFrame.dll’ but still getting an error msg…
[ the module “explorerframe.dll” was loaded but the entry-pint DLLRegisterServer was not found.
make sure that “explorerframe.dll” is a valid DLL or OCX file and then try again ]
i’m running win7 (64bit)
pls help
Hey sajish,
Maybe your explorerframe.dll file is corrupt!
Just curious, are you running Panda Antivirus?
Try this:
Run cmd.exe as admin (if you dont know how enter cmd.exe in the google box on this site)
Then enter “sfc.exe /scannow”
This will make sure that your system files are ok. Then repeat the instructions above.
If that doesn’t work verify that the explorer.exe that you want to use is a 64-bit explorer.exe. If it’s not it won’t work.
What exactly are you trying to do? Install a theme?
up until here i was successful
C:\windows\sysWOW64>rename explorer.exe explorer.exe_old
Access is denied
i missed a step. it works
I can do it better…
Open taskmanager. Click on File> New Task and write regedit.
There is open a window. Click on HKEY_LOCAL_MACHINE>Software>Microsoft>Windows NT>CurrentVersion>Winlogon
Scroll down and doubleclick on Shell. Change explorer.exe into explorer2.exe .Make sure explorer2.exe is in the WINDOWS map. Then log off and log in.
This fucked up my taskbar. Now I only get the superbar, even when I have it set to small. I’m back to using my old explorer.exe, but the problem remains. Any ideas on how to fix it?
Did you forget to restart your explorer? You can do that by restarting your PC or if you terminate the process explorer.exe
I’m also not exactly sure what you mean with “now I only get the superbar”. What else would you want?
If you had a QuickStart toolbar you can enable it like this: right-click on taskbar, “Toolbars”, “New Toolbar”.
hey i only get a black screen and a mouse i can do nothing
pls help i dont want to format…
Read through the tutorial again. If that happens you have to use your old explorer.exe again.
You made a backup right? What is the name of your backup file?
1. Press CTRL + ALT + DEL and then click on “New Task” (for pictures see above) and enter:
runas /u:Administrator cmd.exe
2. then cd to your Windows folder! Enter:
cd c:/Windows/
3. Rename your explorer.exe.
Example: rename explorer.exe explorer.exe_old
The first is the actual file that we want to rename and the latter one is the name for it.
4. Rename your backup file, how did you call it??
Example: rename explorer.bak.exe explorer.exe
If it’s too difficult for you OR if you did not create a backup of explorer.exe, you can always restart your PC, press F8 on boot up and then select the option “Repair your computer”.
If that doesn’t work (I’m not exactly sure) press F8 on boot up and select “Start Windows with Command Prompt”.
Then on command prompt enter:
sfc.exe /scannow
This will check and repair your system files.
Hello, first congratulations for the work. I’m from Brazil, and my text was translated into English by
Google. :(
Well come just say, this has not arranged a solution to this but the message “The module Explorerframe.dll
was loaded but the entry-point DllRegisterServer was not found. Make sure that Explorerframe.dll is a valid DLL
or OCX file and then try again “But I managed to return to work on a 64Bit system Terminating
Process “winlogon.exe” around with this I restarted the PC and done everything working perfeict :)
Hi Rodolfo. Not sure what your problem is, but often you receive the error when you replace explorer.exe with a 64bit-file on a 32bit system (or the other way around).
Glad it works now!
Hello!
Lovin’ your themes so far. I tried the above process and was very successful until the very last step.
I did indeed get the class not registered error message and bc I got this, I was unable to open explorer.exe and therefore there is no start>run step option.
I did, however, use the new task to execute the regsvr32 ExplorerFrame.dll and promptly got an error saying that the file was not there.
Any thoughts on what to do next?
thanks much in advance & keep up the great work!
peace
rooster
Hi Rooster,
you are probably trying to use a 64-bit explorer.exe on a 32-bit Windows 7, am I right?
This is not possible!
Where did you download the explorer.exe from? If you downloaded it from this site it won’t work on a 32-bit system, because I only include 64-bit explorer.exe files. So, you would have to download ResourceHacker and follow this tutorial:
http://windows7themes.net/how-to-change-start-button-in-windows-7.html
I will write a tutorial how to find out what Windows version you are running, will be up shortly. I am very sure that this is your problem.
Cheers
By the way, I just updated the tutorial and added another method suggested by “You can also do it so”. It’s really the easiest and fastest method, but again you can’t use 64-bit files on a 32-bit system.
Ok, so if you don’t know what Windows version you have, read this:
http://windows7themes.net/what-windows-version-do-i-have-32-or-64.html
I can’t do that !!!
I follow method 2 but when i restart computer, explore.exe not run
Kid what error do you get? Open a command prompt (Windows + E, then enter runas /u:Administrator cmd.exe) and use the rename command to get your backup back.
If that’s too complicated follow this tutorial:
http://windows7themes.net/how-to-repair-windows-7-sytem-files.html
Then learn about the difference between Windows 7 32-bit and 64-bit. You used one of our explorer.exe right?
To: sOliver
The Link is working now, thank you so much.
All the best to you and your work.
Splendid007
i got this explore.exe ‘class not registered’ and my whole screen is black! i dont know how to fix this. there is nothing on my screen, just black.
please help
Izz you probably used the wrong 32 or 64 bit program for explorer. I did this once. What you do is after you login and you get a black screen click Ctrl+Alt+Del then start task manager. Then click new task and in the open file dialog. In the open file dialog restore your old explorer and stuff and run explorer. DONE
You can also do it so…
Not gonna lie, his way ^^^ Is soo much easier. I was lost for 3 hours till i read his and now i have my diablo3 start button.
OK but how about 64 bit ? Do U know how the way to change the explorer.exe 64bit without any error like ” class not registered ” etc
i successfully replaced the explorer.exe file, but the windows 7 theme i wanna use (Snoheso) has 3 explorer.exe files, what should i do with the other two?
If a theme has several explorer.exe files you can assume that the author has created multiple start buttons (each explorer.exe will be a different one), you simply have to decide for one that you like. Try them all ;)
If there are two explorer.exe and they are called something like explorer32.exe and explorer64.exe then there’s one explorer.exe for 32-bit systems and one for 64-bit systems.
Hi,
It works, but how can I change back everything? A prompt always pops up when I open a windows folder or something at the control panel. I used method3.
Thanks in advance!
Hey Im confused, where exactly do you put these files.. Im running 64 bit so do I put the explorer.exe in place of the one in sysWOW64 folder? same will the .dll files what folder, there are a few explorer.exe files one in windows folder itself and then in sys64 and sys32… pls thanks
No, ignore the sysWOW64 folder.
ONLY replace the explorer.exe inside C:\Windows\
Read the tutorial above to replace the explorer.exe and don’t forget to create a backup of the original explorer.exe
I can change the ownership and rename C:\windows\system32\explorerframe.dll to *.sav and also the explorer.exe in C:\windows, then copy the provided x64 files.
But nothing changes, no errors, but no change in startbutton or anything else.
Not even after a re-start.
Applying the theme is no problem.
It does not work with any visual style ..
What can this be?
Windows home 64bits Dutch.
Thanks if anyone solved this problem.
hi, I do this replacing of the explorer, how is my windows supposed to look now, how much has changed, i get the apple start icon, is it possible to install the entire mac interface? :b
I guess i should read the other guides in this mac theme pack, silly me.
so by just copy pasting the original explorer.exe. you get back to default windows theme ?.. just want to make sure before tweaking anything..
You get back the default Windows 7 start orb only by replacing the explorer.exe with the original one. You have to do the same for all other files that you replace, e.g. shell32.dll, explorerframe.dll, oobefldr.dll, imageres.dll, ehres.dll, etc. etc.
Hi! I’ve replace my explorer.exe, and everything’s alright… but when I try to do something with elevate privileges in explorer (for example add some file into C:\Windows), User Control Accounts, ask me to do it as always, I press continue, but then it appears a new message, the says Editor Unknown, and I gotta press “ok” again, is there any way to avoid that last message?
I’ve updated this post and recommend everyone to simply download the registry hack at the top. This is by far the easiest way to replace system files.
If you think the hack is not safe, open the registry file in a notepad and you will see that is basically doing what I describe above:
– Taking owernship
– Granting permissions
on this page it says “Rename your new explorer.exe to explorer2.exe and copy it into the Windows directory: C:\Windows\”
Where do I get the “new explorer.exe”file from? In other words where is the ffile used to replace the existing explorer.exe?
Thanks
Mike, you should already have an explorer.exe, why else would you be here? Obviously, you need to download an explorer.exe somewhere.
If you don’t have an explorer.exe download one of the themes with a Start button, they have the file explorer.exe. Most themes on our site only include a explorer.exe for Windows 7 64-bit and a bitmap file for 32-bit users.
If you are on Windows 7 32-bit, please use a software called Start Button changer or use a Resource editor that you find on our site to modify the original explorer.exe after creating a backup.
Okay, im trying not to rage text you here.
Where can I download an explorer.exe file for windows 7 32-bit?
That is all I need.
ALL I need is the file. I am asking you this since this is the most prevalent site which comes up when i search for this file.
WHERE EXACTLY DO I DOWNLOAD IT?
Please……………
Bourne, are you looking for the original explorer.exe or any explorer.exe? If any, then you can download this nice explorer.exe with a skull:
http://windows7themes.net/free-ghost-recon-skull-desktop-theme.html
You can always restore the original explorer.exe via sfc.exe (search site)
Umm i am trying to use this explorer that came in the world of warcraft theme to edit my start button but when i rename the other to explorer.exe_old adn put the new one in adn restart it don’t work pls help.
Hey I followed method 2 and I replaced the explorer.exe file with my new one and restarted my laptop..
When my laptop rebooted it let me enter my password but after the Welcome screen my Desktop is black…
I hit Ctrl+alt+delete and went to the task manager and ran explorer.exe and everything is back..
But every time i start i have to run explorer.exe
please help.
rkidder, enter sfc.exe /scannow into an elevated command prompt (see our tutorials), that will restore your original explorer.exe. Then try replacing the explorer.exe again (manually!!)
OK wrap your heads around this one. Even after doing all this right. Win. 7 still won’t let me take ownership of the explorer.exe!!! THIS IS MADDNESS. Im so irritated. Please I need help. I have full control of everything. I can take ownership of none system files but not my system files. Explorer is not running while I’m doing this FYI. Anybody that can help, it would deeply appreciated.
i lost m explorer.exe when i did rename via cmd it got renamed but not showing that well i downloaded a explorer.exe and getting class not registered i do Start > Run > regsvr32 ExplorerFrame.dll
wtf how i go to start then run i dont got a start bar here? so i tryed this on task bar still got error
The module explorerframe.dll was loaded but the entry-point DLLRegisterserver not fond make sure that explorerframe.dll is a valid Dll or OCX file then try again
If anyone is still reading this:
Everything worked fine with the second method.
But is it possible to change the now elevated rights of the Administrator Account to default settings with the new, modified explorer?
Also, my backed up explorer files have automatically received the same rights configurations as the modified explorer.
Any answer is much appreciated.
Actually I tried to help a friend with a corrupted start menu and was following the steps in Method 2, only to find out that I replaced a 32bit file with a 64bit file which caused a black screen. I then tried to run sfc/scannow but it said I must be an administrator. Unfortunatley I was not able to login as an administrator without having access to the start orb. Without no solutions on the internet I finally tried to use “Browse” in the “New Task” option and that showed me all the files on the computer. This way I could simply delete the 64bit explorer.exe and rename the original back to “explorer.exe”, then hit “Open”. And voila, system back to normal. Well, besides that the startup is still corrupted, but at least the computer is working again!!!!
Simplest solution to restore the explorer.exe back to original!!!!
Thank you so much. Your instructions were perfect and I really appreciate that you provided multiple methods. I had to use the command prompt since I was unable to take ownership with the registry modification.
If anyone else is still having a problem, I read somewhere else that the user profile may be corrupt. So you might be able to solve the problem by just making a new user account and moving all personal documents.