Uh oh, so it’s been a while since I last updated my BIOS. Of course, updating the BIOS is always risky business, but the chance that there’s an energy outage while you are updating your BIOS is ridiculous low. Here’s how you would update an ASUS BIOS.
Is The BIOS Update 100% Required?
Before you update your BIOS you should ask yourself, is it really necessary, do I really have to update my BIOS? Here are some urgent reasons for a BIOS update, for example annoying Windows 7 blue screens that you can’t fix.
1. Step Frequent Blue Screens that won’t go away even after reading the guide how to fix blue screens or black screens after inserting USB devices.
2. Step Me, for example, I frequently received the Windows 7 blue screen error :
Attempt to reset the display driver and recover from timeout failed.
STOP: (OxFFFFFA80057A14E0, 0xFFFFF8800418E2E4, 0xFFFFFFFFC0000001,)
atikmpag.sys – Address FFFFF8800418E2E4 base at FFFFF88004187000, DateStamp 4d409c8d
3. Step I also frequently had black screens after plugging in my USB devices. That is a common problem of old BIOS versions and documented at ASUS.com. A BIOS update can help to restore the functionality of your USB ports and stop the annoying black screens.
0.1 BIOS Update Warning
WARNING: Downloading the wrong BIOS update can result in damaged hardware. Be EXTRA careful when you’re downloading a new BIOS update to get the correct update. Double-check the motherboard chipset with tools like SiSoft Sandra. We do not take any responsibility for damaged hardware, follow this guide at your own risk.
1. Download Latest BIOS (ROM)
The motherboard I use is the ASUS M489GTD PRO / USB3. So, first of all you obviously need to download the BIOS from the website of your motherboard manufacturer.
If you happen to use a ASUS motherboard, head over to http://support.asus.com/ and select your model. I tried searching for my model, but apparently the search tool that ASUS provides is not capable of finding anything. Looks like it’s too complicated to do a simple %LIKE% SQL query. Oh well, ASUS is still the best motherboard manufacturer around even if their support site could be a bit more user-friendly.
Anyway, after selecting your motherboard manual …

… download the latest BIOS (make sure to grab the latest BIOS and not a BETA version – we want a stable motherboard and ideally improve the stability, but BETA BIOS updates are often instable)
Extract the BIOS file (in my case M4A89GTD-PRO-USB3-ASUS-2001.zip). For ASUS motherboard the BIOS is usually a .ROM file. Lucky for us, ASUS makes it very easy to update the BIOS.
2. Put BIOS on EMPTY USB-Stick/Flash Drive
After putting the BIOS ROM on my USB-stick (no, it’s not even a USB flash drive), I renamed the BIOS ROM as suggested in the readme to make the filename short and handy.
3. Enter BIOS & Run BIOS Updater (e.g. EZ Flash)
On boot up, hit DEL to enter the BIOS. This can be different for your motherboard type, so I would suggest reading the manual if DEL does not work. Also keep in mind you need to press DEL before the OS selection screen. I recommend to keep hitting the DEL key after restarting your PC.
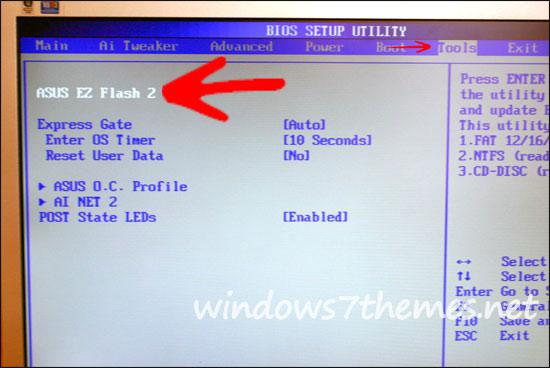
Ok, after finally entering the BIOS, we can start the ASUS Bios Updater. The BIOS updater tool is called EZ-Flash 2.
1. Step Use the left, right arrow keys to go to Tools, then select EZ-Flash 2 with the down arrow keys and hit enter. For other motherboards you might have to look a bit deeper, check your manual!
2. Step At the top you can see your current BIOS version, write it down. Then hit Tab to select the USB device, select it and hit Enter
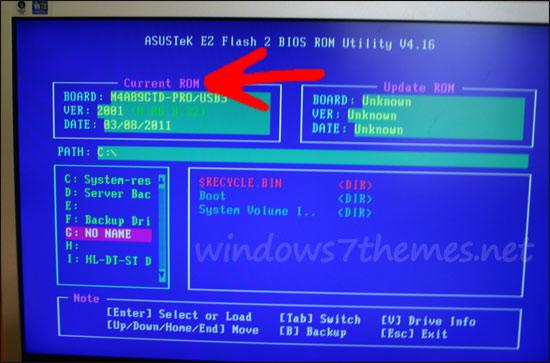
3. Step You will then see the files on your USB device. Select the ROM that we downloaded, e.g. M4A89GTD-PRO-USB3-ASUS-2001.ROM and hit Enter.
4. Step The BIOS file will be verified. You will be asked if you really want to update your BIOS. Select Yes and hit Enter:

Conclusion
If you are lucky and there is no power outage then you have successfully updated your BIOS. If you have any questions, post them below. Please make sure to read your motherboard manual before posting any questions.
Some motherboards will require you to format a USB-flash drive with FAT32 and put the BIOS file on it. Luckily, it’s very easy to update the BIOS if you have a motherboard from ASUS, you don’t even need a proper flash drive.


Just a sidenote, I do not recommend desktop tools like Asus Updater to update your BIOS. Yes, they may work in some cases, but if you want to safely update your BIOS, then do it the right way and put it on a USB device.
I like your explanation it is very helpful and leading step by step
I dont think am a nerd….
but when I boot and hit ..DEL…
then go to … BIOS SETUP UTILITY … TOOLS
I don’t see Easy Flash 2
where to download this tool and how to get it on my comp
regards
Amadeus, ASUS EZ Flash is only available on ASUS mainboards. If you want to update your motherboard, please read your manual and visit the website of the manufacturer to see what they use.
Usually it’s called something similar, so try to learn more about your BIOS. Sorry, I can’t be more concrete without knowing your motherboard chipset.
I have a P5GC-Mx/1333 motherboard from asus, but there is no tools tab in my Bios screen. Why is it so. Is it disabled or it doesn’t exist???