Want to learn how to use BitLocker to enhance security in Windows 8? This guide will show you how.
What Is BitLocker?
BitLocker is security feature that will allow you to encrypt an entire disk drive. This can be anything from an external hard drive or Flash disk to your built-in C: Hard Disk.
It is part of Windows 8.1 and professional editions.If you are using Windows home professional will not be able to use the bit locker feature
Step by Step
1. Open
The first thing you need to do is to open BitLocker. This is simple. Just type it when you’re on your home start screen. After this select the mangage BitLocker option.
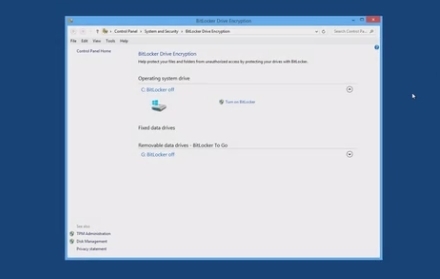
2. Turned On?
From here you should now be able to tell whether a Bitlocker is turned off or on in your operating system.
If it is turned off simply turn BitLocker on with the option that is directly to the right hand side of any hard drive associated with the computer.BitLocker should now start.
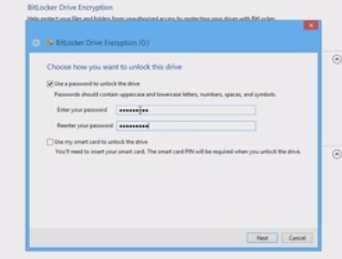
3. Access pins
Some people have smart cards and pins and if you’re one of those you can simply use that to unlock the drive. You can also use a password by checking “the use a password to unlock the drive” box and entering your choice.
4. Storage
BitLocker will now ask you how you wish to store your coverage. There are three options to choose from here. The first is to you save it to your Microsoft account. You can also save it to a file on your computer. And the third option is that you can print the recovery key.
Choose whichever option suits you best. If you do save it as a file make sure that you save it in a secure location such as a hidden section in your hard drive or in your skydive.
5. Encryption Options
You will now be able to choose how much of the disk drive you want to encrypt. You can choose to encrypt only what is used currently on the disk drive. Alternatively you can also choose to encrypt the entire drive. For maximum security we advise encrypting the entire disk drive.
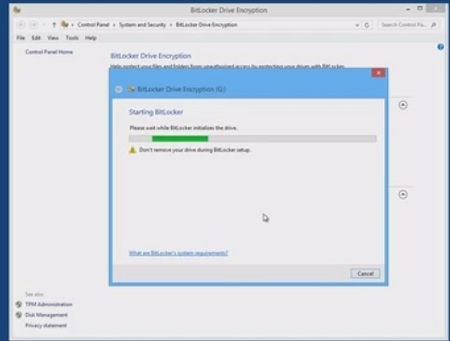
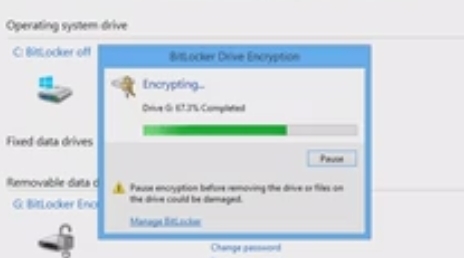
6. Perform Encryption
The next step is to carry out the encryption. The amount of time it takes for the disk drive to be encrypted depends on which option you chose in the last step and of course how big the hard drive is. If you’re only encrypting a small USB Thumb drive for example it should not take very long at all.
7. Six Options
After you encrypt your drive you will be presented with six options.
- You can choose to back up your recovery key.
- You can change your password.
- You can remove that password.
- You are able to add a smartcard.
- You can also turn off or on autolock.
- And you can finally disable Bitlocker entirely.
The autolock feature is a very handy option. It allows the disk drive to automatically unlock when you’re using it under your user account. If you’re comfortable with this option we recommend trying it out as it still allows for security while getting rid of the tedious nature of repeatedly entering password to access documents.
Conclusion
Now that you have set up BitLocker – Windows will notify you to enter a password whenever you enter that disk drive into your computer.If you ever forget your password you can select more options. From there you can use your recovery key to once again gain access to your disk drive.
If you are able to use BitLocker on your computer then we highly advise you do. In today’s world the majority of computers are portable which only serves to increase chance of theft. We now store so much important data on our computers along with personal information that any steps that we can do to add security should be taken. Setting up BitLocker on your disk drive
is a simple procedure if you follow the steps that we have outlined. If you have any confidential of personal data on one your disk drive then we highly recommend you do so!

