
So your router supports DHCP and you want to know how to enable the DHCP in Windows 7 or 8? DHCP is actually enabled by default, because all modern routers nowadays support DHCP, but if your configuration is messed up somehow, you still might want to check it.

Note for Windows 11 users, this process should work on 11 too
| Step | Link |
|---|---|
| 0 (Quick) | Quickest Method To Enable DHCP via NCPA |
| 1 | Accessing Network Properties |
| 2 | Opening Local Area Connection Properties |
| 3 | Checking Connection Status |
| 4 | Entering IP Manually |
| 5 (Optional) | Enabling / Disabling DHCP |
| 6 (Info) | Windows 8 |
Short Instructions: Fast Method For Quick Learners via ncpa.cpl
If you’re already a little familiar with Windows 7, here are the instructions to enable or disable the DHCP in short (for more detailed instructions, scroll a little down)
1. Step Hit Windows key + R
2. Step Enter ncpa.cpl and hit Enter
3. Step Right-click your adapter, usually called “Ethernet” and click Properties
4. Step Scroll down, double-click Internet Procotol Version 4 (TCP/IPv4)
5. Step Select the option “Obtain an IP addres automatically” and “Obtain DNS server address automatically”
6. Step Optionally, you may have to configure your router
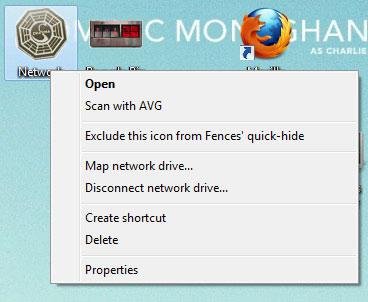
1 Network Properties: Right-Click Network Icon
Right-click on the “Network” icon on your desktop and click on “Properties”:
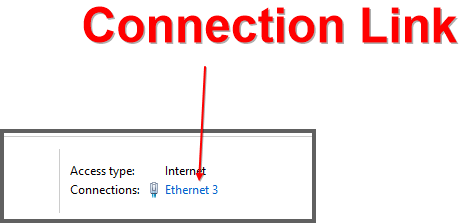
2 Local Area Connection: Click The Blue Link “Local Area Connection”
On the following screen you will get basic network information and see all of your current connections. One of the connections, should be called “Home network” (if you did not set it to something else, e.g. Work network).

- Click on “Local Area Connection”.
In some cases, the name will “Ethernet” or something else, but the layout always looks the same:
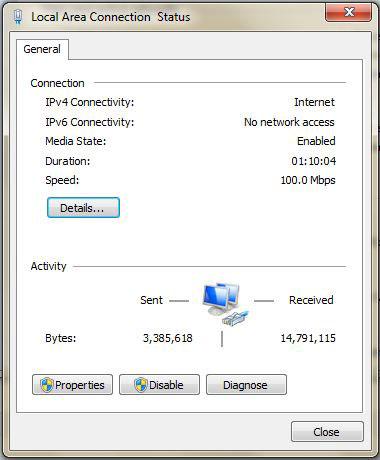
3 Connection Status: Click Properties Button
The status screen of your “Local Area Connection” will appear. Click on “Properties“:
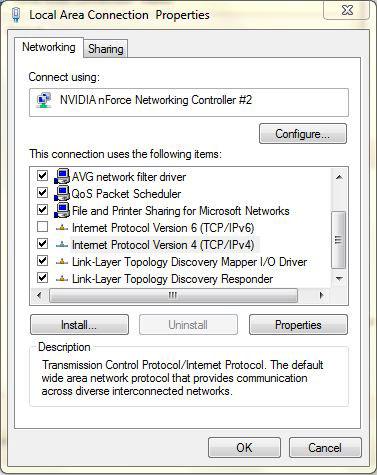
4 LAN Properties: Double-Click Internet Protocol Version 4
Click “Ok” when prompted. Scroll down the list until you find the entry “Internet Protocol Version 4” and double-click on it. (as you can see the Internet Protocol 6 is currently unchecked, more about that later).
5 Internet Protocol 4 Properties: Obtain IP address automatically OR Enter IP Manually
Please do not enter the IPs from the screenshot below unless you know your network IP addresses! Instead select the first option for IP and DNS server
In this case I entered a fictive static IP that I want to use on my network:
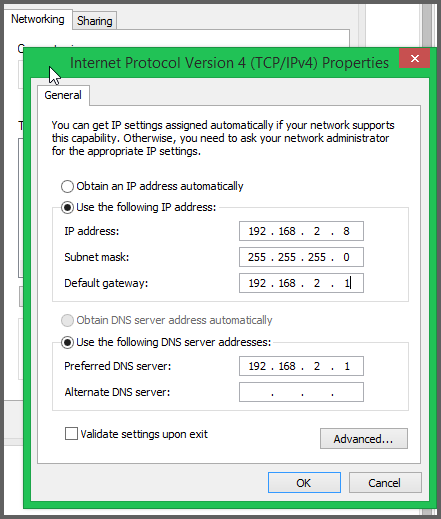
We have the following entries that are important.
- a) Obtain an IP address automatically
- b) IP Address
- c) Subnet mask
- d) Default gateway
- e) Obtain DNS server address automatically
- f) “Use the following DNS server addresses”
- g) Preferred DNS server
To enable DHCP, you have to make sure to check the options a) and e). That’s how you tell your router to automatically find the addresses provided by the DHCP. DHCP stands for Dynamic Host Configuration Protocol and is basically a protocol to retrieve IP addresses automatically and that’s exactly what we want to do, right?
Next Configure your router to automatically assign an IP via DHCP (turned on by default)
Disable DHCP
If you want to disable DHCP instead of enabling it, you can enter a static IP. In your router manual, you will find the default IP gateway. Write it down or remember it. Then enter the IP into the field d) and g). Copy the gateway address from your manual again and enter it into the field IP address, but the last field should be a random number other than the default gateway IP.
Example:
- You router gateway IP could be:192.168.5.1
- Then you enter the IP address:192.168.5.xxx (every other number other than the one defined by your router, in this case “1”)
Related: How to disable IPv6
As you might have noticed, I disabled IPv6. New broadband routers support IPv6, so you can also follow the instructions above and simply use Internet Protocol Version 6. Keep in mind that IPv6 are longer.
If you want to find out if it’s a good reason to enable IPv6 or if you should disable it, you can read this guide: