So your router supports DHCP and you want to know how to enable the DHCP in Windows 7 or 8? DHCP is actually enabled by default, because all modern routers nowadays support DHCP, but if your configuration is messed up somehow, you still might want to check it.

Note for Windows 11 users, this process should work on 11 too
| Step | Link |
|---|---|
| 0 (Quick) | Quickest Method To Enable DHCP via NCPA |
| 1 | Accessing Network Properties |
| 2 | Opening Local Area Connection Properties |
| 3 | Checking Connection Status |
| 4 | Entering IP Manually |
| 5 (Optional) | Enabling / Disabling DHCP |
| 6 (Info) | Windows 8 |
Short Instructions: Fast Method For Quick Learners via ncpa.cpl
If you’re already a little familiar with Windows 7, here are the instructions to enable or disable the DHCP in short (for more detailed instructions, scroll a little down)
1. Step Hit Windows key + R
2. Step Enter ncpa.cpl and hit Enter
3. Step Right-click your adapter, usually called “Ethernet” and click Properties
4. Step Scroll down, double-click Internet Procotol Version 4 (TCP/IPv4)
5. Step Select the option “Obtain an IP addres automatically” and “Obtain DNS server address automatically”
6. Step Optionally, you may have to configure your router
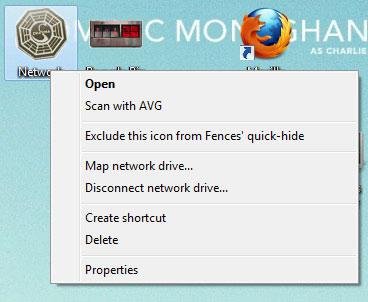
1 Network Properties: Right-Click Network Icon
Right-click on the “Network” icon on your desktop and click on “Properties”:
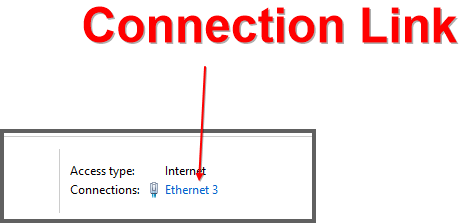
2 Local Area Connection: Click The Blue Link “Local Area Connection”
On the following screen you will get basic network information and see all of your current connections. One of the connections, should be called “Home network” (if you did not set it to something else, e.g. Work network).

- Click on “Local Area Connection”.
In some cases, the name will “Ethernet” or something else, but the layout always looks the same:
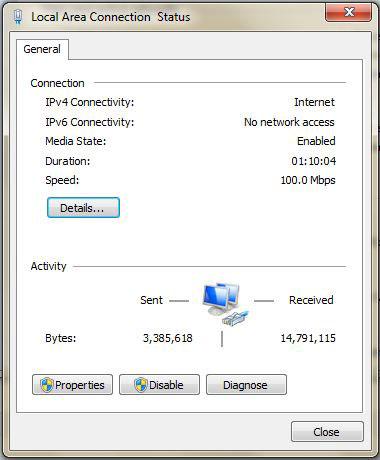
3 Connection Status: Click Properties Button
The status screen of your “Local Area Connection” will appear. Click on “Properties“:
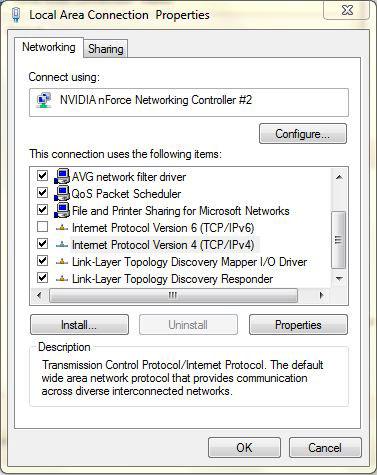
4 LAN Properties: Double-Click Internet Protocol Version 4
Click “Ok” when prompted. Scroll down the list until you find the entry “Internet Protocol Version 4” and double-click on it. (as you can see the Internet Protocol 6 is currently unchecked, more about that later).
5 Internet Protocol 4 Properties: Obtain IP address automatically OR Enter IP Manually
Please do not enter the IPs from the screenshot below unless you know your network IP addresses! Instead select the first option for IP and DNS server
In this case I entered a fictive static IP that I want to use on my network:
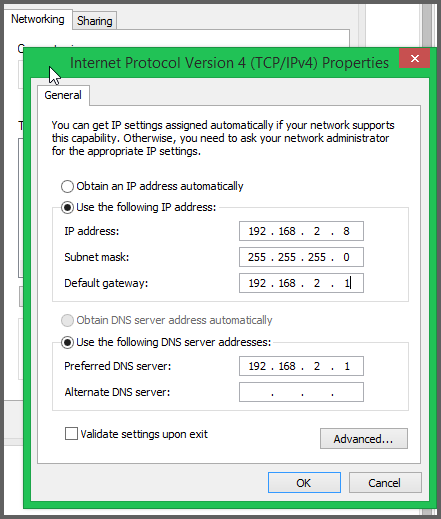
We have the following entries that are important.
- a) Obtain an IP address automatically
- b) IP Address
- c) Subnet mask
- d) Default gateway
- e) Obtain DNS server address automatically
- f) “Use the following DNS server addresses”
- g) Preferred DNS server
To enable DHCP, you have to make sure to check the options a) and e). That’s how you tell your router to automatically find the addresses provided by the DHCP. DHCP stands for Dynamic Host Configuration Protocol and is basically a protocol to retrieve IP addresses automatically and that’s exactly what we want to do, right?
Next Configure your router to automatically assign an IP via DHCP (turned on by default)
Disable DHCP
If you want to disable DHCP instead of enabling it, you can enter a static IP. In your router manual, you will find the default IP gateway. Write it down or remember it. Then enter the IP into the field d) and g). Copy the gateway address from your manual again and enter it into the field IP address, but the last field should be a random number other than the default gateway IP.
Example:
- You router gateway IP could be:192.168.5.1
- Then you enter the IP address:192.168.5.xxx (every other number other than the one defined by your router, in this case “1”)
Related: How to disable IPv6
As you might have noticed, I disabled IPv6. New broadband routers support IPv6, so you can also follow the instructions above and simply use Internet Protocol Version 6. Keep in mind that IPv6 are longer.
If you want to find out if it’s a good reason to enable IPv6 or if you should disable it, you can read this guide:


Thanks for the info but still cannot connect to internet with this darn new windows 7 stuff.
Thank you so very much! I couldn’t figure this out!
wat if the network is connected and internet is disabled??
it is showin a window about ipaddress conflict.cant windows 7 share ip address of a network and enable internet??
Try to unplug your router or modem for longer than 10 seconds, maybe even do a reset. Sometimes routers get messed up and can’t assign an IP address via DHCP and you can’t connect to the internet then.
Obtaining the DNS server address automatically is the preferred settings by the way and should work in most cases.
Windows 7 includes a nice troubleshooting tool for internet connections that is often very helpful.
My router which is a linsys model wrt54gs keeps shuting off when trying to connected via wireless…but it works perfectly when i plug in a ethernet cable.
Strange problem. Have you called their support? I would suggest to do a firmware upgrade and see where that goes .. my router wouldn’t always work immediately, I’d have to do that firmware upgrade first. Not much works right out of the box ;)
Let me know..also check your error log if there is any
Thanks for the info about enabling DHCP. It worked for me. Again THANKS
Wow, thanks that was the answer. I messed up my friends wifi on her laptop trying to secure the wifi. She was a little mad because she needs for school and work. you’re a life saver. Thank you.
It worked for me but this WiFiMax I bought from codejunkies.com still says: “unable to obtain ip adress”
I have searched the web over, and troubleshooted everything I can think to trouble shoot. And alas, I still can’t even get the xbox to connect via Windows Media Center, let alone the internet. I have enable the DHCP, I have tried changing the internet sharing connection settings, I have tried manually entering the IP address, and I still can not get the Xbox 360 to connect to my PC. ANYONE, HELP!!!
Michelle, we can’t really help you with that little information. I hope you will figure it out. If the DHCP is in fact enabled it will automatically assign an IP to your PC, to your XBOX and any other device that is connected to your network.
to connect to the internet try this…..Open command prompt and type cmd and enter. type ipconfig/release and enter. type ipconfig/renew and enter.
I had this issue but the problem was actually my DNS server for the campus network I’m on. I had to specify in the IPv4 properties, under the DNS server tab, that I had a specific DNS domain name to add. I figured out what the domain name was by doing an ipconfig on my other computer that was connecting just fine. Now it works !
I am from India, Pune.
Recently i got a new internet broadband connection ie. Sify Broadband, Previously i have used Airtel and Tikona Broadband connection where i had to Obtain IP address automatically but now for this Sify Broadband i was asked to fill in these details:
PC IP :10.30.68.89
Subnet Mask :255.255.255.0
Gateway :10.30.68.1
Primary DNS :202.144.115.4
Secondary DNS :202.144.66.6
Outgoing Mail Server : asmtp.sifybroadband.com
Outgoing Mail Server Port : Port 587
Incoming Mail Server : imap.sify.com
Incoming Mail Server Port : Port 110
Previously i used to connect through a Linksys E1000 router and everything used to work absolutely fine now my problem is that i can use the net when i directly plugin the cable directly coming from the Service provider into my Desktop but when i try to connect it through my router i cant get connected and when i dignose the connectivity issue it says that DHCP is not enabled, I tried confiq. my router several times after reseting it but no sucsses till now hence please help me with my problem as i want to use WiFi connectivity at my Home
Thanks and Regards.
THAMK YOU very much for the info. I was stuck Like Chuck with that DHCP stuff, but I’m on the net now thanks again.
My D-Link adaptor shows that I’m connected to my home network, but Explorer will not connect to the internet — says DHCP is not enabled. I set it for automatic configuration. I tried a download of Firefox, but would not connect…says it is not configured for the IP address…don’t know how to fix that, either. I pinged yahoo.com using the cmd prompt and was successful so the network is working, I just can’t get the browsers to work.
I have checked all above and it is showing ok, BUT if i leave the comp to idle when i return it’s disabled the DHCP and will not return til i get windows the find and cure..don’t like it like that, how can i keep it enabled ?
Our laptop could not connect although the desktop was. Tried everything and then finally wired the laptop to the router and then windows enabled the DHCP, but wouldn’t as long as it was wireless.
Strange because it was working fine for the last year and then all of a sudden the DHCP was disabled – but at least it is fixed now.