DMP files (dump files) are useful for debugging Windows, so you should know how to open and read DMP files in Windows 7 or 8.1 if you want to debug blue screens. It’s very easy to open DMP files, but the difficult part is locating the actual problem and analyzing the DMP file correctly.

| Step | Instructions |
|---|---|
| 1 | Download Driver Kit |
| 2 | Installation |
| 3 | Use WinDBG to analyze files |
| 4 | Locating DMP files |
In order to open and view DMP files in Windows, you first have to install a driver kit and set the symbol path correctly. This will then allow you to open DMP files using the debugging tool. DMP (dump files) are the most useful files for you to debug your system, so there’s no way around this.
This shouldn’t take longer than 10 minutes, but if you have a slow connection, downloading the 700MB ISO file (debugging tools) might take a while.
1. Download Windows Driver Kit
To open DMP files, you will need the Windows Debugging Tools (additional download). The Debugging Tools are included in the Windows Driver Kit Version 7.1.0. You have to download this ~700MB large ISO file from Microsoft first.
We have prepared a list of links below:
| OS | Driver Kit |
|---|---|
| Windows 7 | Download Windows Driver Kit Version for Windows 7 |
| Windows 8/8.1 | Download Windows Driver Kit For Windows 8/8.1 |
| Windows 10 | Download Windows Driver Kit For Windows 10 |
| Windows 11 | Download Windows Driver Kit For Windows 11 |
For latest details on the downloads above go to microsoft.com
2. Install Driver Kit
I’m usually to lazy to burn ISO files, but feel free to burn the downloaded driver kit to a DVD or Blu-Ray if you wish. Or alternatively open the ISO file using the built-in Windows tools and extract everything. In the Debuggers directory you will find a x32 and x64 installer for the Windows Debugging Tool. Make sure to install the correct one!
- 64-bit Windows: Run setup_amd64.exe
- 32-bit Windows: Run setup_x86.exe
The Windows 10 setup is called wdksetup.exe, not setup.exe
Important: On Windows 7, select Custom installed and change the location to e.g. C:\Debug\ it will make things easier if you don’t like typing the full path.
On Windows 8, you can change the installation path by choosing the second option: Download the Windows Driver Kit for Windows 8.1 for installation on a separate computer
On Windows 10 and 11 run wdksetup.exe
Don’t know how to open ISO files? Read this: How to open ISO files in Windows 7
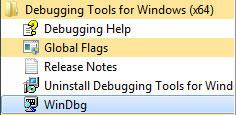
3. Open WinDBG
Either go directly to C:\Debug (or wherever you installed the debugging tools to) and click on windbg.exe:

Or open WinDBG via the Start Menu:
Set Symbol File Path
1. Step Create a new folder on your main drive and call it “Symbols”, e.g. C:\Symbols
2. Step Click on “File” – “Symbol File Path …”:
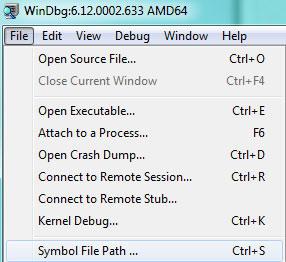
3. Step Insert the following path:
SRV*C:\Symbols*http://msdl.microsoft.com/download/symbols
Replace “C:\Symbols” with your own folder if you created it somewhere else in step 1.
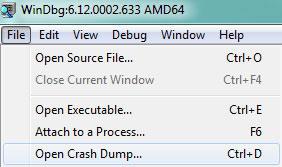
Open DMP file via WinDBG (CTRL+D)
WinDBG still opened? Good, the quickest way to open DMP files now is the shortcut CTRL+D or go to “File” and click on “Open Crash Dump File..”:
Where are DMP files located?
DMP files are located in C:\Windows\Minidump!
You can change the location where they are stored.
Can’t open DMP files? Permission Error!
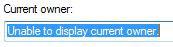
If you are receiving a permission error like the one below, you have to take ownership of the DMP files first.
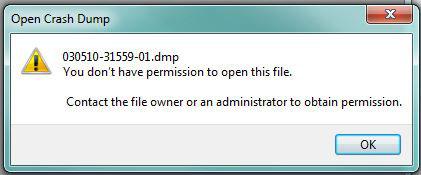
Usually, the owner is not even set:
Important: If you still receive the error “you don’t have permission to open this file, contact the system administrator”, copy the DMP file that you want to open and copy it into a subfolder, then it will work.
Let’s analyze the DMP file!
When you’re asked if you want to save the workspace, click yes. WinDBG will now open the DMP file and process it. This will take some time! Have some patience.
Here’s the first Bugcheck Analysis:
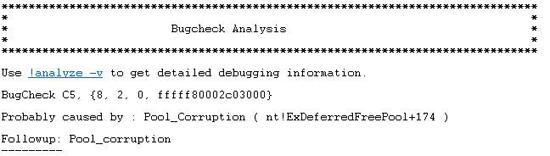
Of course, we want to dig a little deeper and enter !analyze -v to get detailed information. Now, below the next paragraph “Bugcheck Analysis” you will find some more concrete details. For my DMP file it read:
DRIVER_CORRUPTED_EXPOOL (c5)
An attempt was made to access a pageable (or completely invalid) address at an
interrupt request level (IRQL) that is too high. This is
caused by drivers that have corrupted the system pool. Run the driver
verifier against any new (or suspect) drivers, and if that doesn’t turn up
the culprit, then use gflags to enable special pool.
Arguments:
Arg1: 0000000000000008, memory referenced
Arg2: 0000000000000002, IRQL
Arg3: 0000000000000000, value 0 = read operation, 1 = write operation
Arg4: fffff80002c03000, address which referenced memory
In this case I had some corrupt drivers that attempted to access a IRQL that is too high, so my conclusion was to check my drivers. Now that you know the concrete error (my case: DRIVER_CORRUPTED_EXPOOL), you can also do some research and possibly find people with the same problem.
Driver Verifier Manager / Testing Drivers For System Interrupts
Sidenote: To run the driver verifier enter “verifier” into an elevated command prompt (how to open command prompt), you can then check the settings of currently loaded drivers for example. Keep in mind that this is advanced stuff, so you would have to do some research about it first.
If you like, you can read our detailed guide on finding and fixing system interrupts
I hope that this helped out some of you guys who wanted to open DMP files. Once you get used to reading DMP files, they can be handy for finding and solving problems in Windows 7 and Windows in general.


Awesome! I finally got this crap working, why the heck does it have to be so hard :( ? Anyways with your guidance I finally found out what the problem was :)
THANX!
Thank you, very useful indeed. I needed to find an analysis for a series of blue screens on win 7. I have not seen anything so unstable for about 25 years.
Regards,
Andrew
Gotland Sweden
Any help on this would be much welcomed. I find this to be unnecessarily complex and fragile in the setup.
Got windbg all loaded up and set as above, absolutely identically. However, on using I get the following report indicating a problem with the symbols (“. . . symbol path must point to .pdb files that have full type information):
Microsoft (R) Windows Debugger Version 6.12.0002.633 AMD64
Copyright (c) Microsoft Corporation. All rights reserved.
Loading Dump File [C:\Users\Glebe Health\Desktop70810-19546-01.dmp]
Mini Kernel Dump File: Only registers and stack trace are available
Symbol search path is: SRV*C:\Symbols*http://msdl.microsoft.com/download/symbols
Executable search path is:
Windows 7 Kernel Version 7600 MP (2 procs) Free x64
Product: WinNt, suite: TerminalServer SingleUserTS Personal
Built by: 7600.16539.amd64fre.win7_gdr.100226-1909
Machine Name:
Kernel base = 0xfffff800`02c06000 PsLoadedModuleList = 0xfffff800`02e43e50
Debug session time: Thu Jul 8 11:32:21.228 2010 (UTC + 1:00)
System Uptime: 0 days 0:18:59.302
Loading Kernel Symbols
………………………………………………………
……………………………………………………….
…………………………
Loading User Symbols
Loading unloaded module list
……
*******************************************************************************
* *
* Bugcheck Analysis *
* *
*******************************************************************************
Use !analyze -v to get detailed debugging information.
BugCheck FE, {8, 6, 6, fffffa800519eb20}
Unable to load image \SystemRoot\system32\DRIVERS\usbfilter.sys, Win32 error 0n2
*** WARNING: Unable to verify timestamp for usbfilter.sys
*** ERROR: Module load completed but symbols could not be loaded for usbfilter.sys
*************************************************************************
*** ***
*** ***
*** Your debugger is not using the correct symbols ***
*** ***
*** In order for this command to work properly, your symbol path ***
*** must point to .pdb files that have full type information. ***
*** ***
*** Certain .pdb files (such as the public OS symbols) do not ***
*** contain the required information. Contact the group that ***
*** provided you with these symbols if you need this command to ***
*** work. ***
*** ***
*** Type referenced: usbport!_DEVICE_EXTENSION ***
*** ***
*************************************************************************
*************************************************************************
*** ***
*** ***
*** Your debugger is not using the correct symbols ***
*** ***
*** In order for this command to work properly, your symbol path ***
*** must point to .pdb files that have full type information. ***
*** ***
*** Certain .pdb files (such as the public OS symbols) do not ***
*** contain the required information. Contact the group that ***
*** provided you with these symbols if you need this command to ***
*** work. ***
*** ***
*** Type referenced: usbhub!_DEVICE_EXTENSION_HUB ***
*** ***
*************************************************************************
*************************************************************************
*** ***
*** ***
*** Your debugger is not using the correct symbols ***
*** ***
*** In order for this command to work properly, your symbol path ***
*** must point to .pdb files that have full type information. ***
*** ***
*** Certain .pdb files (such as the public OS symbols) do not ***
*** contain the required information. Contact the group that ***
*** provided you with these symbols if you need this command to ***
*** work. ***
*** ***
*** Type referenced: usbhub!_DEVICE_EXTENSION_HUB ***
*** ***
*************************************************************************
Probably caused by : usbfilter.sys ( usbfilter+3c22 )
Followup: MachineOwner
———
Do you have daemon tools or alcohol installed?
If so, you might want to try to uninstall them and see if you still get blue screens. Use this tool to uninstall it: http://www.duplexsecure.com/en/downloads
I’ll be looking into this. Also try the Windows system checker:
http://windows7themes.net/how-to-repair-windows-7-sytem-files.html
Hi, thanks for article. I’m completely new to all this and your article enabled me to open a .dmp file that that is the result of my recently purchased i7 desktop rebooting daily….annoying. Could you possible give me some insight into the report the debug process came up with? Much appreciated if you could! Thanks.
Microsoft (R) Windows Debugger Version 6.12.0002.633 AMD64
Copyright (c) Microsoft Corporation. All rights reserved.
Loading Dump File [C:\Windows\Minidump72510-19250-01.dmp]
Mini Kernel Dump File: Only registers and stack trace are available
Symbol search path is: SRV*C:\Symbols*http://msdl.microsoft.com/download/symbols
Executable search path is:
Windows 7 Kernel Version 7600 MP (8 procs) Free x64
Product: WinNt, suite: TerminalServer SingleUserTS
Built by: 7600.16539.amd64fre.win7_gdr.100226-1909
Machine Name:
Kernel base = 0xfffff800`02a17000 PsLoadedModuleList = 0xfffff800`02c54e50
Debug session time: Sun Jul 25 11:09:11.624 2010 (UTC + 9:00)
System Uptime: 0 days 0:00:11.732
Loading Kernel Symbols
…………………………………………..
Loading User Symbols
Mini Kernel Dump does not contain unloaded driver list
*******************************************************************************
* *
* Bugcheck Analysis *
* *
*******************************************************************************
Use !analyze -v to get detailed debugging information.
BugCheck 124, {0, fffffa800652e8f8, 0, 0}
Probably caused by : hardware
Followup: MachineOwner
———
1: kd> !analyze -v
*******************************************************************************
* *
* Bugcheck Analysis *
* *
*******************************************************************************
WHEA_UNCORRECTABLE_ERROR (124)
A fatal hardware error has occurred. Parameter 1 identifies the type of error
source that reported the error. Parameter 2 holds the address of the
WHEA_ERROR_RECORD structure that describes the error conditon.
Arguments:
Arg1: 0000000000000000, Machine Check Exception
Arg2: fffffa800652e8f8, Address of the WHEA_ERROR_RECORD structure.
Arg3: 0000000000000000, High order 32-bits of the MCi_STATUS value.
Arg4: 0000000000000000, Low order 32-bits of the MCi_STATUS value.
Debugging Details:
——————
BUGCHECK_STR: 0x124_GenuineIntel
CUSTOMER_CRASH_COUNT: 1
DEFAULT_BUCKET_ID: VISTA_DRIVER_FAULT
PROCESS_NAME: System
CURRENT_IRQL: 0
STACK_TEXT:
fffff880`0337e6f0 fffff800`02cd1a79 : fffffa80`0652e8d0 fffffa80`05521b60 fffff8a0`00000005 00000000`00000001 : nt!WheapCreateLiveTriageDump+0x6c
fffff880`0337ec10 fffff800`02bb35a7 : fffffa80`0652e8d0 fffff800`02c2c5f8 fffffa80`05521b60 00000003`00000005 : nt!WheapCreateTriageDumpFromPreviousSession+0x49
fffff880`0337ec40 fffff800`02b1bb85 : fffff800`02c8e360 fffffa80`06548828 fffffa80`06548820 fffffa80`05521b60 : nt!WheapProcessWorkQueueItem+0x57
fffff880`0337ec80 fffff800`02a94861 : fffff880`010f9e00 fffff800`02b1bb60 fffffa80`05521b60 00000000`0000055a : nt!WheapWorkQueueWorkerRoutine+0x25
fffff880`0337ecb0 fffff800`02d2ca86 : 61e461e4`1f661f66 fffffa80`05521b60 00000000`00000080 fffffa80`05509040 : nt!ExpWorkerThread+0x111
fffff880`0337ed40 fffff800`02a65b06 : fffff880`03186180 fffffa80`05521b60 fffff880`031910c0 26972697`edaeedae : nt!PspSystemThreadStartup+0x5a
fffff880`0337ed80 00000000`00000000 : fffff880`0337f000 fffff880`03379000 fffff880`03f2d540 00000000`00000000 : nt!KxStartSystemThread+0x16
STACK_COMMAND: kb
FOLLOWUP_NAME: MachineOwner
MODULE_NAME: hardware
IMAGE_NAME: hardware
DEBUG_FLR_IMAGE_TIMESTAMP: 0
FAILURE_BUCKET_ID: X64_0x124_GenuineIntel_PROCESSOR_MAE_PRV
BUCKET_ID: X64_0x124_GenuineIntel_PROCESSOR_MAE_PRV
Followup: MachineOwner
———
You Rock dude. I was looking for a way to read my dump files and explanations was idiot proof perfect. And that’s saying something.
Thanks for posting this. Still having trouble, but I’m getting there. I think you missed some steps in the “Can’t open DMP files? Permission Error!” section, I can’t seem to find a way to change the ownership of a file.
Moromillas, did you download the takeownership script from our site? (Read tutorial How to replace explorer.exe)
Also, try to copy the DMP file into another folder and then open it.
Thank you! Saved me a lot of time.
Help Please.
I have done the installation and opened one of many dmp files. But what does it really say ?
– Edited by moderator –
Unable to load image \Device\Harddisk2\Partition2\Windows\system32\drivers\PctWfpFilter.sys, Win32 error 0n2
*** WARNING: Unable to verify timestamp for PctWfpFilter.sys
*** ERROR: Module load completed but symbols could not be loaded for PctWfpFilter.sys
Probably caused by : NETIO.SYS ( NETIO!NetioDereferenceNetBufferList+a2 )
DRIVER_IRQL_NOT_LESS_OR_EQUAL (d1)
An attempt was made to access a pageable (or completely invalid) address at an
interrupt request level (IRQL) that is too high. This is usually
caused by drivers using improper addresses.
If kernel debugger is available get stack backtrace.
If you open DMP files you will find a lot of useful debugging information. Most importantly you will find error messages like DRIVER_IRQL_NOT_LESS_OR_EQUAL.
I edited your post and highlighted two errors. You can then do further research on errors, e.g. “unable to load PctWfpFilter.sys” or “DRIVER_IRQL_NOT_LESS_OR_EQUAL”. The error messages will tell you more about your system problems, so DMP files are often very valuable to repair a system.
Explaining all error messages would be to much here, you will get a lot of information about the errors via Google. It looks like you might have a driver problem..
Thanks, I gues :-)
I’ve tried to find some info on how to solve these problems but have not found much. The Blue screen first appeared a few months ago. Two weeks ago I gave up and made a clean windows installation hoping this would solve the problem. Needless to say it did not so I’m a bit lost here. the pctwpfilter.sys seems to have something to do with my anti spyware/antivirus program from Pctools. But that does not explain the “driver_irql..” error does it ?
Inge, you are right that doesn’t explain the driver_irql error. The error could also be related to damaged hardware. If you use a lot of old hardware, I would consider doing some hardware tests, e.g. do some RAM checks with various software like memtest86 (memtest86.com).
Other than that, try to reinstall ALL of your drivers. Yes, especially update your motherboard, graphic card, sound card drivers.
I hope this helps a bit..
I’ve tested RAM with a different program and they seem to work fine. My computer is just over three years old, and used all the time so I am not surprised if some of the hardware is worn out. Is there any way to test the motherboard and graphics card ? I’v uppdated the drivers for the Nvidia 8800 GT card. I tought it might be some hardware not working with windows 7 but since the upgrade from Vista about a year ago I’ve not installed any new hardware. Will try the memtest and get back to you.
Thank-you for a partially helpful article. I needed to examine the mini-dump files because shortly after installing Win 7 my C-media CM6501 sound driver first quit working, then started making Blue screen. I am new to windows debugger so found your article very help-full regarding that. I have virtually the same symptoms as Tris (July 22, 2010 at 9:17 am ). The only difference is the “probably caused by” at the end. I don’t (to my knowledge) have daemon tools or alcohol installed unless they are buried in some windows file. Where can I get the correct symbol files? Following is the slightly different part of the debug output
Edited by moderator:
” Your debugger is not using the correct symbols ”
BrianP, I suppose your problem is that the symbols from Microsoft do not include the debug infos for whatever you are trying to debug (e.g. the USB device)
You can try adding this path:
.symfix C:\symbols\
You can also try to append the path to your driver like this
srv*C:\symbols*http://msdl.microsoft.com/download/symbols;c:\driver
As you can see, all I did was to add “;C:\driver
This will depend on what is causing your problem. In your case it’s a problem with USB, so I’d look into your USB drivers, are there any “symbols” that you can use?
I’m sorry, I’m not very familiar with debugging and I only scratched the edge in this article to give you an idea how to open them.
I also read that you can enable noisy symbols, which means the debugger will tell you where it is looking for the symbols. Maybe you entered the wrong path?
Bought a new recertified by Acer Aspire 1 netbook with Win 7 Basic
I set up a home group with another and a Workgroup with XP boxes
About 6 hours in it rebooted . Created 4 dmp files. 5 days later did another reboot and a dmp file.
I am looking at this but really am over my head.
Forwarded the dmp files to the tech support from the seller and hope they know what the data means
can someone, anyone tell me why on gods green earth this has to be so complicated. i thought microsoft was finally getting a clue with 7, then i find this. my god, maybe i SHOULD just get a stupid apple…
honest to god, whoever decided to not just make this a txt file or something is a certifiable retard and should be shot.
If you don’t have files acces permision, then just open debugger as administrator (right click on the winbg.exe, run as administrator). That’s it.
Hey, I just did a quick test of this to see how this works and I got this :
“*** ERROR: Module load completed but symbols could not be loaded for sptd.sys
Probably caused by : kbdhid.sys ( kbdhid!KbdHidProcessCrashDump+1df )”
Anyone know how I should go about fixing this error?
I’m having the same ERROR: symbols could not be loaded…. is anyone still looking at this thread that can help? Same as Kas above.
This worked a treat for me, ideal for deciphering SAP dump files too
Thanks making the effort :)
Just want to thank you for taking the time to put this on the internet. I just used it to read a dump file. Your instructions were very clear; although, for your step 2 I ran KitSetup.exe from the downloaded ISO files.
I am working on C++ application. Thanks for the above details I am able to dump the .dmp file. I want to see the call stack which is causing the crash of the application. what is the command to see that ? I want to see the stack of method calls used in C++ because of which it’s crashing.