Auto forwarding emails can be useful in many cases. You don’t need to use a special service or software for that – you can easily do it using Mozilla Thunderbird. read on to find out how.
Using automatic email forwarding

Automatic email forwarding can be very useful is a lot of cases – forwarding emails from multiple accounts to one and vice-versa, forwarding different support inquiries to different emails and forwarding your own emails to another account when you’re out of office are just the most common scenarios. You could use special software for the task, but if you have a computer that can be online 24/7, you can just use Mozilla’s free Thunderbird email client.
Auto forwarding emails with Mozilla Thunderbird
Thunderbird has some really powerful autoresponder, filter and forwarding features, and it can be set up to do all of the above jobs and more. Here’s how to set up auto forwarding using Mozilla Thunderbird:
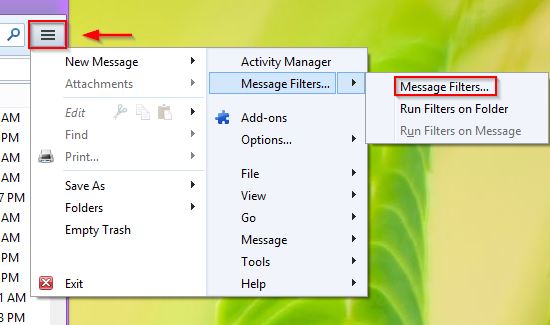
1. Step Open Thunderbird, click on the options button (it’s right next to the search bar by default – it’s got three lines as an icon), then go to Message Filters and click “Message Filters…”.
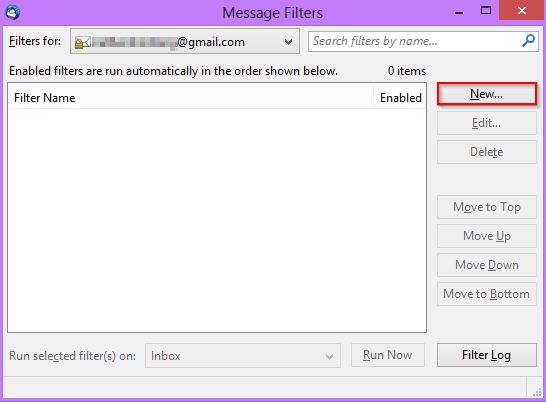
2. Step On the Message Filters window, click on “New…” to create a new filter.
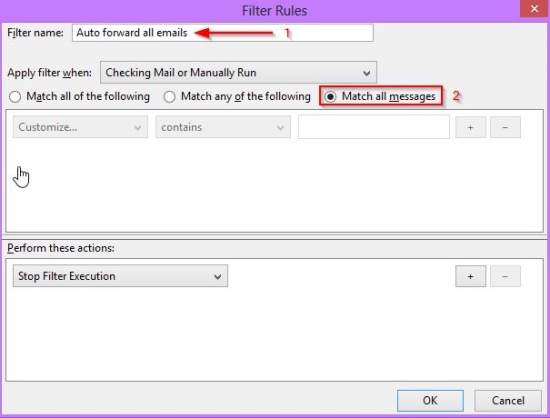
3. Step On the next window, first give the filter a name, then select the conditions when the forwarding should be done. The options here are pretty powerful if you use the “Match all/any of the following” options – you can only forward emails with a specific subject, specific keywords in the body, only emails that don’t have attachments, etc.
In my example, I just want to forward all email from this account to three other accounts, so I’ll choose “Match all messages”.
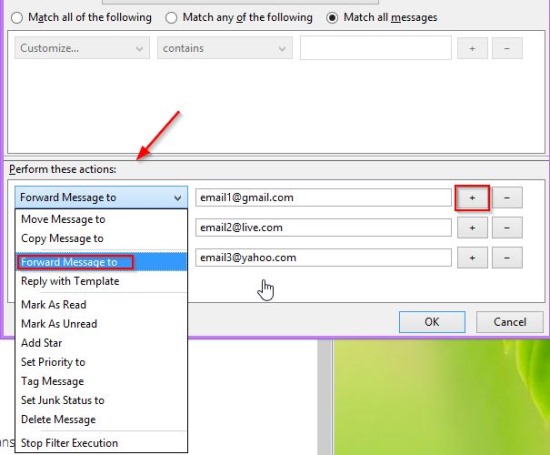
4. Step On the same window under “Perform these actions:”, you can now choose which actions to perform – in this case, you’ll need to choose “Forward Message to” in the drop down menu. You can add or remove actions/email addresses using the “+” and “-” buttons. I’ll add three emails that Thunderbird will forward messages to.
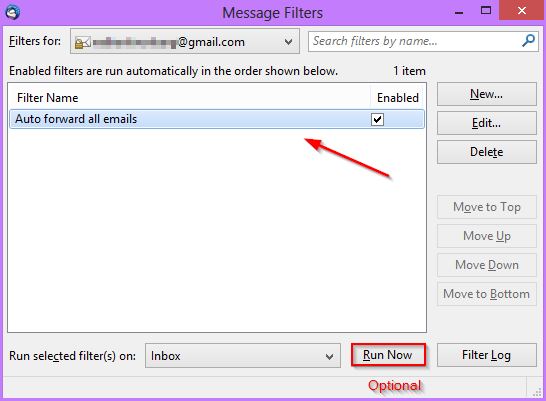
5. Step Once you finish, you can click OK and the filter will be added to the list. The filter will only be active for the account selected in “Filters For”, of course.
Now Thunderbird will forward all emails that come to this email address’ Inbox to the three emails I specified – obviously, the program must be running 24/7, but that shouldn’t be a problem if you use an office PC or remote Windows server.
You can also choose to run the filter on existing emails (so they’ll all be forwarded right away) using the Run Now button, but that’s probably not needed in most cases.
That’s about it – the procedure is really simple, but you can get a much more advanced forwarding setup with a bit of experimentation.
Conclusion
If you need to set up automatic email forwarding for any reason, be sure to try using Mozilla Thunderbird for the task – it’s a really powerful piece of software that can do exactly what you need in this case.


Am I right to assume that Thunderbird will use the relay settings for that specific account?
You’ve created a monster. Help! I followed your steps and it worked fine. The trouble is it won’t STOP. I deleted the filter and it continues to forward. I restarted windows, same thing. I’m running windows 7 and Thunderbird 38.3.0