Overclocking GPU’s is a great way to extend the life of your graphic card, if you do it the right way. Here’s how to perform a proper BIOS flash.
IMPORTANT: This guide is for AMD GPUs and will not work with newer cards. You can instead download this tool for newer ATI cards
Overclocking GPU’s: The Do’s And Dont’s
OC/Boost Cards: Are they any good? GPU’s these days often ship overclocked. Manufacturers like ASUS and Sapphire sell products that include the names “Boost”, “OC” or similar variations of that. If you don’t want to overclock cards yourself, then you can stop reading here and simply buy one of those cards. Cards with a “booster” usually still have a lot of room left before becoming unstable and can be overclocked even higher but you also have to keep the lifespan of your card in mind.
If you don’t want to bother with BIOS flashing or anything like it, then those cards are a good choice but make sure not to buy the overpriced cards like the Tri X by Sapphire. Tri simply stands for a triple fan. Yes, they look good but you can do a modification like that yourself and easily save $100.
Software overclocking vs BIOS overclocking:There’s also a belief that software overclocking is good idea. Yes and no. Several overclocking tools are available like GPU Tweak by ASUS, Afterburner by MSI or Trixx by Sapphire. In general, they are working and can even apply overclocking settings on startup (Afterburner is the most reliable), however you will get a better cost/watt if you overclock using a modded BIOS. On top of that many cards don’t support voltage overclocking via software or draw significantly more power that way.
Getting Started: Requirements For Overclocking Your GPU
If you have multiple cards in your system, remove all except the one you want to overclock. Yes, using ATIWINFLASH you can flash multiple cards at the same time, but it is not recommended, we will therefore not include it in our guide for safety reasons.
You will need the following tools:
- – Download VBE 7 – Scroll down and click on vbe7-0-0-7b-exe to start download
- – Download GPU-Z
- – Download ATI Winflash 2.71
1 Export BIOS Using GPU-Z
Before we proceed with flashing our BIOS (carefully!) we need to export our original BIOS. Not only can you restore the original BIOS before selling the card, it’s also going to be a failsafe you can return to. Backups are important.
Open GPU-Z and click on the save icon on the top right below the graphic card icon:
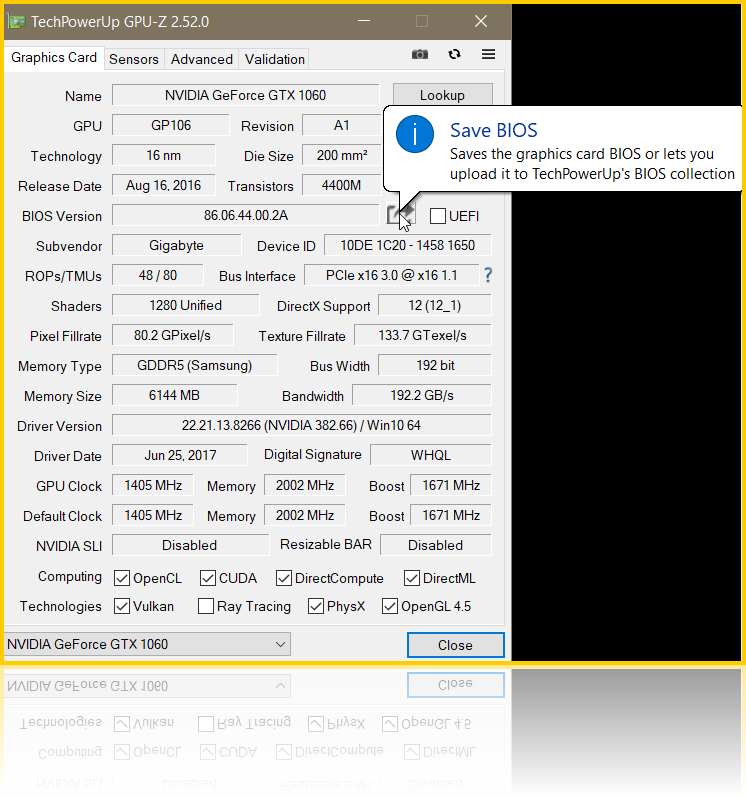
It should save the BIOS with the name of the GPU’s codename e.g. Tahiti, Barts. In addition, I HIGHLY recommend adding “original” before the .rom so you can later extinguish between the original and the modded/overclocked BIOS file.
Example: Barts-original.rom or Tahiti-R9280x-original.rom or some other identifier you can remember EASILY.
You should also create a new folder for your BIOS files or you will later end up looking for it. If you are in a rush like me, simply save the BIOS file on your SkyDrive, Dropbox or Desktop.

If everything goes smoothly, it should tell you the size of the original ROM file.
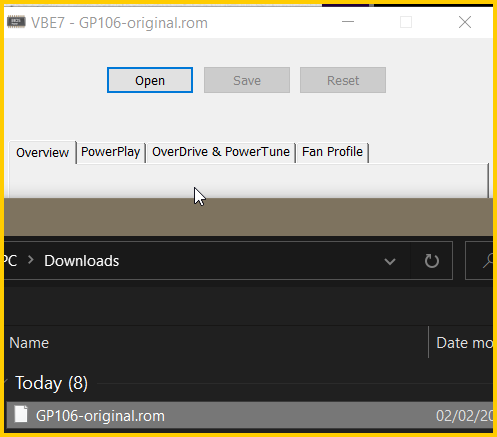
2 Open Original BIOS Using VBE7
WARNING: Anything you do from here on out you do at your own risk. You may risk damaging your hardware or losing the warranty of your card. If you are not comfortable with that, do not proceed or cross-check with different sources to reduce the possibility of grave mistakes.
Next, we are going to open the original BIOS using a tool called VBE7 (also by Techpowerup). In my case, I am using VBE7.0.0.7b.exe – double click the exe file to start it.
1. Step Click the Open button and locate the original BIOS. Yes, you can safely open the original we are going to save a copy within VBE.
2. Step If your card is not supported by VBE (as is the case with this old Powercolor HD6800 Barts GPU I used for the first part) you will get a message Not supported . You will have to look elsewhere in that case, downloaded the latest VBE version or use software tools to overclock your card.
In some cases, you will get the error message saying UEFI image detected, Modifications only affect the legacy BIOS, UEFI part will be disabled. That is quite alright, it is not going to interfere with anything. UEFI will simply be disabled by VBE.
3 Actual Overclocking Via VBE7
1. Step Ok, we can now finally proceed with the actual overclocking part! Go to the tab PowerPlay
2. Step Make sure to select State 1 – Performance from the dropdown at the top. It should be selected by default. At the very bottom you will see the Core Clock, Memory Clock and VDDC for identifier #0. This is what we’re after.
Core clock is the processing speed of your GPU (you’re already familiar with that if you have ever compared the speed of a CPU). Memory clock as the name indicated tells you how fast the memory on your card is. For recent cards is commonly set at about 1500.
When is the memory clock speed important? Video games that make heavy use of filters, HDR processing, AA or similar usually require a higher memory bandwidth. In that case, increasing the memory clock may help to run the game more smoothly, but don’t push it. 1600 may be a good starting point for OC’d cards.
3. Step In order to avoid an unstable card, we are going to make changes incrementally. It is usually best to look up safe core clocks for your specific cards but for starters you can safely increase both the core clock and the memory clock by 50. Beyond 50, say 100, you may also have to start supplying more voltage, but that greatly depends on your usage. In my case (crypto-mining), I can overclock the card and undervolt it at the same time but for video games you need to greatly increase the voltage whenever you increase the core/memory clock speeds.
4 Flashing Your GPU BIOS Via ATIWinflash – For ATI Cards
When you have settled on some settings, either by looking them up online or testing it out incrementally, we can proceed.
1. Step While still in VBE7, click the Save button
2. Step As noted above, make sure to use a clear identifier e.g. Tahiti-xfx-modded.rom or Tahiti-R9280x-modded.rom
3. Step Open an elevated administrator command prompt (REQUIRED!)
4. Step Locate atiflash and extract it to a folder. Switch to the command prompt and cd into the directory where atiflash is located: e.g. cd K:\Users\[username]\Downloads\atiflash_271
5. Step The syntax for flashing your card is: atiwinflash -f -p 0 C:\path\to\romfile.rom
EXAMPLE: atiwinflash -f -p 0 C:\BIOSFILES\Tahiti-xfx-modded.rom

6. Step You should get a progress bar titled atiwinflash. After a minute you should carefully read the message. It it reads WRITE FAIL, you need to proceed with step 8, else proceed with step 7
7. Step If you see no apparent error (read carefully!) you can reboot now and test your new clock speeds for stability.
8. Step If you see an error, e.g. WRITE FAIL, you should switch to the command prompt, hit the arrow up key to bring back the last issued command and change atiwinflash to atiflash. In some cases, atiwinflash has problems writing a BIOS to a card that is currently in use. I do not know the exact reasons, but I know that atiflash is somewhat more reliable but lacks the progress bar.
9. Step Done! You should now boot the PC and test the card under load. If your PC freezes or crashes you have to repeat all the steps above and lower your core clock/memory clock and/or supply more voltage.
Overclocking For Video Games Vs Bitcoin/Crypto Mining
Let’s say you want to overclock your R9 280X to run The Witcher 3 at the highest settings, you would then go ahead and change the core clock to 1100 and the memory clock to 1600. You will either not touch the voltage (VDDC) or increase it a little to avoid power issues.
NOTE: If you set the voltage (VDDC) too low for your given core and memory clock, the computer will either freeze or crash instantly. In that case, you need to boot the PC and start fresh. Lower the clock speeds or increase the voltage. This requires some testing, so you best get used to rebooting your PC a couple times.
My rather limited experience with this is restricted to Ethereum and Bitcoin mining, I am specifically not overclocking for games, which usually have the highest requirements. So you may have to experiment with the settings to find something that works for you or use suggestions for your specific card.
Can I Overclock and Undervolt My Rig At The Same Time?
In my case, I could run some cards (depending on manufacturer and cooling) at 1200 core clock, 1600 memory clock at about 1084 VDDC. But that won’t work if you intend to play games with it. Games often draw more power than mining rigs due to the heavy involvement of shaders on your card. A single mining card will rarely require more than 200W per card, whereas games can easily require 300W or even 400W.
Shaders are responsible Rendering high-quality textures is very resource-intensive. If you’ve ever seen a 3D rendering program you should know that any effects applied to 3D models can take a long time to process/render.
In any case, cryptomining turns out to be less damaging to your hardware than running a video game 24/7, but who runs games all day long? Exactly. Graphic cards are not supposed to run 24/7 and will at one point simply die. First to die is usually the fan. A replacement of the fan would set you back up to $50.
Troubleshooting
There are a few issues you can run into. Either your card is not supported by VBE or it fails to write the BIOS properly. In the latter case, a simple restart may help to clear things up.
If you run into any other problems or need more instructions for a specific step, let us know in the comments below.

