 One of the best advantages of modern PC’s is that you can automate just about anything. The Wake On LAN features is well-known, but very few use it, why is that? Here’s how to use the WOL feature to start your PC over the LAN or even Internet!
First Step: Enable Simple TCPIP services
Before you can use Wake On LAN enable this Windows feature:
1. Step Enter Windows features into search bar and click on the item that pops up
2. Step Make sure to select the checkbox Simple TCPIP services and click OK
Second Step: Enable Wake On Lan Via Advanced Network Adapter Properties
1. Step The first step is to actually enable your network adapter to support Wake On Lan (short: WOL) or even if you successfully send a Wake On LAN signal your PC will not react to it.
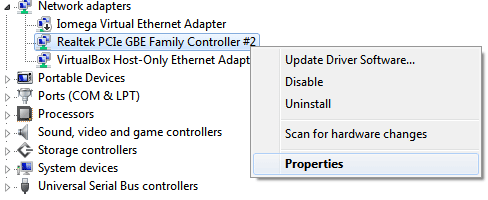
2. Step Open up the Device Manager by entering Device Manager into the search bar on your Start Menu
3. Step Uncollapse Network Adapters and right-click on your main network adapter then on Properties. My main network adapter is called Realtek PCIe GBE Family Controller #2. Adapters labeled as Virtual are obviously no real physical adapters. If you have multiple adapters, simply enable Wake on LAN for all of them.
4. Step Go to the tab Advanced and scrol down the list until you find the options:
- Wake on Magic Packet (this is important)
- Wake on pattern match
- WOL & Shutdown Link Speed
- Shutdown Wake-On-Lan
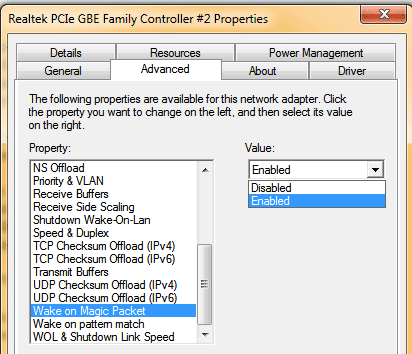
5. Step Simply select Enabled from the dropdown for all available options. If you also want to shutdown your PC via Wake-On-LAN make sure to enable the Shutdown option as well.
I haven’t really tested Wake on pattern match yet, but it’s probably very useful in some cases.
Ok, that’s all for now.
Third Step: Enable Wake On LAN via BIOS
Next, you actually have to enable WOL via the motherboard BIOS. Keep in mind not all motherboards actually support Wake-On-LAN. I’m using the Asus M4a89gtd pro and it supports WOL, so look that up as well. If you’re having trouble entering the BIOS, keep hitting DEL right after turning your computer on – eventually it will open up.
1. Step Read your motherboard manual how to enter the BIOS
2. Step Read your motherboard manual to find out what setting you have to enable to send WOL signals. Keep in mind some motherboard manufacturers like ASUS make it really too difficult for end users and use cryptic names for Wake on LAN features.
Here’s what I turned on in my BIOS. Well, I actually took a few quick shots to show you what it would look like so you’d better be able to follow this guide:
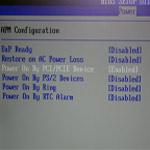
Within the BIOS go to the tab “Power” using the arrow keys. The APM configuration allows you to set various “Power On Features”. IMPORTANT: This might not be available in your own BIOS, so look for similar entries.

There are various options to Power On your PC:
- Power On By PCI/PCIE Device
- Power On By PS/2 Devices
- Power On By Ring
- Power On By RTC Alarm
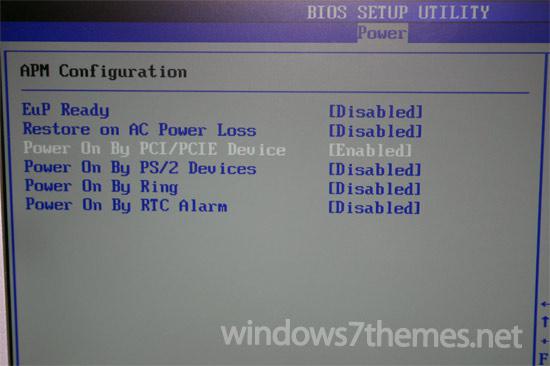
3. Step Turn on the option Power On By PCI/PCIE Device if you want to wake up your PC using wakeonlan signals.
Find Your Physical MAC Address So You Can Actually Send WOL Signals
NOTE: This step is necessary to send Wake-on-LAN signals from Ubuntu or Windows to your device that you want to wake
One of the pre-requisites of sending a Wake signal is to actually have the MAC address of the PC that you want to wake up.
We have various great tutorials and tools on our site that explain how to retrieve the MAC address of your PC
The articles above includes our FREE tool to retrieve MAC addresses on just about any network in bulk, meaning all of your networked devices will be shown with their complete MAC address!
In short:
1. Step Open a command prompt and enter ipconfig -all
2. Step Find something like Ethernet adapter Local Area Connection and write down the number Physical Address e.g. 48-5B-39… etc
Please read our tutorial (link above) if you struggle finding the MAC address, it’s rather easy; it won’t take long to retrieve your MAC addresses
IMPORTANT: The MAC address that ipconfig -all gives you needs to be rewritten, replace the dashes with a colon!
Finally: Sending The Wake-On-LAN Signal From UBUNTU
From Ubuntu
I wanted to send out the wakeonlan command from an Ubuntu PC to my Windows PC. Thanks to yum/apt you can easily get the necessary tools using one command.
Ubuntu: apt-get install wakeonlan
Then type in wakeonlan 48:5b:39:27:00:14:9B
Finally: Sending The Wake-On-LAN Signal From Windows
From Windows
If you want to send the WOL signal from a Windows PC to a Windows PC, I highly recommend that you download a free WOL utility.
1. Step Head over to http://www.matcode.com/wol.htm to download MC-WOL.EXE (I tested it, it’s safe)
2. Step When that is done, open a command prompt and use CD to change the directory to the location of MC-WOL.EXE (e.g. C:/Download/)
3. Step Then enter MC-WOL 48:5b:39:27:00:14:9B
IMPORTANT: The MAC address that ipconfig -all gives you needs to be rewritten, replace the dashes with a colon!
Possible Issues You Can Run Into
If you are running a firewall either on your Windows PC or your Ubuntu PC you absolutely need to configure it to allow port 9 UDP. In some cases it may be necessary to also unblock port 7, but I’d have to do more research on that.
Please post your questions below and give me some days to get back to you.

