 Windows 8 comes with an all new task manager that is quite pleasant to view and use – but if you want to stick with Windows 7, the good news is that there is a way to replace the default task manager with a Windows 8-like alternative.
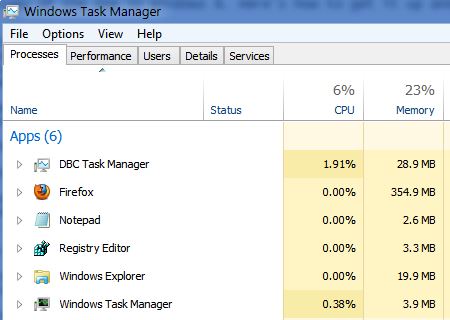
The new task manager in Windows 8
One of the things introduced in Windows 8 is the new Task Manager, which has been significantly revamped. It has a more modern design and is easier to read – everything is clear at one glance. But it’s definitely not a good enough reason to upgrade from Windows 7, especially if you don’t like the Metro UI in Windows 8.
Getting a Windows 8-like task manager in Windows 7
Thankfully, there is an alternative – a task manager that looks and works pretty much like the one in Windows 8 and which can be used instead of the default one in Windows 7. It was created by user Hanrui at Neowin forums, and it’s really great – pretty much a copy of the one in Windows 8. Here’s how to get it up and running on Windows 7 instead of the default task manager:
1. Step Download the appropriate program executable (32 or 64 bit) from the official thread here – http://www.neowin.net/forum/topic/1149964-a-windows-8-like-task-manager-for-windows-7-work-in-progress/ . As you can see, it’s a work in progress and the latest version is not on the first page – you’ll need to scroll through the second page and any newer pages to find the latest release.

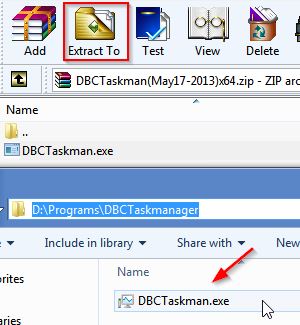
2. Step Extract the archived .exe file to its own folder, preferably in the Program Files folder.
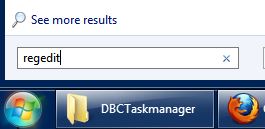
3. Step Now, there are two good ways of replacing the default task manager in Windows 7. Let’s go with the more complicated, but safer option first – using the Registry Editor. Open the Registry Editor by typing “regedit” in the Start menu’s search field.
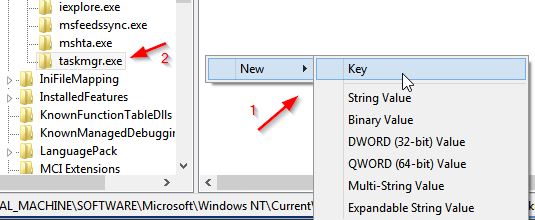
4. Step Navigate to “HKEY_LOCAL_MACHINE\SOFTWARE\Microsoft\Windows NT\CurrentVersion\Image File Execution Options”. You will see a few registry keys (sub-folders) there already.
Create a new key by right clicking on the empty space and selecting “New->Key”. Make sure the “Image File Execution Options” folder is selected, so the key appears under it.
Now, name the key “taskmgr.exe” (without the quotes, of course).
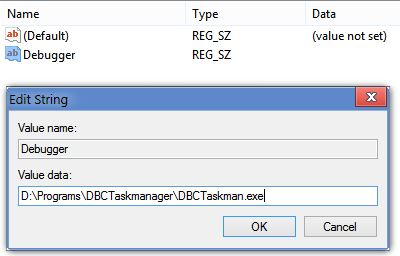
5. Step Select the newly created taskmgr.exe key and create a new string value named “Debugger” in it.

6. Step Right click on the new “Debugger” string and select “Modify”. Enter the full address of the new task manager program. This will basically make the new task manager start instead of the old one. This can be done for any program, by the way – it’s a nice little known trick in Windows.
7. Step Now you will see the new task manager anytime you press CTRL-ALT-DEL and click “Start Task Manager” or when starting from anywhere else. To revert to the old task manager, you just need to delete the “taskmgr.exe” key from the registry – pretty easy!
Method 2 – Step 1. Now, there’s another option for replacing the default task manager, which may be simpler to do if you’re not comfortable with the Registry Editor and typing a lot. You can just replace the actual task manager executable that is located in the “Windows\System32” folder.
First, you’ll need to download a file that will let you take ownership of system files (which you need to do in order to replace the task manager’s main executable) from here: http://www.askvg.com/add-take-ownership-option-in-file-folder-context-menu-in-windows-vista/ .
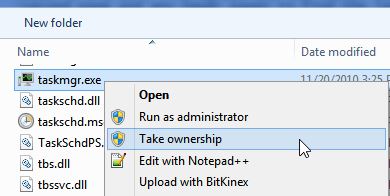
Just open the archive and run the “Take Ownership – Install.reg” file. You’ll have a new “Take Ownership” option in the right-click menu. Now navigate to “C:\Windows\System32” and find the “taskmgr.exe” file. Right click on it and select “Take Ownership”.
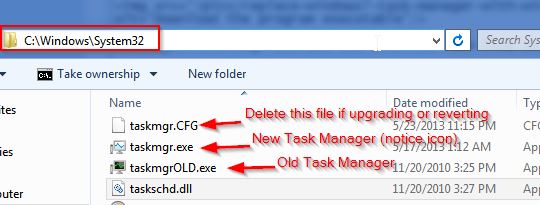
Step 2. Now, you could just delete the taskmgr.exe file, but I really recommend you rename it to something like “taskmgr.exe.backup” or “taskmgrOLD.exe”, which will let you revert back to it in the future if necessary.
Afterwards, rename the “DBCTaskman.exe” file to “taskmgr.exe” – as you may have guessed, you’re basically fooling the system into thinking this is the actual task manager executable. Now simply move or copy this new taskmgr.exe to the “C:\Windows\System32” folder and that’s it – the new task manager will start every time you open it from anywhere!
So there you have it – the new task manager and not one, but two working methods to make it the default app! Be sure to give it a try and share the trick with others, too!
Conclusion
The default task manager in Windows 7 is still very good, but if you want the fresher looking version that appeared in Windows 8, you can have it! Just follow the tutorial and enjoy the new task manager without Metro UI!

