If you want to know how to use the DLNA server in Microsoft’s latest update check this out
What is DLNA?
Digital Living Network Alliance or DLNA is a non-profit group of over 250 alliance members. It was formed in 2003 by Sony to provide interoperability for sharing digital media between different consumer devices such as computers, game consoles, TVs, camcorders, printers, cameras, smart phones, and other multimedia devices.
Various digital devices with different technologies or architectures are capable of connecting with each other if they are DLNA certified. And they can be operated from a Home Network, irrespective of whether it is wired or wireless.
DLNA certified devices use Universal Plug and Play or UPnP for Media management, Media discovery and Media control. You can make your Windows 8 computer a DLNA certified media server simply by activating this capability of the Windows Media Player (WMP) 11 or 12. This will allow you to connect all DLNA certified media devices (XBOX 360, PS3, Camera, Printer, TV, receiver etc.) to that server and allow you to view media stored on your computer from those devices.
Steps to enable DLNA feature
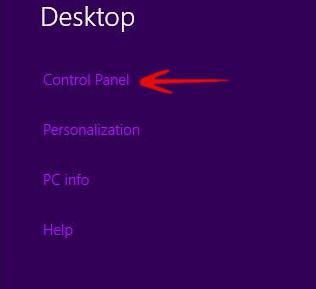
1. Step First of all open the real desktop Control Panel (if you are new to Windows 8, open the Metro Control Panel, and then scroll to the bottom and click the “More settings” link)
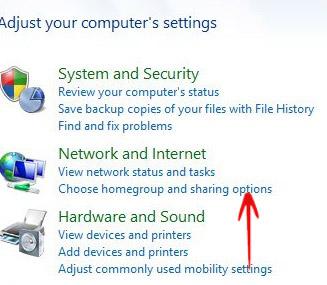
2. Step Select Choose home group and sharing options under Network and Internet option
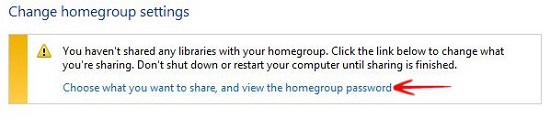
3. Step If you are using this Home Group feature for the first time, you will get a message box. Now, select Choose what you want to share, and view the home group password option.
4. Step A new window will appear. Choose files and devices you want to share. Now click on Next.

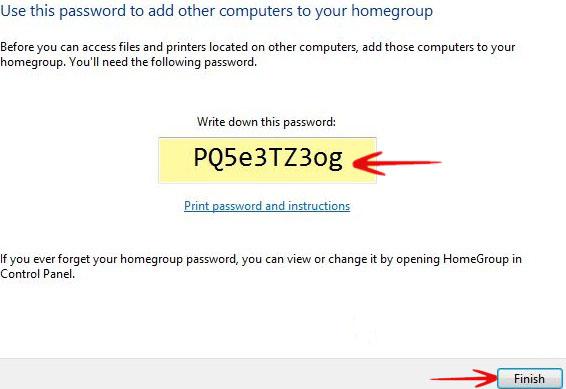
5. Step You will get a password which is important to connect any other computers, printers or devices with your home group. You may change this password later. Click on Finish.
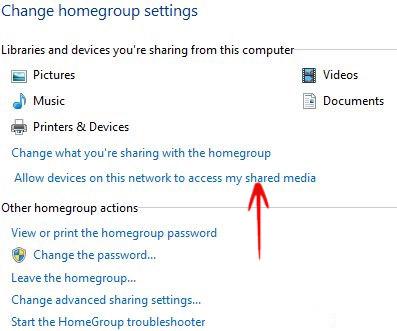
6. Step Now click on Allow Devices on this network to access my shared media option.
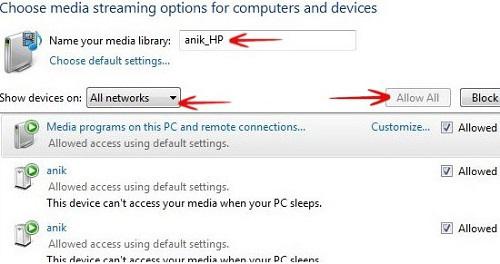
7. Step The Media Streaming Options window will open. Choose a name for your Media Library then select Show devices on: All networks and choose your desired settings.
After performing these steps, folders under C:\Users\Public directory are shared as default (assuming Windows 8 is installed on C:\ ).
In case of Pictures, the content of the Public Pictures folder can be accessed by any supported DLNA certified device which is connected to the server (computer), wired or wirelessly. Similarly, Videos stored in the Public Video folder can also be accessed or played by any supported DLNA device or player as DLNA server content. Not only that, Windows Media Player 12 supports Media Streaming. It can be used as DLNA server. Using this function, you can easily enjoy the video formats which are not actually supported as DLNA contents, like .MP4 or .WMV files.
This is the complete guide on how to enable and use DLNA features in Windows 8.

