If you find yourself frequently browsing Wi-fi in public places then learn how you can protect yourself with this guide!
Importance of Public Wi-fi Secrurity
If you find yourself out and about during the day using various public wifi services from your favourite coffee shops or wherever else it is important to remember the security risks.
When you are browsing on a public Wi-fi platform you can expose yourself to potential hackers and the like.

If you are connecting to any sites that do not use HTTPS then you really need to ensure to safeguard your browser to avoid someone stealing your cookies and pretending they are you for example. Here is how you can use proxy servers to achieve this!
Step By Step
1. Step
The first thing you need to do is install Hamachi. You need to install this on the computer that is going to act as a proxy as well as the laptop or computer you are looking to browse securely on public networks with.

Most will install it on their home desktop as a secure proxy. Once you run the program for the first time you will need to create a new private network.
Give your network a unique ID and password and make sure you remember the password.That’s all it takes to set up a network.
2. Step Next install Hamachi on your laptop and open up the application. This time you can join the network and enter the network information.
You can repeat this procedure for as many computers as you wish to use the proxy with.
3. Step Another proxy that can be used is Privoxy. Privoxy is an open source web proxy that is also free to install. It can be downloaded from the link below.
http://sourceforge.net/projects/ijbswa/files/
It is available on Windows,Mac and Linux. The installation process is once again straightforward.You may need to give it access to open a port if you are using a firewall. Pivoxy will be running in your system tray even if you do not see a window.
4. Step Now you need to configure Privoxy to channel traffic through your new Hamachi set up. Open up Edit and then Main Configuration and you will open up a text file named config.txt.
Press CTRL F and locate the string – listen-address 127.0.0.1:811 and replace that ip address with the one you were given by Hamachi. Click Save and and restart Privoxy.
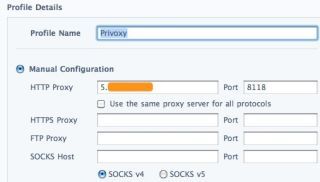
5. Step Finally you will need to setup your browser to use the new setup and allow you to browse more securely.
Install the Proxy Switchy extension and enter a Profile name. In the HTTP proxy box found under the Manual Configuration you need to enter the Hamachi VPN IP details you were given.
 >
>
Now whenever you need to privately browse and secure yourself just click the Proxy With icon on chrome and select the option you set up.
Conclusion
The initial time and effort it takes to set up a proxy server is certainly worth it. Once it is set up you can use it over and over and it is simple to add to more computers in the future.
There are many ways to set up a proxy on your computer for private web browsing but this is certainly one of the simplest and straightforward methods there is.
Follow the steps outlined in this guide and you will be browsing securely wherever you are!

