 You want to install and set up a Wifi camera? In this example tutorial we’re going to help you setting up a Trendnet camera but you can use it for other cameras as well that have a similar setup
In this tutorial I will walk you through setting up a TrendNet camera properly. Let’s go:
Connect Your Camera, Forward Port 80
0. Connect the camera using the adapter that was shipped in the package
1. Step Buy an ethernet cable (depending on your model they may have included one) and connect the camera with your router – put the cable into port 1 on your router and into the ethernet port on the backside of your Wifi camera
2. Step Go into your router configuration by entering the IP address of your router. You will have to look this up in your router manual. If you have lost that, you can download a copy from the router manufacturer e.g. cisco.com, dlink.com, asus.com
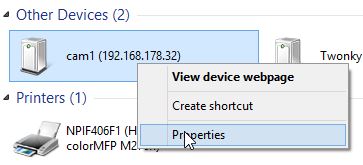
3. Step Now, go check what IP address the router assigned to your Wifi cam – if you have a decent router it will list the IP on the dashboard, otherwise you can open the Network (use the shortcut on your desktop) and it may show up there as a camera e.g. Trendnet IP672WI.
4. Step While you are logged into your router make sure to forward port 80 from your router to your Wifi cam or you may not be able to access your camera! This is an important step, without doing this properly you can not proceed below
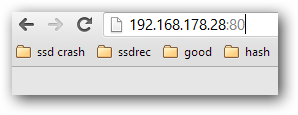
5. Step By default Trendnet and other Wifi cameras use the port 80. However, I HIGHLY recommend you change that later on. Enter the IP into your browser address bar e.g. Google Chrome
Log Into Wifi Cam And Start Setup Wizard
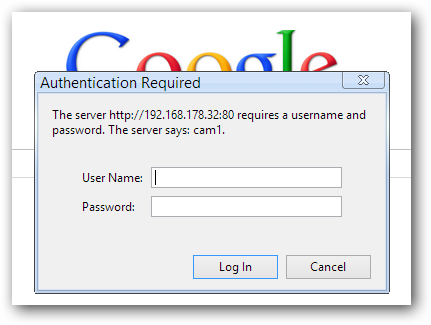
6. Step You can log into your cam entering the default username and default password. Both are admin (we change that later) – if admin does not work for you, look it up in your manual
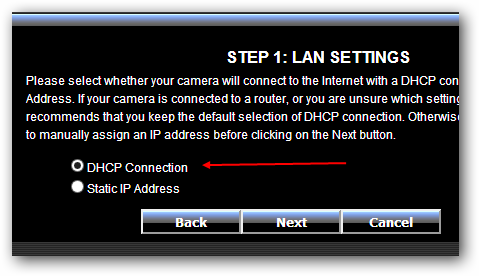
7. Step When you’re finally logged in, click on Wizard or similar to open the Setup Wizard. The first step is to decide between DHCP and static IP – if you have a good router, there’s no need to assign a static IP. You can have your router assign a dynamic IP, you can always set up a static IP later if you require it. If you’re using a dynamic DNS domain to to connect later, you will not need to enter the IP manually
8. Step Next, if you use a PPoE connection you will have to enable this option

Use DynDNS For Accessing Camera Via Static Domain (Useful if your IP is dynamic)
9. Step Next, this step is important if you want to have a domain to access your Wifi camera over the internet. Simply put, there are many cool services like DynDNS (sign up here) that can auto-fetch your IP and create a dynamic domain that always point to your most up-to-date IP address. So, after signing up you can enter your details below. Enter the username and password you used when signing up DynDNS.org – also enter the Zone domain that you have to set up first within DynDNS (click on Add Zone and follow the instructions on dyndns.org)
IMPORTANT: If you have a router that already provides this feature, it is not recommended to set this up AGAIN. If your router updates your IP via DynDNS already, this may cause problems and you might end up breaking the DynDNS TOS by issuing too many updates

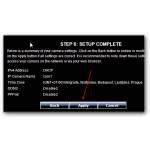
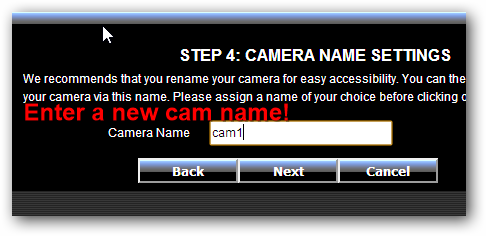
10. Step It’s time to enter a short and sweet name – this is important for improved security and better access
11. You can synchronize your camera with a time server. Enter time.nist.gov into the NTP server field

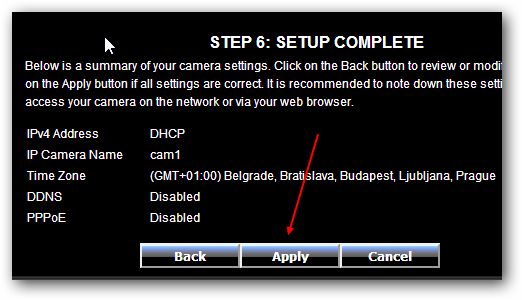
12. Finally, click on Apply after confirming your details
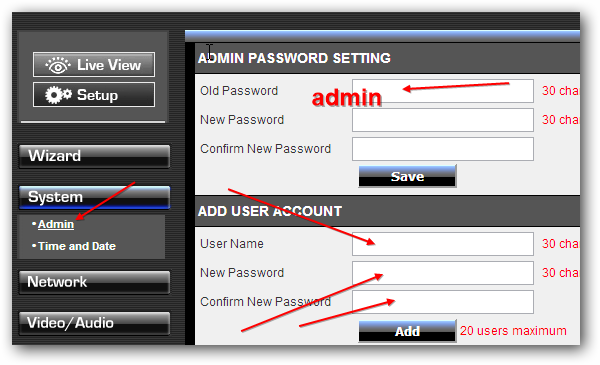
13. As a pre-caution we recommend that you change the admin account password and add a new user account, for that click on System / Admin and you can then change the password. Note: You cannot delete the admin account
14. That’s it! You can now test your camera by clicking on Live View

