Did you know that Windows Vista and Windows 7 reserver 20% of your bandwidth for the system? So, if you did not disable the bandwidth limit, you should probably do so to speed up your internet during Windows updates and other Windows tasks that require bandwidth.
![]()
Tip:
A common believe is that Windows takes 20% of your bandwidth and reserves it. Of course, this is not true! Disabling the bandwidth limit will not magically speed up your internet, it will simply not allow Windows-related tasks that require bandwidth (e.g. Windows Updates) to reserve bandwidth when they need it. Let’s say you’re playing a game and you enabled automatic Windows updates, you will then suddenly experience significantly more lag when this setting is enabled.
Disable Bandwidth Limit in Windows 7 Professional / Ultimate
1. Step Enter GPEDIT.msc into the search field on your start menu to open the local policy editor (Important: This feature is not available on Windows 7 Home, see below for more information for Home users)
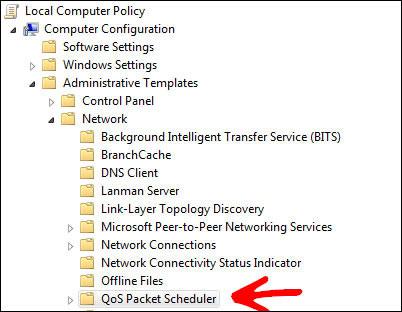
2. Step Uncollapse Computer Configuration, Administrative Templates, Network, QoS Packet Scheduler
3. Step In the right pane, double-click on Limit reservable bandwidth and select Enabled:
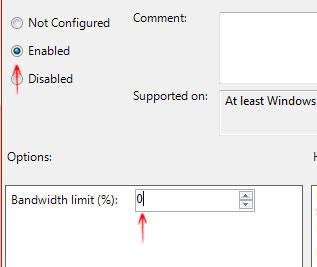
4. Step Enter 0%
5. Step Click on Apply
6. Step The bandwidth limit is now disabled.
Disable Bandwidth Limit in Windows 7 Home Premium
Download the following registry tweak and double-click on it. That’s all you need to do to disable the bandwidth limit in Windows 7 Home: Download Registry Tweak: Disable Bandwidth Limit
Or copy this into a notepad, save as .reg file and execute:
Windows Registry Editor Version 5.00
[HKEY_LOCAL_MACHINE\SOFTWARE\Policies\Microsoft\Windows\Psched]

"NonBestEffortLimit"=dword:00000000


if you disable it or do not configure it will still use the default 20%, what you have to do is ENABLE it and configure it to use 0%
paco, that’s correct, thank you for the clarification. You need to read the description text of the policies very carefully, often “Disabled” is not disabling a feature but enables it.
Fixed the tutorial, thanks again.
This is not true, and you should not disable this service. Windows does NOT reserve any of your bandwidth for itself.
– Mod edit Link spam – Read article then post useful response
Mark if you would actually read the article then you would realize that I pointed that out already
“A common believe is that Windows takes 20% of your bandwidth and reserves it. Of course, this is not true! Disabling the bandwidth limit will not magically speed up your internet, it will simply not allow Windows-related tasks that require bandwidth”
You should still disable the service if you plan to do Windows updates and other downloads at the same time. PERIOD
hi my name is derick and i would like to know how to do it in home premium similar to the way you do it in ultimate with gpedit.msc i usually do it like that when i had pirated version of windows now i have official version of windows home premium 64bit windows 7. could you pleas show me how to get to it in home premium. i want to know so that i can turn it on and off. and i dont want to just download the reg file. i just need to know how for myself for some reason.
How to disable Bandwidth Limit in Windows 7 starter ? Please email to me, [email protected]
Why my Win 7 can transmit max 280Mbps over gig interface? I can’t reach more.
I’ve got FTP server with gig NIC and laptop too. I know that win size is main limiter how can I tweak it?
Hello Oliver,
Thanks for your valuable tip. i’ve a doubt – suppose if no updation is happening in the background then will get the full internet speed rite? Otherwise windows will use the 20% of the internet speed for background activities like windows updates and other things. if that is the case then we actually dont want to do this rite? hope u may correct me if i am wrong.
Regards
elveera.
You are my hero. Did a bandwidth test of my computer BEFORE doing anything to see if it worked, and it capped around 4100, 4200Mb/s (20% of that is roughly 840) and went to around 6000Mb/s. Which obviously is much more than 20%. This saved me because I am a gamer and my bros have been complaining of my lag. Thanks so much.
This registry tweak is incorrect!
You have typed Effort incorrectly, you left out the “t” in Effort.
“NonBestEfforLimit”=dword:00000000
should be “NonBestEffortLimit”=dword:00000000
In the premium edition registry this value is already in by default.
Reverse this and make it 100 and you can install updates faster
Is their any disadvantage of enabling limited bandwidth to 0%? please specify. ‘Coz i have doubts regarding this matter. When enabling it to 0%, it means, if i’m downloading something, it will use all my bandwidth which will be the reason of a disconnection from playing online games, just a thought.
I used your registry tweak to disable bandwidth limit on my computer but gain nothing. I would like to have my enable default 20% bandwidth limit. Can you send me registry of that? (I am totally noob about this resgistry, don’t know how to do it by myself)
ti, as stated in the introduction Windows does not actually limit your bandwidth – you cannot speed up your internet that way. If you are truly interested in making your internet connection faster, then I recommend you read this interesting article with 7 good tips:
http://windows7themes.net/how-to-speed-up-internet-connection-in-windows-7.html
This includes useful tips like changing DNS provider, buying WLAN repeaters or scanning for malware. Handy guide!
Hi! I ran registry entry that you provided and now I have problems with connecting to my network :/ Could you please provide me with registry entry that would reverse previous one?