So, you want to want to know how to record what you hear in Windows 7? It’s definitely possibly, although some people will not be happy if I tell you how to do it.
0. Prerequisites:
Before you can actually follow this tutorial, you will have to read another tutorial. If you actually want to install the tools we are using in this to tutorial to record what you hear, you will most likely encounter the error message:
Windows requires a digitally signed driver
I wrote a very detailed guide that will teach you how to install drivers that are not digitally signed.
Read it here: How to install unsigned drivers
1. Install Virtual Audio Cable for Windows 7
Virtual Audio Cable is basically capable of transferring audio from one device channel to another, although it’s only a virtual audio device.
Download Virtual Audio Cable (XP/Vista/7/2000/2003, 32+64-bit)
In order to install Virtual Audio Cable on Windows 7, you will have to read the tutorial above (see prerequisites!)
2. Make Virtual Audio Cable Default Device
In order to record what you hear, you have to make the virtual audio cable your default playback device.
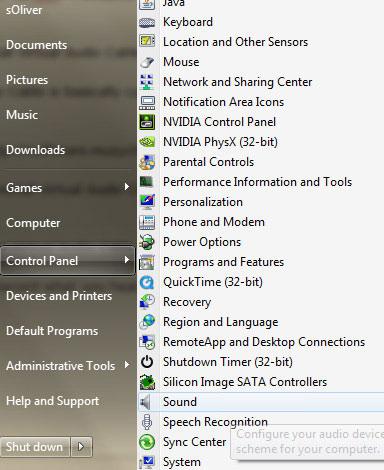
Open up the Control Panel and click on “Sound”:
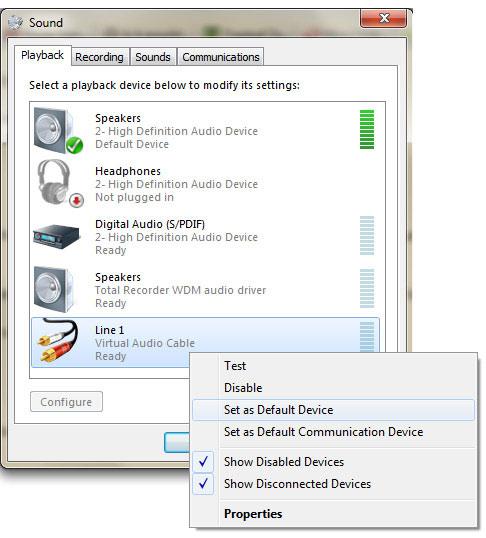
On the “Playback” tab, scroll down the list until you find the entry “Line 1” (Virtual Audio Cable):
3. Play Your Music
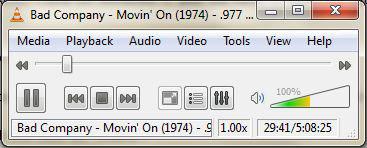
Now, the easy part, start your favorite music player and open whatever you want to listen to. I decided to open up the stream 977Music Classic Rock via VLC:
Playing: Bad Company – Movin’ On (1974)
You will hear that you hear nothing at all. That is 100% correct! Unfortunately, the “easy” method doesn’t allow you to listen to the music, but at least you can record it (and that was probably what you were trying to do, right?). If you want to listen to the music and record it at the same time, I’ll soon publish a 2nd part of this tutorial for advanced users. Please bookmark our site if you want to find out how to do it.
4. Record what you hear
Next, the final step! So, to record what you hear (or what you don’t hear), you need a recording tool. My favorite freeware solution for recording music or podcasts online is “Audacity”. The latest beta 1.3.7 supports Windows 7 and can be downloaded from sourceforge:
Download Audacity for Windows 7
1. Step After installing Audacity, open it and hold down “CTRL + P” (or go to Edit -> Preferences).
2. Step From the dropdown field “Recording device” select “Line 1 (Virtual Audio Cable)”:
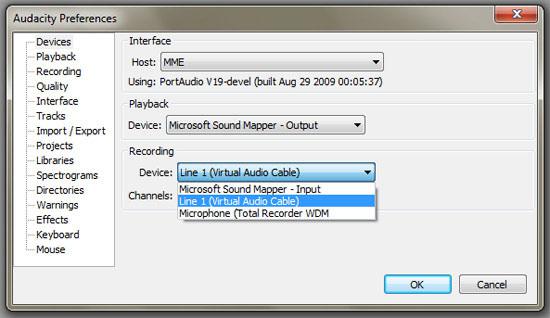
3. Step Confirm with ok and finally push the red recording button. In order to record what you hear you have to push the button every 108 minutes! (ok, just kidding).
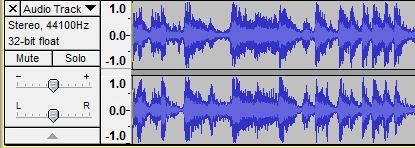
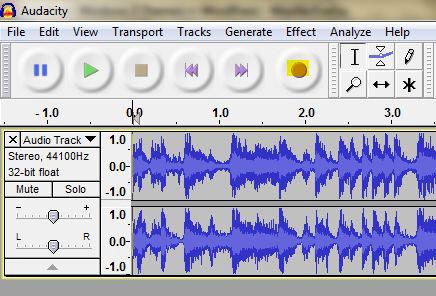
You should now see that Audacity is recording your music:
Voilà, you are recording what you hear, only that you can’t hear it yourself. But if you own a laptop, you can simply do all of this on your laptop, record what you “hear” and still listen to your music at the same time!
Advanced: Listen + Record & Stream music to other PC’s
VLC allows you to stream music to other PC’s in a network. A tutorial that will teach you how to do it will follow shortly.
If you have any ideas, requests, questions, feedback or anything else to say, let us know!


Thanks
but how come u cannot listen …y its weaker than XP
I.E if you want to play guitar and sing on a track and listen to be accurate how do u do that:D
Awesome! But for what I’m trying to do I kind of need sound (recording my own live sets). Will defenitly read the follow up post…
Thanks for this. I learned a lot regarding the unsigned drivers, but you might want to mention that Virtual Audio Cable is apparently not free. I got everything up and running, but the only sound I had coming out of my speakers in the end was a woman’s voice saying “Trial… trial… trial… “
Actually you can hear while recording with this trick: Go to the Recording tab, select Line 1 and then Properties. Then on the Listen tab, check “Listen to this device” (I dunno how it’s translated exactly. My Windows is in spanish). Of course that sound will be slightly delayed, but at least you can hear what you’re recording now.
I have no “Line 1” listed under the playback tab in my sound devices. I’ve installed, and uninstalled and reinstalled Virtual Audio Cable several times, and following the directions in the prerequisite tutorial as well. It’s just not working.
the best solution is to use audio record wizard. sound quality won’t diminish…
OMFG it works, with sound!!! Damn JA you are awesome!! The lag is less then half a second (more than manageble). Now the only thing to figure out is how to get rid of the “trial, trial….” from vac. Im guessing all that will take is a quick google search or two (hoping to find a non trial version/alternate program to vac).
PS. To all who didn’t read JA’s comment and are still stuck all you need to do is go to the properties for line 1 under the recording tab, go to the listen tab, check listen to this device and set the icon next to line 1 to speakers and voila!
Just to clarify, you need to specify which playback device to use for listening. The standard setting is to play through default (which is now Line 1).
To be clear, restating what they said above:
Open Playback Devices from sound menu.
Set Line 1 as default
Click Recording tab
Set Line 1 as default
In properties of Line 1, click ‘Listen to this device’
Change ‘Playback through this device’ to your normal speakers
Apply and enjoy
hello thanx for good tips!
as a old trick quick fix to record “what i hear” direct connect soundcard line-out and line-in with a minijackmale-to-minijackmale cable. works fine… no buzz or loss.
recording using “wavepad”, “sound recorder” or other, set to “line in”.
to listen at the same time thru speakers add “Double Adapter Splitter Plug” (male-to-twin-female).
1. Right click on the speaker icon in the bottom right.
2. Choose Recording Devices
3. In the empty white space, right-click and choose Show Disabled Devices. You should see Stereo Mix appear in the list.
4. Right click on Stereo Mix and choose Enable.
5. Right click on Stereo Mix again, and choose Set as Default Device.
I’ve done everything. Without errors. But my audacity is still monitoring only microphone, and recording only microphone… What might be wrong? please help. I must admit: **** microsoft!
Hi
This Virtual Audio is trial…
It’s working, but it keeps saying “trial.. trial…”
Yup – virtual audio did not work for me because it keeps saying “trial”. Being a hardware guy i did come up with a simple solution. You still need to download audacity , its free and simple and works great. Put a headphone jack spliter on your sound card output (normally where your speakers are connected). Connect one side of the spliter to your speakers and the other side to line IN of your sound card. Now select line in as the recording device in audacity and now you can record AND listen at the same time. :)
That with the spliter would not be feasable for a labtop right ?
When will you be updating your site so we can “hear” what we record?
hbaker said: Stereo mix.. This worked for me cus i have a Realtek soundcard.
Go for Audiograbber, the best , and it is free.
under playback tab and recording tab
-show disabled devices
-set Line 1 as default device
under recording tab
-go to Line 1 properties and choose listen tab
-tick listen to this device
-playback through this device: Speakers
enjoy :)