So, let’s say you want to install the latest fancy Windows 7 desktop themes, then you need to know how to replace system files in Windows 7! Well, at least if you are interested in modifying the shell and explorer skin, because then you have to replace system files like shell32.dll, explorer.exe or shellstyle.dll.

Backup System Files
- Backup system files
- Try on Virtual PC first
- Install multiple systems
0. Prerequisites. Before you replace any system files, make a backup. I am not responsible if your system won’t start or if you do any damage to your system and lose valuable data. Microsoft strongly advices you not to modify system files. Of course this does not keep us from modifying and hacking whatever there is, because we want to customize ANYTHING.
If you replace system files with corrupt files or if you replace the wrong files your system will NOT boot. Keep this in mind. If you are new to this, I would recommend to try everything on a virtual PC before you do it on a live system. Another advice: Installing multiple systems, e.g. XP, Vista and Windows 7 is a good idea and can come in handy for replacing system files, if you do something wrong you can always boot another system and undo the changes.
Take Ownership of a System File
1. StepTo rename or delete (don’t) system files you have to take ownership of the system file.
Download this script: Download TakeOwnership.zip and double-click on the .reg (registry) file to add an option “Take Ownership” to your contextual menu (the right-click menu).
Then you can right-click on your system files and take ownership of them. You can also do this via the command line using the command TAKEOWN /f . For more instructions, read this.
Rename Windows 7 System Files
2. Step After taking ownership of the system file, you can rename the system files (don’t delete them, you will still need your original system files). Rename your system file to .bak.dll or .bak.exe or something else that you WILL remember. When you try to rename a system file, you will be prompted via UAC to confirm the action, do it.
System files, like shell32.dll, are protected. So, if you want to copy a file to the system32 folder, it won’t work. Also renaming an existing file in system32 to for example shell32.dll won’t work.
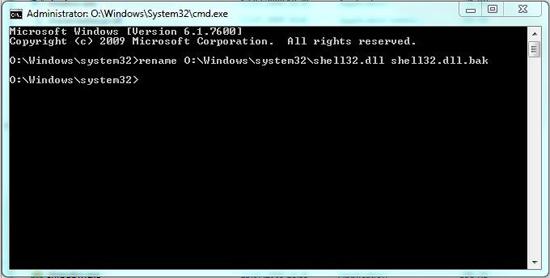
Personally, I always rename system files via the command line.Run an elevated command prompt and use the syntax “rename path_to_system_file new_name” (without the quotes).
Example:
Copy New Files to Windows 7 System Folder
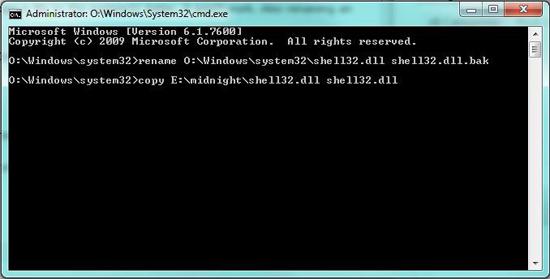
3. StepOpen an elevated command prompt. Copy your new system files to the system32 folder (or wherever your system files are stored) to replace the old files.
Example:
My new shell32.dll was stored at E:/midnight/, so I enter:
copy E:/midnight/shell32.dll shell32.dll
Keep in mind that this will copy shell32.dll to the folder that you are currently in. After opening an elevated command prompt, this is by default /Windows/system32.
How to replace Explorer.exe in Windows 7?
If you are looking for a way to replace the explorer.exe in Windows 7, then read a comprehensive guide here:
Replace System File: Explorer.exe
Ok, now you know how to replace system files in Windows 7. This should help many of you who want to install Windows 7 themes. A lot of the new shell themes require you to replace files like shell32.dll!


Hello.
I have installed MS Windows 7 x64 Home Permium on my new PC and after few days I have a strange problem with explorer.exe
I don’t know why but explorer is very often shuts down with no reason.
Sometimes it’s a few times in a raw. Even when I click on something with right mouse button.
My PC specs: (Phenom II X4 955, DDR3 1600Mhz, MA770T-UD3P, ATI 4870, OCZ 550W.. etc)
In my journal event i can read something like that:
Application that gives error is : C:\Windows\explorer.exe
Module that makes this error is C:\Windows\SYSTEM32\ntdll.dll
or
Module that makes this error is also C:\Windows\SYSTEM32\msvcrt.dll
Can I do with that something? What are these errors anyway.. It is realy fantastic to have these problems on the new brand OS
Rename Files
Kenth, did you replace the explorer.exe with one of our files or a 3rd-party explorer.exe to change the start button?
Anyway, I would recommend you to do a system check. You can easily scan your system files like this:
open an elevated command prompt:
http://windows7themes.net/how-to-open-elevated-command-prompt-in-windows-7.html
then enter:
sfc.exe /scannow
If this was just to advertise your renamer, you could have send me a mail :) I’ll be writing a post about it, would appreciate a link to our site
Despite being logged into my Windows 7 system as Administrator I have been unable to rename system files until I found your takeownership.zip file, which has at last enabled me to do something I have been trying to do for months!! Many thanks for the info and the download.
Geoff
Np Geoff, glad I could help!
I know how frustrating this can be, that’s why I am writing all of this stuff. Let me know when you have any other Windows related question (you can always directly contact me via contact form)
It keeps telling me that the file is being used in another process… How can I stop this process or work around it?
I’m trying to replace ExplorerFrame.dll in system32 on a Windows 7 64-bit system. Any ideas?
sir i have installed crystal xp theme and after that i lost my transparency of windows 7 it has been changed into classic style and i uninstalled crystal xp theme even though i am unable to get my transparency back how to replace my original 7 task bar transperancyy pls asses me i am struggling for that from one month
how to replace my shell as windows 7
I didn’t rename the exe files now I get an atbroker error when i log on. i have only a blank screen and error message and log in. the only thing i can do is run a command prompt in safe mode please help.
Greg, a command prompt should be sufficient to restore your old system files.
Please get familiar with the xcopy and move commands, as well as CD
cd C:\Windows\
move explorer.bak.exe explorer.exe
You need to replace explorer.bak.exe with your backup files, assuming you have a backup.
If you don’t, enter this into command prompt:
sfc.exe /scannow (in safe mode)
and then wait
Hi I have rigorously attempted to install Shell themes on my win7 home premium! I have done all of this, unstalled Theme Patchers, Theme Mangagers all this crap, no matter what I attempt I can’t get a theme to properly encompass my windows! It has crashed twice today and I have restored it! frankly I have had enough of this shit but equally had enough of the lousy theme’s I just an elegant simplistic theme! Every one i’ve doneloaded doesnt have any shell32, and most seem to now be missing the rest of the dll’s, can you please give me a SIMPLE way to without a doubt, step by step, entirely & correctly install a Theme! Thank you very much sir,
Leo