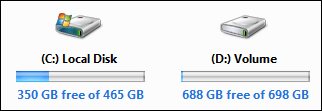
Do you think the drive letters are supposed to be in front of the drive name? Yep, we too. Luckily, there’s a handy registry setting that allows you to change it. You can either do it manually or download the registry hack from us.
If you are not familiar with editing the registry, please proceed below and download our registry keys, that require only a double-click to install. Important: Do only use them Windows 7!
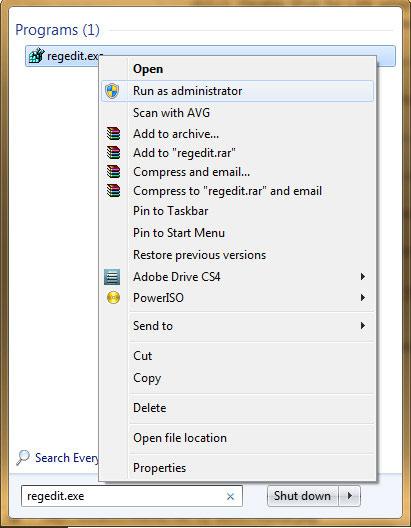
1. Step Open up the registry
2. Step Uncollapse HKEY_LOCAL_MACHINE\SOFTWARE\Microsoft\Windows\CurrentVersion\Explorer
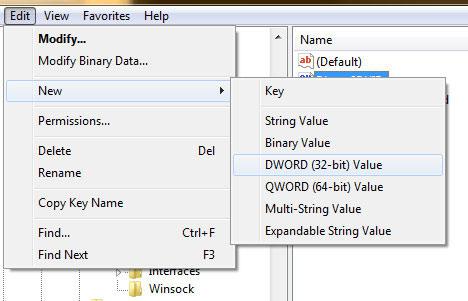
3. Step In the right pane, right-click and click on “Create / New DWORD (32-bit) key”
4. Step Give the key the name ShowDriveLettersFirst
5. Step Double click on the new key and change the value from 0 to 4
6. Step Either reboot or restart the explorer.exe
This handy registry key will show the drive letters first. If you no longer want the driver letters in front simply remove the registry key.
Download Registry Key: Show Drive Letters First / Last
Optionally, you can also insert the following lines into a notepad, save it as a .reg file and then double-click on it:
Windows Registry Editor Version 5.00
[HKEY_LOCAL_MACHINE\SOFTWARE\Microsoft\Windows\CurrentVersion\Explorer]
“ShowDriveLettersFirst”=dword:00000004
You can download the registry key here:
Download ShowDriveLettersFirstLast.zip
The other registry key will show the drive letters after the name by removing the key.


HKEY_LOCAL_MACHINE\SOFTWARE\Microsoft\Windows\CurrentVersion\
should be
HKEY_LOCAL_MACHINE\SOFTWARE\Microsoft\Windows\CurrentVersion\Explorer