Are your system icons greyed out in Windows 7? If your system icons are greyed out and you need them badly, then you should read this tutorial to find out how to enable the system icons again!
![]()
First Steps! Prerequisites
Before your follow this tutorial:
1. Step Restart. Sometimes a restart will solve this problem.
2. Step Open an elevated command prompt. Enter “sfc.exe /scannow” (without quotes) and hit enter.
3. Step Wait until the scan has finished, then reboot.
We are doing this system scan because sometimes, viruses can change your explorer.exe and then you will lose your system icons in Windows 7. Also, if you followed our tutorial and replaced the explorer.exe, you might accidentally disable all system icons.
Enable System Icons via Local Group Policy Editor
Important: If you are Windows 7 Home or Windows 7 Home Basic, click here now.
Ok, so all of the system icons are greyed out, what can we do about it? We can edit the local group policies to enable the system icons again, so that they will all appear in your system tray again.
1. Step Click on “Start”
2. Step Enter “gpedit.msc” into the search field and click on “gpedit.msc” at the bottom when it appears.
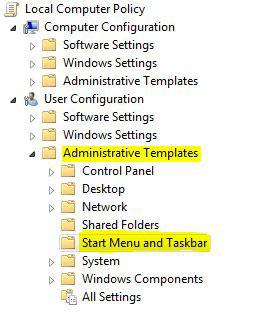
3. Step In the left pane, uncollapse the folders “Administrative Templates” and then “Start Menu and Taskbar”:
4. Step Scroll down in the right pane until you find the entries:
![]()
- Remove the Action Center icon
- Remove the networking icon
- Remove the battery meter
- Remove the volume control icon
5. Step Double-click on “Remove the Action Center icon”
6. Step On the following window, check the option “Disabled”:
![]()
7. Step Click on Apply and then on “OK”.
8. StepRepeat the same for the other entries “Remove the networking icon”, “Remove the battery meter”, “Remove the volume control icon”.
9. StepReboot.
When you log in all the system icons should appear in your system tray and they will no longer be greyed out.
Remember this will only work on Windows 7 Professional, Enterprise and Ultimate. The Local Group Policy Editor isn’t available on Windows 7 Home nor Windows 7 Home Premium. That’s why you will need some registry keys.
Enable System Icons via Registry
Copy the following text into a notepad:
Windows Registry Editor Version 5.00
[HKEY_CURRENT_USER\Software\Microsoft\Windows\CurrentVersion\Policies\Explorer]
“HideSCAVolume”=dword:00000000
“HideSCAPower”=dword:00000000
“HideSCANetwork”=dword:00000000
“HideSCAHealth”=dword:00000000
Save it with the extension .reg (simply enter “enablesystemicons.reg” as your filename).
Double-click on it and confirm the UAC prompt.
Instead you can also download the registry keys, double-click on the file and you are done:


Hi, thanks for allowing me to try this, but unfortunately it did not work for me. I followed each step to the letter, I went back to group policy editor to see if the changes I made were still there and they are, they still say disabled on all 4 items but in the notifications area the power icon and the action center icon are still greyed out.
I even used the Enable System Icons via Registry, then rebooted and still they are greyed out.
Any ideas, thank in advance.
Windows 7 Ultimate SP1, 32bit system, intel P4 3.20Ghz 2 logical threads, 2.00 GB memory, NVIDIA GeForce FX 5600
In My Registry
[HKEY_CURRENT_USER\Software\Microsoft\Windows\CurrentVersion\Policies\Explorer]
HideSCAHealth REG_DWORD 0x00000000 (0)
HideSCANetwork REG_DWORD 0x00000000 (0)
HideSCAPower REG_DWORD 0x00000000 (0)
HideSCAVolume REG_DWORD 0x00000000 (0)
NoDriveTypeAutoRun REG_DWORD 0x00000091 (145)
NoRealMode REG_DWORD 0x00000000 (0)
I am in the same boat as jim moore.
Action Center and Battery are greyed out, and going through the fixes here did not bring them back.
If anyone else has had this problem and knows of some alternate fixes, that would be great.
For me I had to delete the HideSCA*** entries, run gpupdate /force, and restart. <-Yes, even running Windows 7 Home Premium had to do the gpupdate /force. Hope it helps!
Mike
After all above steps are taken I have found that you cannot run APC software with their UPS batteries. If you want the Power/battery system icon to appear uninstall Powerchute and remove the APC driver in . You should uninstall the APC software and then remove the APC driver from your OS in Device Manager. Also remove APC from HID devices in Device Manager. Unplug your battery from the computer and plug it back in. If APC Battery comes up you have to uninstall the driver from your computer. Then after that the Microsoft HID battery will take over and run natively. Reboot and your Battery Icon will appear with the others.
Note: This only applies to the Battery Icon which gets greyed out in settings if APC software is installed. Hope this helps some.
Hi,
Ive got similar problems i have tried everything including the above methods. And my action center icon is still greyed out and when i go to group policy to check the thing (Remove the Action Center icon)its not there. The rest of them are but my action center isn’t.
Dell N5010 Inspiron Windows 7 Home Premium
For those who the Registry is not working for, run “enablesystemicons.reg” and then do the following.
Press [Crt+Alt=Delete] and bring up the Task Manager, go to the Processes tab. Find “explorer.exe” and End Process. Your taskbar should disappear. Don’t fret we are going to bring it back now.
Go to Applications press “New Task…” and type “explorer.exe” (without quotes).
you’ve successfully restarted your taskbar. Are the icons back?
WOW! I had tried numerous things before, as well as the regedit and restarting my laptop… but amazingly, everything worked after i did the cmd sfc.exe/scannow. So thank you all
thank you indeed.the only thing that really worked out is “sfc.exe /scannow”
None of the above worked for me. I still have a greyed action center icon listed and no flag on the taskbar. The action center is working but no notification.
Robert, what do you see when you open this in the registry editor:
HKEY_CURRENT_USER\Software\Microsoft\
Windows\CurrentVersion\Policies\Explorer
Then double-click HideSCAVolume and post the value here
hi oliversk,i have same problem as Robert,action center comes up if I open it but cant turn it on in task bar ,its grayed out,i did what u told Robert,the value is 0.what do I do now
Joyce and Robert, do you have Windows 7 Pro or Home? If you have Pro, have you tried using the local policy editor?
Enter gpedit.msc into the search bar, then find User Configuration, Administrative Templates, and Start Menu and Taskbar, there you can enable all icons
If that doesn’t work for you, there may be a corrupt DLL that sfc.exe can’t repair.
0. I assume that you used
sfc.exe /scannow(if not enter that into the prompt)1. Open an elevated command prompt explained here http://windows7themes.net/how-to-open-elevated-command-prompt-in-windows-7.html
2. Enter
findstr /c:"[SR] Cannot" %windir%\logs\cbs\cbs.log |more3. Copy and paste the text here
I tried this and the notification area icons control panel now has explorer and quickset with a red x on then – could you post a .reg to undo the changes wrought by the one you posted above?
thanks