Podcasts and Audiobooks can be a great way of keeping updated along with learning new information. With so much content out there wouldn’t it be great to know how to listen to more in less time? Here’s how!
Audacity For Podcasts and AudioBoooks
Audacity is a great free application that can be used for many audio related purposes. The one we are interested in this guide is how to make speech audio used in podcasts and audiobooks faster.
If you have Audacity application installed in your computer, you do not need to download anything else. Otherwise, you can download and install it from http://audacity.sourceforge.net/download , before starting the whole process.
If you are a podcast enthusiast and find yourself listening to many podcasts everyday – you will certainly be pleased with the ability to quicken up or even slow down the pace to your level.
1- Importing File and Viewing Options In Audacity
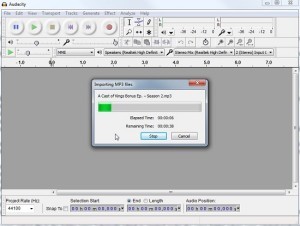
Open the podcast of your choice by either clicking “File” menu and Selecting “Open” or by the usual drag-and-drop method. Depending on your computer’s resources and the length of the recorded media, this may take a few minutes.
Click on “File” from the top menu bar and select “Edit Chains” option closer to the bottom of drop down menu
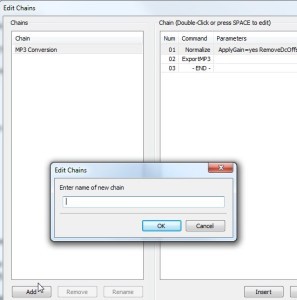
On the newly opened window, click the “Add” button on the bottom left of this window.
2- Changing The Speed And Tempo Of Playback In Audacity
On the newly popped up dialog box, type a name for your chain, something like “Speed Up 60%”
On the left panel, you will see your chain placed, in alphabetically sorted list and on the right panel, you will see an empty chain editor, on which you will notice a line saying “01 -END-“.
Click “Insert” button below the editor panel.
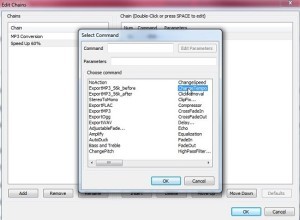
Select “ChangeTempo” by double-clicking on it. After your selection shows up in the “Command” area, click on the “Edit Parameters” button and in the “Percent Change” input area, type 60.
Alternatively, you can use your mouse and the slider scale to achieve the same result, or fine tune your speed selection. Then click “OK” and click “OK” one more time.
At this point you will see your “ChangeTempo” command with the proper parameter, in your edited chain panel.
3- Automating The Speed Up Process In Audacity For Future Use
Note – this next step is optional and works only if you have the free MP3 plugin installed.
Click “Insert” button one more time.
Select “ExportMp3” by double-clicking on it. Then click “OK”.
Click “OK” on the lower right side of the editor panel to save your work. This will close the “Edit Chains” window.
Click on “File” from the top menu bar and select “Apply Chain” option closer to the bottom of drop down menu.
Highlight your newly created chain’s name and click on “Apply to Current Project” button.
Wait .Wait some more. This could take long time. Depending on the length of your audio recording and how powerful of a computer you have – you are looking at wait times of 10 minutes or much longer. You will see the status of your operation in the progress dialog box.
Once the process is complete, you will find your output file in the folder name “cleaned” which is created under the same folder where your original podcast was located.
For additional podcasts which need to be sped up, you can skip the beginning steps to this point above. Also, for different podcasts, you might want to create multiple chains with different tempo rates and use different chains for each podcast.

