I’m currently migrating some of my hard drives to a RAID drive and thought I would write a little about how to install Clonezilla on a USB device to clone your drives.
Clonezilla is a great piece of software. Definitely not easy to use and install, but once you get it running you can use it to clone your hard drives including your operating system Windows 7 hassle-free and for FREE!
1. Step Download Clonezilla ISO (download a stable release)
2. Step 7zip (7-zip.org) has built-in support for ISO files, so you can probably extract the files if you have installed it. If you don’t got to 7-zip.org and get it, then extract the ISO file content to your USB device
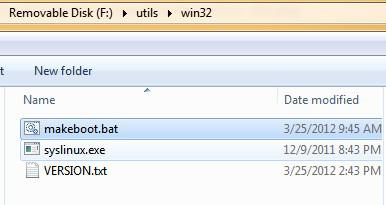
3. Step Once the files are extracted, open the Windows Explorer and go to your USB device and open up F:\utils\win32 (where F: is the letter of your USB drive)
4. Step Double-click on makeboot.bat to make your USB device bootable – this is an important step
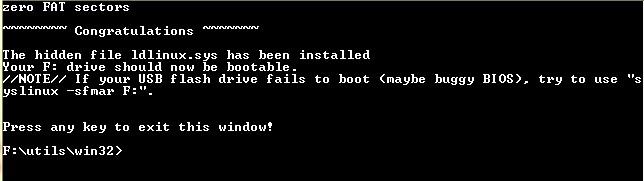
5. Step A command prompt will open: This batch file will prepare drive F: for boot using syslinux. You can proceed with any key

6. Step If you believe you saw some errors pop up, open a cmd prompt and enter:
F:

cd ./utils/win32

makeboot.bat
Each command on a new line and hit enter after each line
7. Step I wanted to demonstrate this error, because I believe it will be a common one. Before you can use syslinux to make your USB drive bootable, it is necessary to format it using the filesystem FAT32 rather than NTFS or you get the error zero FAT sectors
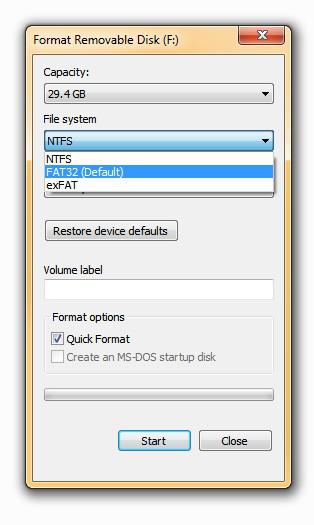
8. Step I’ve already outlined it in my other post how to create a bootable USB Ubuntu Live CD in Windows 7 how to format your USB device:
Right-click on your USB drive, select Format from the context menu, then select FAT from the dropdown as seen below:
9. Step After formatting your USB device properly, extract the Clonezilla ISO again to F:
10. Step Run the 3 commands from step 6 again and see if you still get the error zero FAT sectors. If you still have problems, enter syslinux -sfmar F: as suggested by Clonezilla’s batch script. You can lookup the additional paramters sfmar online:
-s, –stupid
-f, –force
-mar = installs a bootable MBR, marks the partition used active, raid
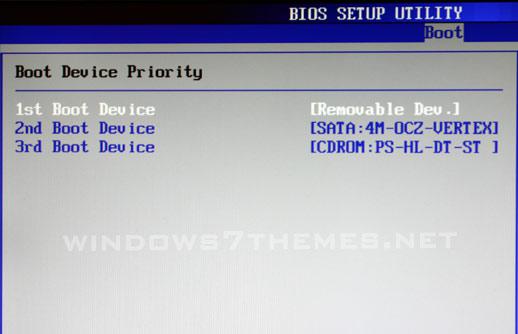
Check BIOS to change boot priority order
When it’s finally done, make sure to check your boot priority order
Keep hitting F8 to open the boot devices and select your USB device. This key may be different on your motherboard, because it is also used to enter Safe mode, but on the ASUS m4xx series F8 should bring it up
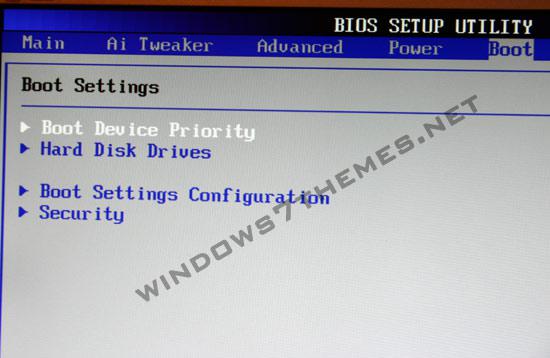
The 1st Boot Device should be labeled Removable Dev or similar e.g. USB/Removable Media etc.
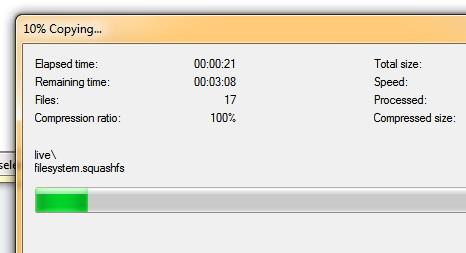
You can then boot from your USB drive and run Clonezilla to clone your hard drive
We might have a tutorial up later that explains how to use Clonezilla, but you will find countless good tutorials on this on clonezilla.org

