 Wondering how to join a domain on Windows 8, read this guide!
IMPORTANT: Join Domain Option Greyed Out
If the option is greyed out, make sure you are on Windows 8 Pro or higher. The regular version does not support it.
Still greyed out? Start the WORKSTATION service via services.msc (search for it)
Still? Remove your network adapter from the Windows 8 device manager, generate a new SSID for your network (wireless network), possibly try NewSID from sysinternal
Also change the workgroup is the option is greyed out constantly
For certain companies, a network containing all of the company’s information that can be accessed by employees is necessary to keep business running. Here is an easy guide about how to join the domain of your company network.
1) Make Sure you have everything you need: Pro or Enterprise
Regular Windows 8 does not have the ability to join a domain, but Professional and Enterprise versions do, so checking the version is vital. Be sure to have all the necessary information handy, such as the name of the domain that you wish to join, as well as the user information such as the user name and password. Lastly, make sure that the profile trying to join the domain has administrator status. Close all programs, as you will need to restart the computer at the end.
2) Access the Control Panel
First, get to the start screen. If you’re not already there, press the Windows button or hover the mouse in the lower-left corner until “Start” appears and then click on it. In the Start Screen’s search bar, type in “Control Panel” and then click “apps” in the bar just underneath it. The words “Control Panel” will appear in the search results. Click “Control Panel” and the application will open.
3) System Properties
On the Control Panel, click the icon labeled “System and security” and then click “System“. In the lower right of the system window the words “Change Settings” appear in blue, next to a Windows shield icon. Click “Change Settings”. This will open a window titled “System Properties“. Click the button near the bottom of that window which says “Change”. This will open a window called “Computer Name/Domain Changes”.
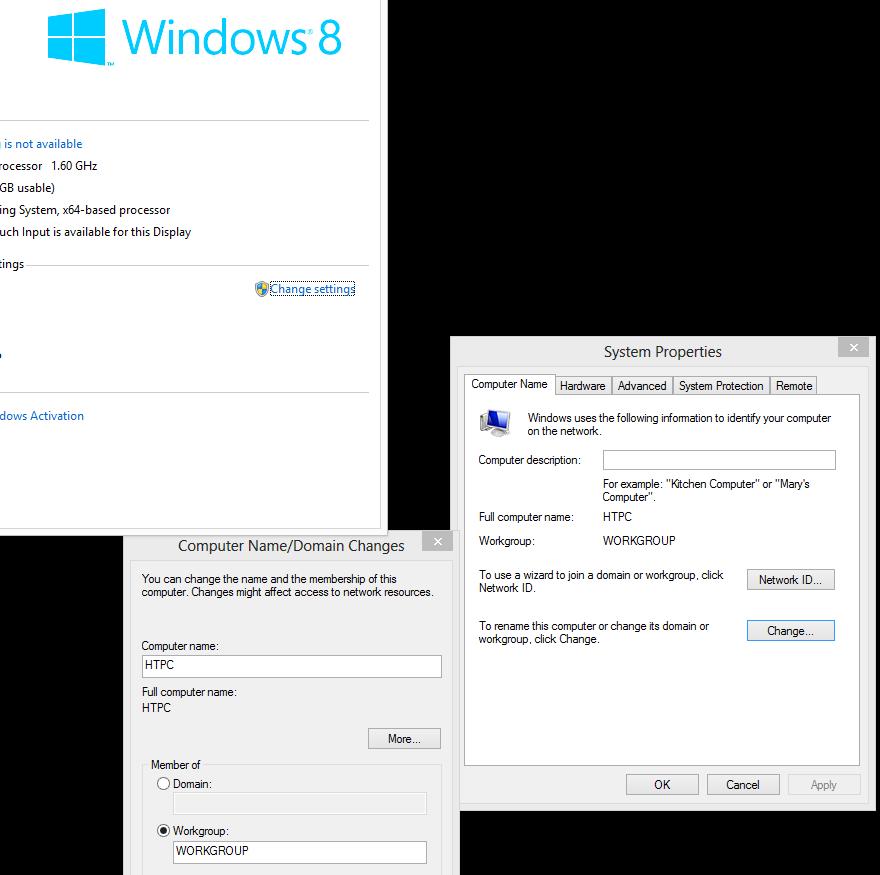
4) Inputting Domain ID
Near the bottom of the “Computer Name/Domain Changes” window is a white text box with the words “Member of:” over them. Type the domain name into that text box, and then click OK. You will be prompted for your User ID and Password for the network. Enter the information and click OK.
5) Restart Computer
If all has gone well, a display welcoming you to the network will appear, click OK. Then a prompt saying the changes will not take effect until the computer is restarted will appear; click OK on that as well. Close out of all windows, save and close any running applications. When the computer prompts you to restart now or restart later, click “Restart Now”.
6) Log in to Domain
After the computer has restarted, it will offer the choice of the user’s typical profile or “Other User”. Select “Other User” and enter the domain credentials (user name and ID). Welcome to the Domain!
7) Troubleshooting
The most common thing which causes this procedure to fail is not having the correct information input into the program. Before proceeding any further, double and triple check that the domain name, user name and password are correct. Check for case sensitivity. Failing that, check with your company’s IT team to make sure the domain isn’t offline.
Microsoft has been working on streamlining the domain joining process since the feature first appeared in Windows NT. With many tricky options now done automatically by the system, Windows 8 has the easiest domain joining set up yet.

