Everyone in this social media run world knows the importance of working with images. Cropping has become a tool of the trade just as screenshots have become a medium of visual aids.
This is perhaps why Windows 7 introduced a new tool that allowed complex screenshots to be taken, called Snipping Tool. Here is a guideline on how to take screenshots of different types using the snipping tool:
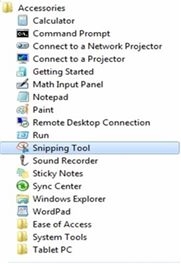
1. There are many ways of finding the snipping tool, which is usually found under the Accessories section of the start menu. Alternately, simply typing in snipping tools in the start menu should throw up the application.
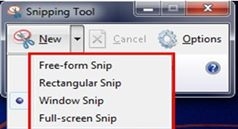
2. The main tool window has three buttons, namely New, Cancel and Options. While the new button allows you to choose one of many ways to create the screenshot, the cancel button aborts the progress and Options button prepares customization of the application.
3. There are mainly four types of screenshots provided under the new button – Free form snip, rectangular snip, window snip, and the full-screen snip.
4. While the free form snip allows you to draw around any irregular shape you want to capture, the rectangular snip is made in the form of a rectangle on the display.
5. The window snip allows you to select a window or a message and captures only it, while the full-screen snip captures the entire screen, like the traditional print screen key.
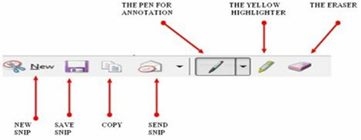
You also have the option of editing the captured image before saving it with multiple tools like the pen, the eraser and the highlighter. You have the option of saving the screenshot in multiple formats such as png, jpeg, gif, jmht etc. You can also directly use the tool to send the screenshot to any email recipient by entering his email ID details.

