If you want to know how to edit open the Power User Tasks Menu in Windows 8, go through this tutorial.
What is the Power User Tasks Menu?
Microsoft’s Windows 8 is really full of surprises. Windows 8 has a new hidden feature, Power User Tasks Menu. The “Power User Tasks Menu” only appears at the bottom left corner of your screen. To access it, move the mouse cursor into the lower-left corner of your screen. Small Start menu preview screen will pop-up. After the Start preview screen appears, right-click and will see the Power User Tasks Menu.
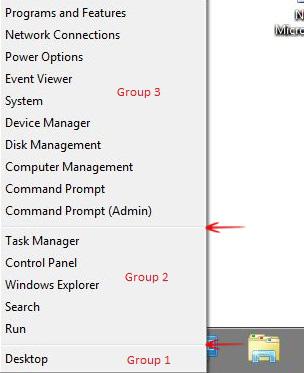
Alternatively you can press the (Windows + X) keys to see the Power User Tasks Menu. By default you can see Programs and Features, Control Panel, Device Manager, Disk Management, Search, Run etc. options in Power User Tasks Menu. But you can edit it in limited ways to add or remove your desired options in the Power User Tasks Menu.
If you examine default Power User Tasks Menu minutely you can see there are three groups and each group is separated by a horizontal line (see the snapshot below).
Follow the steps to edit the Power User Tasks Menu in Windows 8.
Steps to Edit the Power User Tasks Menu in Windows 8
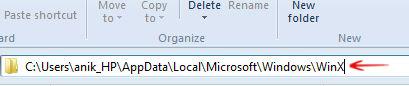
1. Step First of all navigate to C:\Users\anik_HP\AppData\Local\Microsoft\Windows\WinX, where replace “anik_HP” with your actual Windows user name. (If you have not installed windows 8 in “C” drive then replace “C” with the corresponding drive letter).
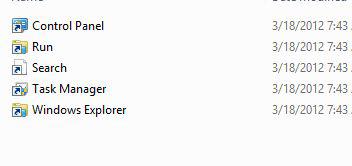
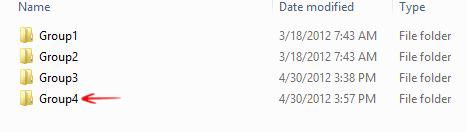
2. Step Now, you will see three folders, Group1, Group2, and Group3.

3. Step If you open these folders you can see some shortcut files are there. These are the shortcut files of those utilities which are in Power User Tasks Menu.
Actually, all the shortcuts which are in these three folders map directly to the three groups that are in the Power User Tasks Menu. Group 3 is at the top of the Power User Tasks Menuand Group 1 is at the bottom.
4. Step You can edit this menu in a few different ways. But the ability to arbitrarily add any shortcut to Power User Tasks Menu is not possible. You can see what happens when you try to add some other shortcuts which are not in those three folders:
At first create a folder inside of WinX folder and name it Group 4.
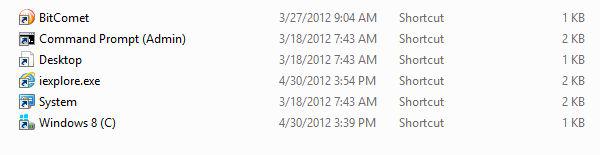
Now, copy some shortcut files from Group1, Group2 or Group3 folders to Group 4 folder. I have copied Command Prompt (Admin) , Desktop and System
. Next put three different types of shortcuts like Internet explorer (software comes with Windows OS) shortcut, BitComet (a third party application) shortcut and C drive (drive shortcut) in “Group 4” folder.
Finally, sign out or restart your machine to see the change in your Power User Tasks Menu.
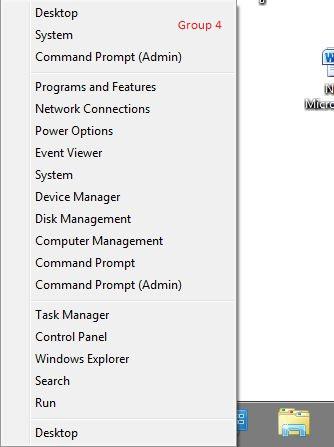
You will see a new group appears at the top of the Power User Tasks Menu. But in that group you can only see Command Prompt (Admin), Desktop and System options. So, it can be assumed that the ability to arbitrarily add any shortcut you want to the list is missing.
5. Step You can also delete any item from Power User Tasks Menu. Just go to corresponding folder (Group1, Group2 or Group3) and delete the particular shortcut file and sign out or restart your machine. You will find the item is no longer there in Power User Tasks Menu. You can also delete a whole group by simply delete the whole group folder.
It is really very amazing how this system works and what types of shortcuts it accepts. So far you have seen that it only supports the shortcuts which are in Group1, Group2 and Group3) folders.

