Someone asked me how he would quickly and safely remove hardware when the “eject” icon is missing. The best solution I could find to quickly remove hardware is to add a shortcut to your desktop or use a free tool like USB Disk Ejector.
Whenever you connect external devices like flash or USB drives you can normally safely remove them again by clicking on this icon in your system tray:
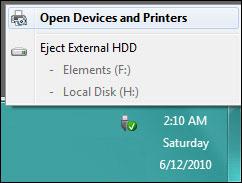
But sometimes it can happen that this icon won’t show up after connecting an external devices. So, what do you do? You can add a shortcut to your desktop to safely remove your hardware.
Add Shortcut to Safely Remove Hardware
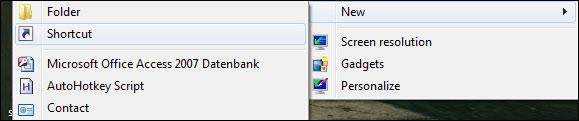
1. Step Right-click on your desktop and click on New / Shortcut:
2. Step Copy and paste this when you’re asked to enter a location:
C:/Windows/system32/rundll32.exe shell32.dll, Control_RunDLL hotplug.dll
This is basically the path to the dll file that is responsible for removing hardware (hotplug.dll)
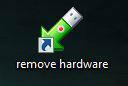
3. Step When you’re asked to enter a name, call it remove hardware
4. Step Now you have a working shortcut to safely remove hardware. If you need an icon for that shortcut, either download this icon:
![]()
Or you can search your shell32.dll file in C:/Windows for a icon that fits.
And here’s the final shortcut to remove hardware:
Remove Hardware Safely via Software
There are some free tools that allow you to eject USB devices. One of the best tools I found is the USB Disk Ejector, which you can download for free from here: Download USB Disk Ejector
Although this free tool has an interface you can do this via the command line as well:
- Eject the drive that the program is running from.
- Eject a drive by specifying a drive letter.
- Eject a drive by specifying a drive name.
- E ject a drive by specifying a partial drive name.

