Ok, this is not a developer blog, but Microsoft is making code-signing really difficult, so I thought I’d publish another tutorial on this subject
First Things First: Get The Code Signing Cert
I got my code-signing cert from a COMODO reseller called KSoftware. They have a really cool app to sign files, so you don’t even have to use the signtool.exe by Microsoft and you can sign tools using a pretty UI. Neat, I am tired of creating batch files for everything.
Buy A Cert For $80
Download K Software Code Signing Tool
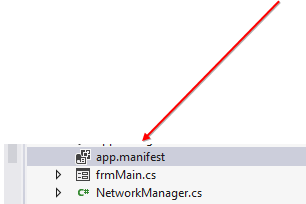
In VisualStudio: Open The App.Manifest!
Ok, before we can publish a ClickOnce application, we need to remove something from our app.manifest
Uncomment this:
And instead, add this:
Adding An EULA To ClickOnce App
You can use the Bootstrap Packages in C:\Program Files (x86)\Microsoft SDKs\Windows\v8.0A\Bootstrapper\Packages\ to create your own EULA
1. Step Create a folder EULA
2. Step In the folder EULA create a file Product.xml and copy and paste this:
3. Step Create a sub-folder en
4. Step Create a file Package.xml and eula.bat in the sub-folder en
5. Step Copy this into Package.xml
6. Step Copy this into eula.bat echo "EULA Accepted"
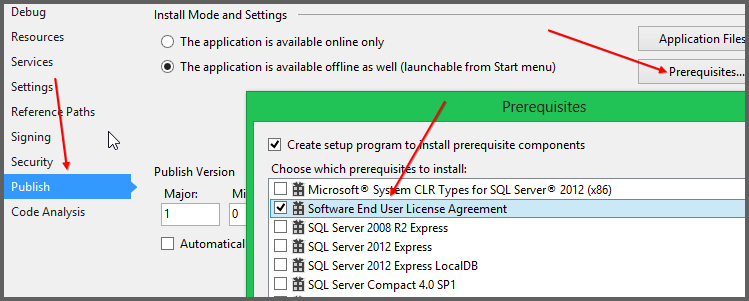
7. Step Restart Visual Studio – Go to Publish, click Prerequisites and then check the option “Software EULA”:
Enable ClickOnce
1. Step Right-click on your project and click Properties, go to the option Security
2. Step Check the option Enable ClickOnce security settings

Don’t Use Deploy File Extension
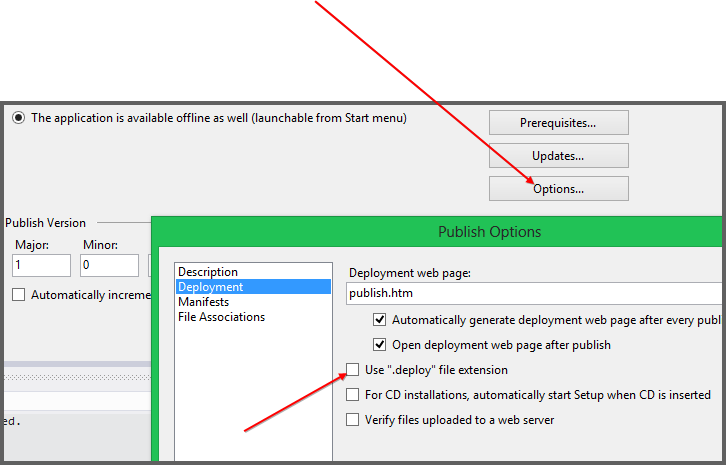
1. Step Go to Publish
2. Step Click Options, click on Deployment and uncheck Use deploy file extension. We DONT want to use the .deploy extension because if we do we cant sign those files, we can only sign exe files!
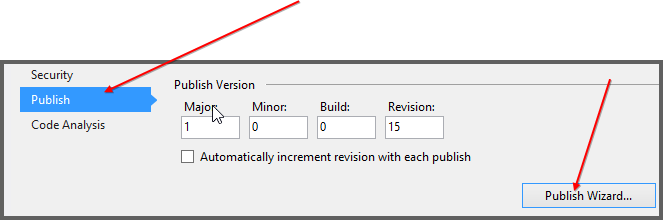
3. Step Open the Publish Wizard
4. Step Follow the instructions and select the Option “From a website” – enter your website with a subfolder called repo
5. Step Create the folder repo in your root dir e.g. www.domain.com/repo/
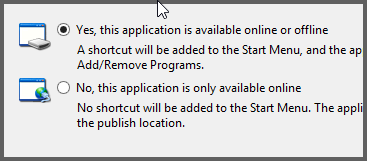
6. Step Finish the Publish Wizard (Select, yes this app is available online or offline)
Ok, now you should have a folder with your entire application files and resources. We need to upload those files, but before we do that we sign those files
Finally, Sign Your Files
7. Step Now you’re ready to launch the KSoftware Sign Tool (see First Things First) and add the entire folder with all exe files
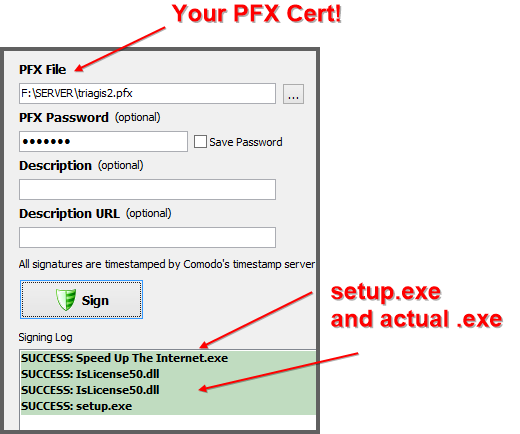
8. Step Once you’re done upload all files to www.domain.com/repo/
9. Step Try downloading the setup.exe – no warning message? Great! Else you need to read more carefully and make sure your cert provider (we recommend KSoftware) is not having problems!
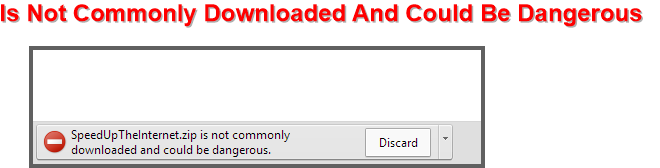
This Is How We Avoid: “Is Not Commony Downloaded And Could Be Dangerous
In this tutorial we covered the basics to get you started. Once you have signed the setup.exe and your actual .exe file (see screenshots) Chrome will no longer complain about the exe and will no longer show “this file is not commonly downloaded and could be dangerous”.
On top of that, Windows will NOT show a SmartScreen message!
Voilà, we just solved two of the biggest obstacles to increase our software downloads and becoming a legitimate software publisher. W00t!
Now go and party, come back and publish your software!
Questions
I’m new to this, so there may be a few problems, feel free to add any observations or suggestions


Update, this is how you can solve the Chrome warnings, but apparently you do need a certain rep or the SmartScreen filter will kick in anyway, no matter if you signed your app or not, possibly you need an Extended Cert
A great way is to simply upload to Skydrive as suggested here:
http://stackoverflow.com/questions/13065184/how-do-i-clear-this-browser-warning-when-users-download-my-app
When using KSoftware Sign Tool you may end up getting the error:
.exe, has a different computed hash than specified in manifest.
Will look into it you may have to use AfterTargets as specified here:
http://stackoverflow.com/questions/12521642/file-has-a-different-computed-hash-than-specified-in-manifest-error-when-signi
Update 2: Apparently when you uncheck .deploy it will cause errors and give you the “different computed hash error” – so we can’t uncheck it as suggested in the article, will update the article shortly
http://msdn.microsoft.com/en-us/library/ms228998.aspx