Problems correctly installing or configuring a RAID drive? No worries, here’s a full guide on how to set up a raid drive in Windows using an ASUS motherboard that will get you started.
Please note before proceeding: ASUS is one of the most popular choices, if you have a board from a different manufacturer you can still follow the instructions but certain BIOS settings may be called differently. Just look around they are usually called similarly.
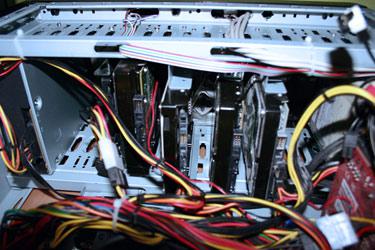
1 Step: Open Case And Installing The Hard Drive
Installing the hard drives can take some time, especially if you don’t have the correct brackets and need to make sure the screws are sitting tight!
Step 2: Setup the RAID Within BIOS (Example: Asus M4a89gtd)
Please read your motherboard manual on how to create a RAID setup. In this example I will show you how to do it for the ASUS m4a89gtd pro:
1. Step When you boot your PC, hit CTRL + F To Enter Raid Setup Mode (time it right, when the system says so)
2. Step Hit 2 on your keyboard to enter LD View
3. Step Now hit CTRL + C To enter the RAID Creation Mode
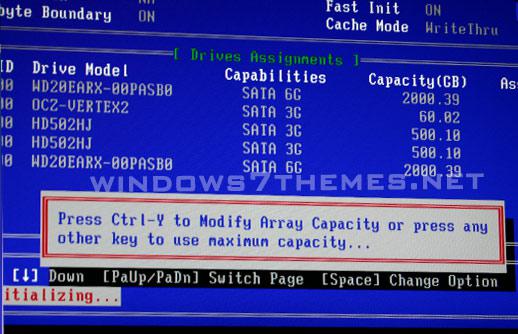
4. Step Use the arrow keys to select the drives you want to assign to the raid array and then hit Space to assign it
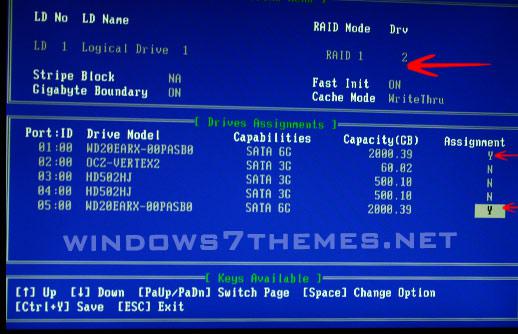
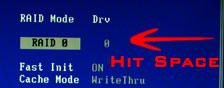
5. Step Select the Raid Mode e.g. RAID 0 and then hit Space to change it from 0 to 1 or other available Raid modes Raid 0,1,2,3,4,5,6. Look up the different modes on Wikipedia. RAID 1 = Mirroring, RAID 0 = Performance are the most important ones for end-users. I selected Raid 1 to have a mirror copy in case one hard drive fails.
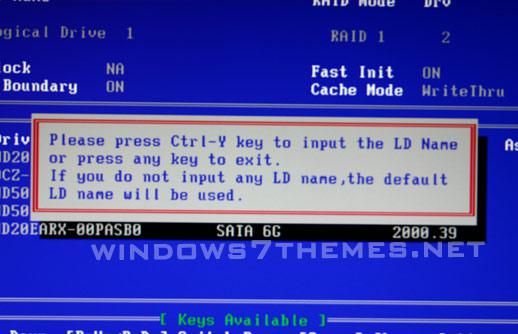
6. Step Hit CTRL + Y (Use Z on EU keyboards) to save the RAID
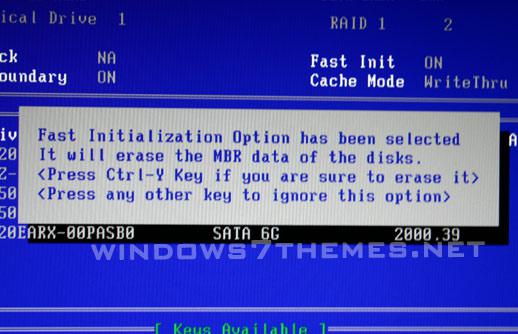
If you let Fast Init on ON – you will get the message Fast Initialization Option has been selected. it will erase the MBR data of the disks. This is recommended to clear the old MBR (Master Boot Record)
7. Step Hit CTRL + Y again and enter a LD Raid Name – this will be the identifier for your RAID array!
8. Step Press any key to assign the maximum capacity e.g. 2TB in this case to the RAID. If you want to assign another capacity (disk space) then follow on-screen instructions
9. Step You should now see Functional on the screen – which means the RAID is now working

10. Step Ok We’re done – use ESC to exit and Reboot
Step 3: Change FROM IDE TO RAID! (ASUS: Storage Configuration
1. Step Open the BIOS
2. Step Look for a setting called Storage Configuration OR SIMILAR (this will be different in your BIOS)
3. Step Change the setting OnChip SATA Type from IDE to RAID
4. Step If you still want to use some single drives, make sure that some drives can still use IDE or they will not be recognized any longer (they will simply disappear and not be listed within Windows 7). In my case, I was able to set SATA-Port 5 and 6 to IDE and SATA 1-4 to RAID.
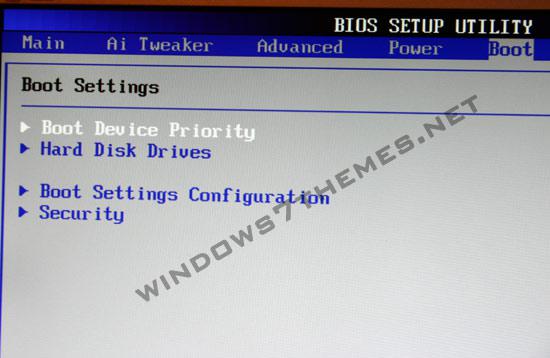
Step 4: Make Sure Boot Priority Is Still OK
After installing the hard drives, it is required to change the Boot Device Priority. Within the BIOS, go to the Boot Menu and look for an entry called Boot Device Priority:
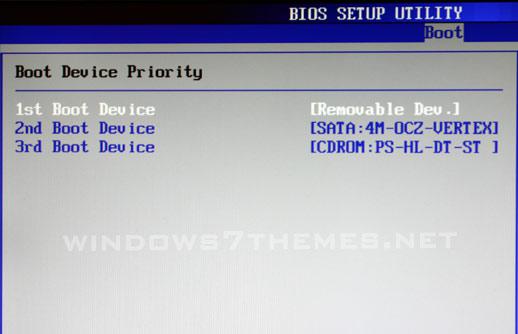
Select your main hard drive and move it to the top. It should look like this. If you intend to install an operating system on the RAID drives then make sure the 1st Boot Device is Removable Dev. / DVD so you can insert your Windows 7 DVD and install it.
Important: The main boot Device should NOT be labeled RAID: unless your are installing an OS on the RAID – If all disks are labeled RAID, change some back to IDE
Step 5: Installing The Raid Controller Drivers
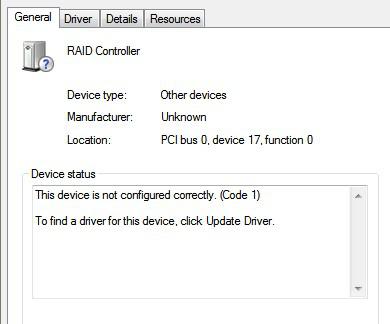
Ok, after installing the RAID via the BIOS, I thought sure there are going to be some problems on Windows 7. Well, I’m used to initializing drives myself by now (I keep forgetting it at times and am left wondering where my drives are, fun times!), but apparently that wasn’t the problem, so I opened up the device manager and there was the problem:
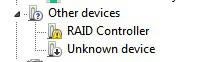
As you can see the Raid Controller wasn’t properly installed.
After visiting Asus.com I checked for some RAID drivers and indeed there are some available:
- AMD AHCI Driver V3.2.1540.35 for Windows 32/64bit XP.
- AMD AHCI Driver V1.2.0.164 for Windows 32/64bit Vista.
- AMD AHCI Driver V1.2.0.164 for Windows 32/64bit 7.
- AMD RAID Driver V3.2.1540.35 for Windows 32/64bit XP.
- AMD RAID Driver V3.2.1540.35 for Windows 32/64bit Vista.
- AMD RAID Driver V3.2.1540.35 for Windows 32/64bit 7.
My motherboard is the Asus M4a8 and I went to this site to get the drivers: http://support.asus.com/. If you have another motherboard check the website of your manufacturer for drivers, manuals, etc. – I can and will not provide links to all motherboard manufacturers here, but I created a page for you with a list of the most popular motherboard manufacturers driver download sites
1. Step Download the Raid Controller Driver
2. Step In my case I found the driver within a sub-folder. This is the full path:
AMD_RAID_V32154035_XPVistaWin7\RAID\
AMD\Driver\Disk\RAID\Win7\x64
3. Step Double-click the file ahcix64s.msi if you are on 64-bit. If you are on 32-bit you need the x86 installer
4. Step Now I tried to install the drivers, but apparently the AMD Catalyst Install Manager is bugged…
I got the error: An unknown error has occured. Please xit and restart Catalyst Install Manager
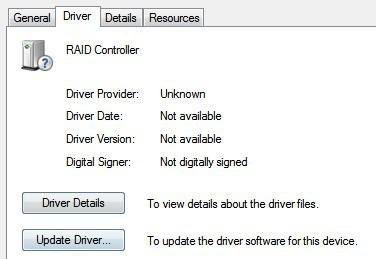
Open the Device Manager instead and right-click on the device with the yellow exclamation mark, then select Properties
It will show this:
Go to the tab Driver and click on Update Driver
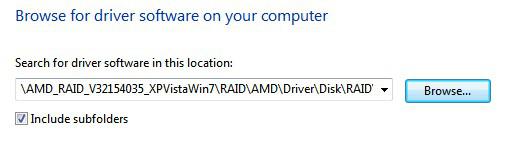
Select Browse my computer for driver software

Click on Browse and locate C:\Downloads\
- AMD_RAID_V32154035_XPVistaWin7\RAID\AMD\Driver\Disk\RAID\Win7\x64
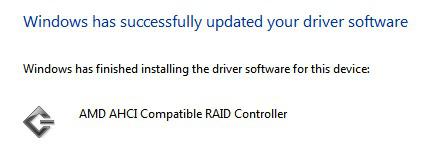
If you located the CORRECT folder with the .inf file then it will say Windows has successfully updated your driver software
Step 6: Initializing The Raid Array Hard Drive
Enter manage disks into search bar on your Start menu and click the item that pops up to open the Windows 7 Disk manager
You will see this – select MBR unless you know what you’re doing and have drives larger than 2TB

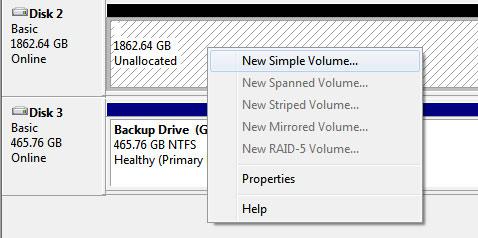
Right-click on the Disk that is your RAID e.g. Disk 2 (Unallocated) and created a New Simple Volume
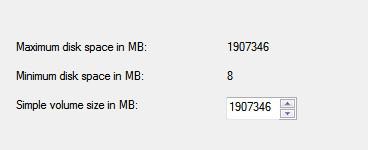
Enter some disk space that you want to assign
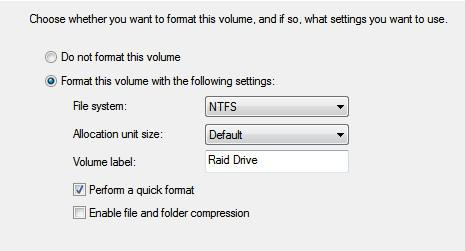
Finally, format the Raid drive and enter a volume label for the drive
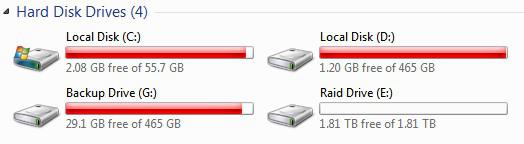
Success, here is the Raid Drive with 1.81 real TB (2TB label is misleading because if you calculate it correctly, it will be 1.81, so don’t be surprised it’s not a 2TB drive)
Final Tips
If you are installing a RAID, make sure that you do NOT assign all SATA ports to RAID. If you do that and simply boot up the system you will get a blue screen with the errorB. On my board I was able to assign port 5 and 6 to IDE. On my board I connected cable 5 and 6 to my OCZ SSD and my backup drive, both are NOT Raid drives. The other 4 SATA ports are now configured as RAID drives. It will take some time to find the best configuration, but simply keep testing.
Another common problem is installing the Raid Controller Driver. It was quite a problem locating the drivers and when I finally located the correct drivers in a sub-sub-sub-folder, the installer was bugged, so I had to install it manually using the Device Manager.


Many thanks for your tips.
It was very useful in my case and really help me to fix my trouble with RAID on windows.
Many thanks and it was a pleasure to read you ;)