Changing the hard drive icon in Windows 7 is a bit more difficult than changing the Explorer icon, but it’s easy with our list of imageres.dll icons. More after the break.
![]()
First things first!
We are about to change system files, because the hard drive icon is stored in a system file called imageres.dll. So, always make your backups. Also, get familiar with the command prompt. I can’t stress enough how important it is. If you don’t know the basic command prompt commands, first go do some research on this. Search for examples of cd, dir, runas, copy, rename and other basic commands.
0. Download Resource Editor for Windows 7
0.1 Create a copy of imageres.dll stored in C:/Windows/system32
0.2 Download Your New Hard Drive Icon, e.g. this Mac Hard Drive Icon
Now that we’re armed with a cool resource editor and have a backup of imageres.dll we can try to hack some Windows 7 resources. Let’s do it!
Ok, wait? How am I supposed to know what image I have to change? That’s easy. A lot of system icons are stored in the system file imageres.dll. Luckily, I have compiled a list of icons that are stored in imageres.dll
1. Step Read through this list of icons stored in imageres.dll
2. Step The hard drive icon is icon #32
3. Step Open ResourceHacker
4. Step Make sure you close some programs or you might get the error message: Out of system resources
5. Step Open the file C:/Windows/system32/imageres.dll
6. Step Uncollapse IconGroup
![]()
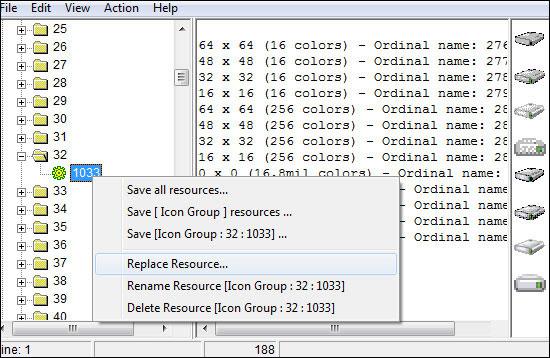
7. Step Uncollapse 32 and right-click on 1033. Then click on Replace Resource
8. Step Next, click on Open file with new icon…
![]()
9. Step After selecting the Mac hard drive icon, it should appear in ResourceHacker. Now click on Replace
10. Step Now it should look like this with the new hard drive icon on the right:
![]()
11. IMPORTANT: Click on File – Save As
12. Create a directory where you store all your dll files in the future. Save the file as imageres.dll
Replace New Imageres.dll With Old Imageres.dll
Important: If you mess this up you might very well break your system. You will find endless tutorials on our site how to restore it (e.g. use sfc.exe) but you need to have at least some basic understanding of computers. Please, read through our tutorials first and do some further research, then you can safely try this on a VirtualPC first. Then when it works go for your real system.
13. Replace your imageres.dll (instructions below).
14. Don’t know how to replace your imageres.dll? Read our comprehensive guide How to replace shell32.dll or How to replace system files
15. Keep in mind, even if you use the TakeOwnership script, you still have to give yourself permission. How to do that? All explained in the tutorial above (step 14). If you are a security freak you might want to remove that permission after replacing your imageres.dll
16. An important command to keep in mind is runas /u:Administrator cmd.exe, which you can enter into run (Windows key + R). Then you can move and copy files via command prompt.
17. Clear your icon cache
18. Enjoy your new Mac hard drive icon:
![]()
How I Replace Imageres.dll
Here’s how I do it. This is my method, if you do it differently that’s ok. First I take ownership and take permissions via GUI. Then I open a command prompt with admin rights.
1) runas /u:Administrator cmd.exe
2) rename imageres.dll imageres.dll.bak
3) copy C:/path/to/imageres.dll C:/Windows/system32
4) restart explorer
5) possibly clear icon cache
6) done
There are probably easier ways to change the hard drive icon in Windows 7, but this is the most reliable way and will work if you do it right. Yes, replacing system files is a pain in the ***, but once you know how to do it it’s easy. I always replace the files via command prompt. All comands that you really need for this are: cd, copy, rename, dir, runas and you’re good to go!

