The dreaded message bootmgr is missing still exists today, but luckily there are some easy solutions that can help you to fix your boot manager and launch your computer again!
IMPORTANT: Common Issues With USB Devices: Unplug External Devices
The message bootmgr is missing will also appear every time you boot your PC and you have a USB device connected that has boot-capabilities but has no boot manager on it (in order to make a USB device bootable, read the instructions below).
In order to avoid this issue, shut down your machine, unplug the USB device and start it again. If the issue persists you will know that it is not the USB device that is causing the problem.
Make sure to unplug other devices that may be causing issues as well, including USB drives, external blu-ray drives, external hard drives, external DVD drives and so on.
Repairing Boot Records in Windows 7 (Skip for 10)

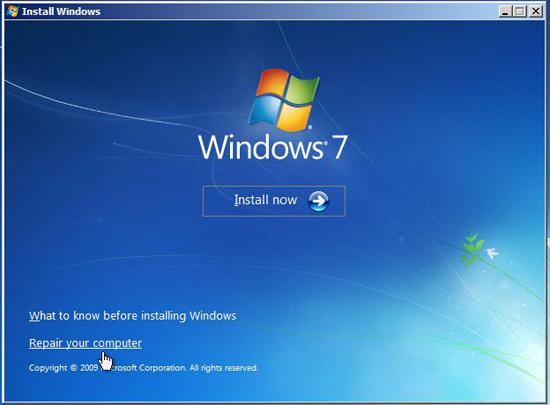
To repair your boot records, you have to launch the start-up option “repair your computer”. Please locate your Windows DVD before proceeding, in case we need it, but we can proceed without if you don’t find it.
1. Step Insert your Windows DVD or USB device. On boot-up press F8 to get to startup options. Alternatively, go into your BIOS, change the boot order to boot from your external drive. Once you see the Windows installation screen there will be an option to repair it (below Windows 7, but Windows 10 still works similarly) . You should Click on “Repair your computer”:
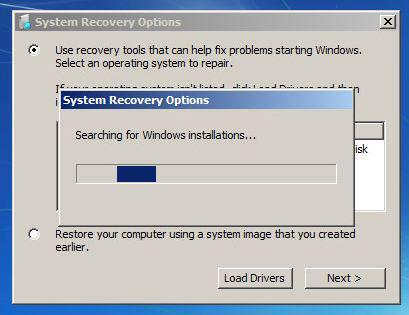
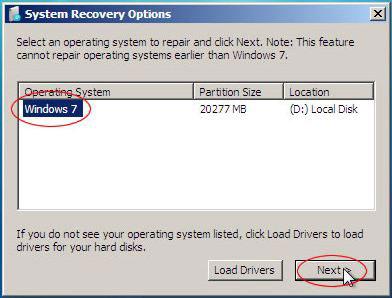
2. Step You’ll get a list of operating systems installed on your PC:
We have outlined the steps that are necessary to repair the boot manager:
Repair In Windows 10:
If you are on Windows 10, insert your recovery device. This would be your original installation disc, a USB drive with Windows 10 on it even better a recovery device that you created previously.
1. Step You should get this screen:

2. Step Now open the advanced options


Alternative Method 1: Repair bootmgr via Command Prompt (cmd)
Open the command prompt.
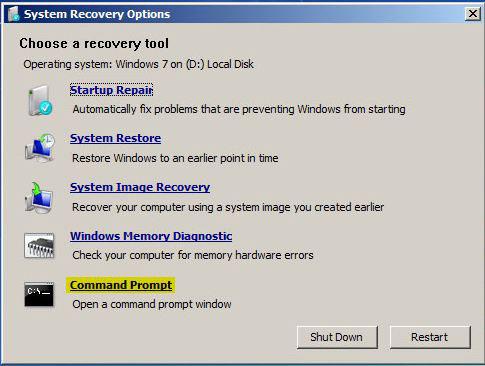
Next, simply enter the following command to fix your boot record:
/fixboot
In case your master boot record has been damaged as well, I would also ru
/fixmbr
Method 2: Repair bootmgr via “Startup Repair” (Described Above! Skip If You Have Tried)
Theoretically, Windows should be able to find and fix this error. If you click on “Startup Repair” instead of Command Prompt, then Windows will scan your system for common errors and will hopefully figure out that your bootmgr is broken.
Alternative Method 3: Check disk for errors
Another error why you are receiving the “bootmgr is missing” error after installing Windows, might be that your hard drive has disk errors. It is always a good idea to also run the command
chkdsk C:\ /f /r
This might take some time, depending on the size of your hard drive, but it is necessary to verify that there are no corrupted files on your disk.
How To Properly Boot From USB Devices
If you actually intend to boot from a USB device and you always get the error that your boot manager is missing, I recommend that you look into tools that can make your USB device bootable. One such tool is UNetbootin, another you may want to try is called LinuxLive USB Creator. For bootable linux pen drives, try downloading a copy from pendrivelinux.com which is a great source for all sorts of bootable discs.
BootMgr is compressed
Another related issue is the “bootmgr is compressed” error. If you get this error, you can also follow the steps above. We outlined the steps in this guide
You may frequently run on this problem when you compress your disk and it accidentally compressed the boot records or the file winload.exe as well. This can happen on Windows Vista, XP, 7, 8 and 8.1 under various circumstances. It is recommended not to compress your entire main partition (usually C) in order to avoid this kind of problem and only compress certain folders.
1. Step Boot from DVD as outlined above
2. Step Open the repair your computer options
3. Step After selecting your OS, click on Load Drivers.
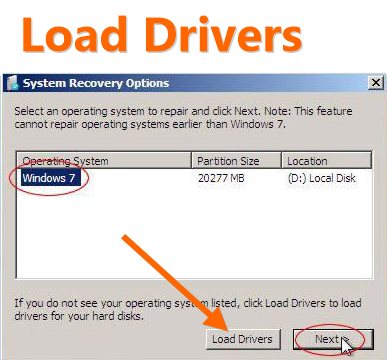
You may be asked to insert installation media to properly load the drivers. Find your compressed drive within the file explorer and open the Properties dialog, finally uncheck the option to compress the hard disk. This will turn of the disk compression that may be causing this issue.
After removing the compression you should be able to boot up again
What Is Causing This Issue? Drivers, NTLDR, winload.exe?
If you delete or modify various drivers, the NTLDR boot loader (NT loader) or the file winload.exe you will run into issues with the booting process. Luckily you can repair it using your Windows DVD and the computer repair options.
So even if you manage to delete those files, get them corrupted or compress them, there’s a good chance you will be able to use your PC again if you follow the steps above carefully.


cannot get anything when i punch f8 when we turn on the computer can u help novice computer person daughter going to school
Restart your PC and try to hold F8. You will get a screen with 6 different options, one of them will be Safe Mode, select this and hit enter.
You have to hit it at the correct time, so simply hold it down and it should work. However, some motherboards use another key to get into safe mode.
Give the following keys a try (hold or hit repeatedly)
CTRL
F5
F8
Shift
It has to be one of them. You can look this up in your motherboard manual.
I’ll be posting an alternative if nothing works, but I’m positive that it will.
The f8 thing didn’t work for me. Windows wouldn’t even attempt to start, the error pops up while I’m still in bios early boot stage. I had to make a windows repair disk on another PC and I had to reboot using that CD which then let me do the repair and now it works. I’m now trying to find out what caused the problem.
i had same(bootmgr missing) problem with my new dell laptop which i had purchase on 10.09.2010 and i am not having reinstall to window7 CD.
I am not having CD where along with my laptop i just got 2cd’s(driver Cd,software CD) Cd’s are that there is no window7 CD so what should i do now???/?? and while purchasing i have taken 15 months anti-virus of MCAfee so now does that all software is gone???
now what should i do?????
You will need a boot disk to open a command prompt and run the commands. If you don’t have one you will find them online. You can also go to the shop where you bought the laptop and they will repair it. They might also give you a recovery disk which will allow you to repair/reinstall Windows 7. If you don’t want to go to the shop, you might be able to download the DVD online from the website of your laptop manufacturer e.g. Toshiba, Dell, HP, etc.
I hope this helps.. let me know!
I have a problem…when I launch the command fixboot.or the auto repair it say that is impossible to fix…I don’t know what to do… help me please… :(
thanks. It help me much, but isn’t it actually need to be recboot /fixboot rather than just /fixboot ?
i cant press f8 because when i start my pc it only says bootmrg missing when i press f8 its going to make a terrible sound any ideas
lester, you need to press F8 at the right time to get into safe mode. Depending on your motherboard there are other keys that you need to use to get into the safemode. Please read your manual and/or refer to this guide:
How to get into safe mode without F8
sOliver i have a laptop(packard bell) there was a win vista on it. I formatted all the partitions the one with 100mb size too when i install the win7. I get the error BOOTMGR is missing Press Ctrl+Alt+Del to restart and i can’t get the win safe mode or something another i tried all the keys showed here. I can only go to the setup and F12. I can’t boot it. Please I need really help of you and very sorry for my bad english i hope you understand it.
UnnameD, read the comment above yours, there is a link how to get into safe mode without F8. But since you want to repair the boot records, simply insert your Windows 7 DVD, then when the computer boots press DEL to get into the BIOS. Now read your motherboard manual how to change the boot order, the DVD drive has to be the first one.
Then your PC will boot from DVD and you should be able to start the Windows 7 repair tool.
if i made this it will repair, but i´m gonna still having all my files because i`m not format right? or i´m gonna lose all my work?
hi, so i thought my laptop had virus so i chose to do the system recovery. it formatted all installation in my laptop and during the reinstalling period, i canceled it because i had to go. the next day i turned it back on, it showed “BOOTMGR is missing Press Ctrl+Alt+Del to restart _”
sorry i dont have a CD/DVD to recover. wondering if you can help? thanks.
Updated the “bootmgr is missing article” with a few important details.
@lorena Yes, you will still have your files. It will only fix the MBR, the master boot record which stores important information about your boot sectors and what not. After repairing it the bootmgr will be available again and you can boot again.
@littlealex You might want to think about creating an emergency disk to recover your data and then download a DVD from the internet (if you have a valid license). You can also take the laptop to the store where you bought it, I think
they can reinstall it.
Link: Create emergency multi-boot recovery disk
Usually the “bootmgr is missing” error can be fixed by running the commands given in the article above. You might also want to read the other articles that are listed at the end of the article.
thnxxxxxxx a lot…..
it helped me…
if people you dont have a win 7 disc…try for win 7 “RECOVERY DISC”.its less than 200 mb for 64 bit..you can create it on any other win 7 working computer..google it…
Hi,
I have the same problem except that I can’t get to the repair option. After the message BOOTMGR is missing press Ctrl, Alt, Del I don’t have any options. what do I do now?
Bernie, please read the comments and your motherboard manual how to get the OS boot up options, usually F8. Also, you need to change your boot order, boot from the Windows 7 DVD and then you can repair the bootmgr as described above.
Hi all,
For your information:
1. To enter BIOS on most pc’s these days is F2, another common one is ESC , then try DEL or F12 before the others listed above.
Then change boot order.
NB: NOT FOR NOVICES!
2. F8 KEY!
Two Answers.
1. laptop
2.Desktop
1. Most newer laptops dont show POST messages so the first thing you see is the Win logo. In these cases wait a second or two before pressing the F8 key, if you dont get the selective menu then vary the time before pressing F8.
2. In my experience most desktops will freeze or pause the POST test on power-on if you press the F8 button too soon. The process should be:
Power on PC
Wait for brief message about ‘detecting drives’
Then ‘detected drives’
(you have to be quick!)
Now press F8
Now use up/down arrows to scroll to ‘safe mode’
Press enter
In my opinion the commands FIXBOOT and FIXMBR are great, saved the day several times, so good advice from them guys above me.
Good luck all.
insert your win 7 cd in cd drive and restart your system
go to bios and make dvd drive your first priority booting device or some times dvd will not boot
in windows7 installation select repair your computer
it will search for any windows installations select an installation that you want to repair
click next select startup repair after 5 sec cancel it [ if you let it , it may solve your problem ]and now from the disp select command promt
Bcdboot C:\windows [enter]
BOOTREC /FIXMBR [enter]
thats all
Hi, i have got everything like the images however the part where it searched for windows installations, nothing appears up. So i cant fix and partitions can some one help me please thank you
i am facing the problem “bootmgr” missing press alt+ctrl+dlt for restart…
while pressing any function keys, there is no responce, if press F8 also, same error is displaying, if there is any solution plz informed to me, i am using windows 7, i have windows 7 recovery disks also,
plz save me frm this problem
Ok I’ve tried everything soliver said changed the boot order don’t have a disc and I can’t get to the advanced boot menu with or without F8 someone please help me, I’m at the point of getting anew laptop/ hard drive
device is not accessible,while reinstalling O.S i am using original DVD got from Compaq laptop
My system recovery isn’t compatible with my windows 7 and I can’t open “choose a recovery tool” what do I do?