 This will be a guide how to install Windows 7 themes properly. You can install themepacks created on Windows 7 by double-clicking on it, but for 3rd party themes you will have to patch your uxtheme.dll and some other dll files first.
Overview: Update March 2014
Installing custom Windows 7 themes can be more difficult than you think. This is a comprehensive guide that will teach you what you have to do.
Installing .Themepack Themes vs. Installing Unsigned Themes
Before we start, answer this question:
Do you want to install a theme that has the file extension .themepack or is it a complex shell theme that actually changes the appearance of your operating system and has the file extension .theme and usually comes with a whole folder of files?
If the answer is that it is a .themepack theme, you can install the theme with a simple double-click. If it’s not, then proceed with the next step.
Before installing 3rd-party themes: Create a backup
Microsoft does not allow you to use themes that modify the shell of Windows 7 or other parts like the Start orb or the taskbar. In order to install those themes you will have to patch your uxtheme.dll, themeui.dll and themeservice.dll, which can be found “C:\Windows\system32\”.
Method 1: Universal Theme Patcher
Alternatively, you can download the Universal Theme Patcher created by deepxw that works with Windows XP SP2 SP3/2003/2008/Vista SP1 SP2/Windows 7, 32bit(x86)/64bit(x64). This won’t create another background process, instead it will patch your files.
Download Universal Theme Patcher.
This patcher will automatically patch the following files on Windows 7: uxtheme.dll, themeui.dll, themeservice.dll

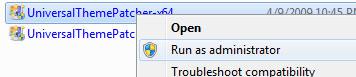
In order to patch the files, you will to run this with administrator privileges. To provide admin rights, right-click on the file and select “Run as administrator”:
The tool will automatically create a backup of the file, so it’s totally safe, because you can always restore the original file:

One last step: To install 3rd party themes, you have to copy the complete folder to C:\Windows\Resources\Themes
Click here for more instructions where to copy your Windows 7 themes
Method 2: Background Service UXStyle Core
The first and probably easiest way to install Windows 7 themes is to use the UXStyle Core tool (created by Rafael withinwindows.com).
The UXStyle Core tool can downloaded from http://uxstyle.com/ or from our own server: Download UXStyle Core
This tool will create a new process “UnsignedThemesSvc.exe” that is running in the background and will allow you to run 3rd-party themes properly.
After rebooting your PC, you should check if the service “Unisgned Themes” is started. To do that follow a few instructions:
2. Step Enter services.msc into the search field
3. Step Enter “U” and look for the service “Unsigned Themes”
4. Step Double-click it and click on “Start”
5. Step If it could not find the specified file, you should download

One last step: To install 3rd party themes, you have to copy the complete folder to C:\Windows\Resources\Themes
Click here for more instructions where to copy your Windows 7 themes
Troubleshooting Unsigned Themes service
Error:
Windows could not start the Unsigned Themes service on local computer.
Error 2: The system cannot find the file specified.
Fix:
Download Microsoft Visual C++ 2008 Redistributable Package

Sidenote: Before you use the UXStyle Core, you should deinstall any previously installed UXTheme.dll patches. The UXStyle Core is working on Windows XP, Vista and Windows 7.
If you have problems installing unsigned themes after installing UXStyle Core, check if the service is started: Enter “sc start UnsignedThemes” into command line or follow the instructions above.
Reboot your PC after installing UXStyle Core!
UXTheme.dll x64 Build 7100
I uploaded my own dll files, but you should only use them if you are using Windows 7 Build 7100 (RC) x64:
Download UXTheme.dll x64 7100#
If you found this tutorial useful, please retweet it, submit it to digg or stumbleupon. I would really appreciate it.
Where should I copy my themes to?
To install your 3rd-party themes you have to copy your themes to the folder C:\Windows\Resources\Themes
Let’s take a peek at that folder to understand how it works:

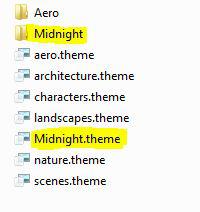
The themes folder has some .theme files but also a folder called “Aero”. This folder is part of the Aero theme (aero.theme). The folder MUST have the exact name of the .theme file (in this case Aero). The folder name is case-insensitive.
Now let’s take a peek at a typical 3rd-party theme:
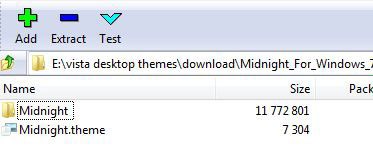
A folder and a .theme file! For now, it doesn’t really matter what is in that folder. Now, when you extract the folder and .theme file you have to make sure that you are not creating a subfolder for the theme, it has to be exactly like above! If the folder Midnight and Midnight.theme are in a subfolder your theme won’t be recognized.
What should I do with shell32.dll, explorer.exe and other system files?
Many themes will include system files that you have to replace, e.g. explorer.exe, shell32.dll or other system files. You have to replace them to fully install your themes.
Be advised that modifying system files can render your system unusable! Always be VERY careful when you replace system files.
Read our tutorial: How to replace system files in Windows 7
Installing Shell Themes & Theme Installer 0.7
Update 8/8/2010:
A new guide has been added that explains how to install custom Windows 7 shell themes. This guide includes some special tips for 64-bit Windows 7 users. When you install shell themes on Windows 7 64-bit you’ll have to copy some files to the SysWOW64 folder, that’s explained in the guide:
Additionally, we have added a theme installer that makes installing themes a lot easier:
Windows 8 Users
Last but not least, I want to explain to you how this work on Windows 8 and Windows 8.1 – any themepacks you create on Windows 7 will work 100% on Windows 8, however all shell or 3rd-party themes won’t and require additional patching.
For the full instructions, you read this guide
Also, Windows 8 themes (deskthemepacks) do not work on Windows 7 – there is no backwards-compatibility, only forward-compatibility, keep that in mind when installing Windows 7 themes


Thank you so much for this tut, saved me time to search on google, worked and was easy to understand
OK I ran UXTheme and it says it’s ready to install. So if I have a theme – what do I do now? I tried clicking on the theme name and it seems to put it in the Theme area but doesn’t do anything
I’m stuck on the first solution. I got the error while trying to start Unsigned Themes, and I even downloaded your solution to the problem… in fact, both of the installations. However, I still continue to get that problem! Is there something else that I’m missing?
Hi Kyo,
are you running Windows 7 32-bit? Then you will need Microsoft Visual C++ 2008 x32. You can check that here: Start Menu -> Control Panel -> System -> Look for “System Type: 32-bit Operating System”.
I recommend solution 2 (!), try that one if it doesn’t work after you installed the correct version of C++. Patch the files and then if you have a theme (not just a .themepack!) that changes the taskbar and other things, you copy them to C:\Windows\Resources\Themes.
There’s not much you could possibly do wrong.
Let me know if it works.
Actually, I’m running 64-bit. Having just upgraded from Vista (and fiddling a bit with the themes on there), I thought it would be just as easy on 7. Sadly, I’ve tried both of your solutions, with the same response on my laptop: nothing. I’ve installed the appropriate C++ version, and tried both solutions with different themes just to make sure one wasn’t broken.
Thanx for adding where to add the theme files oliver :D
I have patch 3 dll files by using universal theme patcher,but still facing problem style changed but explorer did no work.
So I’ve been struggling to get themes to work on Win7 for days. I’ve turned UAC off and tried UxStyle, Universal Theme Patcher, and everything I can think of.
Screenshot of problem: http://hizost.com/f/88
The tops of the windows and bottom don’t use the custom themes, but everything else does. UnsignedThemesSvc.exe runs well and all of that, just no tops and bottoms of windows are being skinned =(
Anyone have ANY idea what’s up?? Is ExplorerFrame.dll responsible for this or what??
Thank you for the insructions
you made this very easy
Ok i started the unsignd themes…downloaded the ux, did it…Downloaded a theme put it in the themes folder….didnt appear when i tried to personalize…..i also noticed that the other themes said( windows theme) my theme said (.desktop) what should i do?
my expirience:
“windows 7 64 ver 7600 – fresh install”
first solution dont work
second work but…
after restart when i aplly any of 3d party themes
and i close window everything looks ok. but i cant
come back to change theme again. window with themes
wont appear so i restored files.
after all it does not much amazing difrence.
thanks for effort
tried all the methods..Universal Theme Patcher, adding theme in Themes folder but still doesnt work. What can be done to make the theme work?
I followed all of the instructions but I can’t hit the start button it is just barely visible.
you must have done something wrong then. Your BMP file is too small I’d suppose. Download one of our start button BMP files and modify that one .. then it should work
Helo,I’m new in computer thingy. Before the first step,what do you mean i have to backup uxtheme.dll, themeui.dll and themeservice.dll, which can be found “C:\Windows\system32\”. And where do i have to patch them..??
Hey Leo. You should backup (copy) your system files. The files we are editing are system files that are important. If something goes wrong you need a backup, therefore you have to copy the files that I mentioned to a secure place. Copy, not move!
You will find the files in C:\Windows\system32, simply select the files with a simple left-click (hold down CTRL to select multiple files), press CTRL + C and then open a new folder somewhere else where you want to store your important system files and press CTRL + V.
Then follow the instructions of the tutorial. You will download a tool that allows you to patch your files. As a beginner try Method 2 first! Then you have to download the Universal Theme patcher: http://windows7themes.net/themes/UniversalThemePatcher_20090409.zip
This tool will help you to patch your files. It will even create a backup of your files, but it’s better to have multiple copies of your important system files anyway.
Hello, bought a new laptop recently so quite fresh with win7,
my question was, tried method 1, installed, restarted, services.msc, cant find the Unsigned thing anywhere so uninstalled that now.
going to try method 2 now.. sorry for seeming clueless but am i missing something or is it only about patching the files..? i’ve picked theme 19 in the 30 themes list
(windows7themes.net/windows-7-desktop-themes)
trying to get it installed but im just wondering if it gets simple after i patch and what i should expect to see? (feels like theres more work to it)
Any help or answers would be awesome.
Yep, definitely go with method 2. It works far better.
Just patch your files, copy the files where they belong (read tutorial for instructions) and then you’re good to go.
If you have to replace files like explorer.exe etc. you should read our other tutorials as well, it can be a bit difficult for beginners.
Replacing explorer.exe http://windows7themes.net/how-to-replace-explorer-exe-in-windows-7.html
sorry to keep bothering but, i’ve come as far as changing my explorer.exe now, patched the 3 files, installed fonts and all but i cant figure out where to put all the other DLL’s..? en-US and shell ones? regarding en-US i can find a folder of that in WINDOWS and in Sys32 folder.. cant seem to find where to put those anywhere so ^^’
thanks thus far anyway :D
Hey,
here’s a quick answer (will shortly post tutorial and long answer).
You have to copy the folder “Midnight” and “Midnight.theme” (can be found in in the main folder “Midnight Theme” to C:\Windows\Resources\Themes\
Read this and you will understand everything:
http://windows7themes.net/windows-7-themes-folder-location.html
As for the shell32 images, you can use ResourceHacker or Restorater for this job. I am using ResourceHacker.
Please read this tutorial (it’s about changing the start button, but you are doing the same for the shell images):
http://windows7themes.net/how-to-change-start-button-in-windows-7.html
=> I’m talking about the Shell32 Replacement Images!
thanks for your quick reply oliver, i’ll get to work and see what i can do :) already seems alot more understandable
thanks alot for your time!
thanks! theme is up and running, had already installed the orb in the extra’s, so thats how far i’ve come now :D which im quite satisfied with already!
I have a question.
Does changing the Windows theme with this whole patching method have any affect on the speed that that Windows will run other programs? Like, it will it take up more resources to run a 3rd party theme than usual because it’s not a ‘natural’ part of the Windows 7 shell?
Thanks for your help! :)
Hey anne to somewhat answer part of your question, i’ve so far not noticed any slowing down at all, no. still the same speed as always, one thing to watch out for is the somewhat darker themes though, i used to have one installed where i couldnt properly find some buttons anymore and where text-entry was rather dark, and Office-Word background was darkened a little, so i switch themes when i use Word now :D which isnt really much work, but i expect none of these problems with lighter themes.
~Leroy ~your average websurfer~
hello, please i want ur help !! i tried the 1st method but i could not find the specified file, then i tried the 2nd and patched the files .
what should i do to apply the theme ?
@anne Windows 7 themes mostly replace BMP files. So, theoretically, themes with very large BMP could slow down your system, but a modern PC that runs Windows 7 should be able to run ANY Windows 7 theme just fine.
I wouldn’t really worry about it, I’d worry more about unnecessary services and background processes that can slow down your PC.
@safo please read through the comments. You have to copy shell themes to C:\Windows\Resources\Themes\. Other themes (.themepack files) can be installed with a simple double-click. Make sure that you copy the theme folder and .theme file to C:\Windows\Resources\Themes\ or it won’t work.
@Leroy: Did you figure out how to replace shell32.dll? If not, read this tutorial that explains how to replace system files in Windows 7:
http://windows7themes.net/how-to-replace-system-files-in-windows-7.html
Oh and ONLY replace shell32.dll in Windows/system32 .. DON’t replace shell32.dll in Windows/syswow64 or you will get this error:
Atbroker.exe (0xc000007b)
I have tried both ways of patching the files. Nothing seems to work.
I am running win7 64 (build 7600)
I used the option 2 first and all the files patched fine. I downloaded a theme and it showed up in “downloaded themes” under personalized and it did nothing. it made the sound when I click on it and the screen flashed but no change in theme.
I then tried uxstyle and still, same scenario.
Please help, this is very frustrating.
thanks!
Hi, I just installed the USX style thing, I was just wondering what i have to do to use the theme now.
Mike you have to copy the Windows 7 themes to C:\Windows\Resources\Themes\ .. see a few comments above for instructions.
I am now going to add a detailed explanation to the post, since this seems to be a common question!
@cjjd2 you still have problems? If so, please post a link to the theme that you are trying to install. Thanks.
Mike, I have updated the tutorial now. I hope that this will answer your question, but feel free to ask if you don’t understand something.
I know that installing Windows 7 themes can be troublesome sometimes, but it’s worth it, trust me. Don’t give up!
Okay, so i still don’t know how to install the mac theme, as posted earlier, on the theme selection page of this website. However, i have done some research stuff and found out that the explorerframe belongs in the system32 folder, so how do i find this in the registry editor, so that i can try and use this, or can I use it since it is an 86bit theme?
I want my desktop to look exactly like the picture shown, and i am trying to get the Dark Pearl VS by Morphious.. Thanks
Brandon
i have a windoes vista..can i still install a windows 7 theme? n if i can will it be safe???
Frkboi, you can’t directly install Windows 7 themes on Vista, but you can extract the contents of a Windows 7 theme and then install the content on Vista manually.
This will be more work, but for some themes it can be clearly worth it to install them on Vista.
If you need instructions, refer to this tutorial:
http://windows7themes.net/how-to-install-windows-7-themes-on-vista.html
Short: Get 7zip, extract, copy files where they belong
How to use Windows 7 Theme in Windows XP
Mik, you can extract the contents from our themes to install the Windows 7 themes on XP, this will take longer, but if you really want a theme it can be worth it.
Please read this guide:
http://windows7themes.net/how-to-install-windows-7-themes-on-vista.html
I have just download COD MW2. But, I have trouble installing it because I could only get desktop wallpaper and a screen saver out of it. So can anyone please help me install it.
also I always get “Windows can save this theme”
Hi
I installed one of the themes witch changed shell32.dll explorer, explorerframe.dll etc. but how do i remove it and change it back to the normal theme?
Best regards
Marcus, didn’t you create a backup of the original files? Simply restore the backup files to revert your changes. If you don’t have any backups, I can upload my 64-bit files for you. If you need 32-bit files, you’d have to ask someone else.
Yes i made a backup of the files, should i just switch them with the files from the theme?
nvm i got it working :)
thanks for your time
That is Most completed Guide I have ever seen , thanks.
Thanks mate you really helped me :)
im having problem in 2nd solution
i dont have undesigned themes option in my computer
is there something i am missing?
do u have any other way?
thanx
Innocent fairy, it’s called unsigned themes and it’s a service that you installed on your computer if you followed method 2. In fact, I don’t recommend method 2. Instead, please try method 1 it’s much much easier for beginners.
1. Download the Universal Theme Patcher
2. Run it and click on Patch 3 times
3. Done
Then you can install any 3rd-party themes by copying them to Resources/Themes folder as described above.
What kind of theme are you trying to install? If it’s a .themepack file that you want to install simply double-click on it.
i have tried method 1 twice and it asks to right click this program and i dont know what to rite click i dont have a clue of it.
and about what kind of theme im trying to install, i am installing the themes avaliable on this site [sorry i dont know the details]
Right-click on the file that you downloaded: UniversalThemePatcher_20090409.zip
Then at the top it says “Run as administrator”, click on that.
Most themes on this site are .themepack themes that you can install with a double-click. Have you tried that? It will then auto install the theme.
i used method two on mom’s computer and dad’s computer as well except dads doesnt work.. i started unsigned themes in services.msc and extracted a theme(that worked on mom’s) to desktop and copy and pasted to windows/recources/themes.. doesnt change a thing tho?
ok i have downloaded universal theme patcher [4 th time] and i rite clicked it and there is no option like run as administrator
and i also tried by double clicking and itz not working either!
when i double click it following options come
explorer frame
fonts
Q-2,4
i am so annoyed with the themes![sorry 2 annoy u 2]
@Niles Have you tried method 2 for installing them on the 2nd computer? Did you also copy the .theme file including the folder with the same name?
@fairy I’m sorry to hear that it is still not working for you. Could you explain on what file you did the right-click. From what you describe above I conclude that you did not right-click on the correct file after downloading the theme patcher. Please give me the exact name of the file.
I have Windows 7 Ultimate, x32
in my personalizing option, it says this page is not available on this edition of windows.
I used method 1.
dint work.
can it work at all on my sys?
:p
This is the first time I hear about this error. Could you take a screenshot and post it here so we can have a look?
We’re working on something MAJOR that will simplify installing Windows 7 themes dramatically and it will be released in the next week hopefully.
Please also refer to this post to run the troubleshooter:
http://windows7themes.net/how-to-enable-windows-7-aero-theme.html
I tried downloading the uxstyle program but it doesnt show up in the services list at all. Have I done something wrong? Im running 32bit.
Guys, installing themes has become a lot easier! We have released a special tool for installing themes!Check it out here:
http://windows7themes.net/windows-7-theme-installer-beta-0-7.html
you still need to patch to run the installer anyway.
If the basic issue occurs they must have other issues with they’re pc.
Methods 1 & 2 work fine on both X86 & x64.
I prefer 1 because method 2 has a program constantly running in the background.
I have had problems with Vistaglaz before too.
I am not able to apply any theme to my windows 7.
and even i could not change my desktop wallpaper
kindly help
Karthikraj>>
It sounds like you have got a computer with windows 7 lite
who microsoft locked down the personalize settings on.
There is third party programs for changing the themes but
unfortunatly i dont think you can use these themes.
Search for “windows 7 lite change wallpaper” on google
Good luck!
hello good day…
just want to know if i can use this process in my win7 home.
when i’m trying to install the .themepack it says that my OS does not support themes.
if i will use theme patcher and everything in this tut, will this help to change my themes?
thank you in advance . . .
Hi Allan,
you can install Windows 7 themes on Windows 7 Home Premium, but you can’t install themes on Windows 7 Sarter. I heard there are some programs that allow you to install themes on Starter as well and will let you know about it.
Also please read the tutorial again to understand the difference between themepack themes and custom 3rd-party themes (there’s a huge difference). In short, the theme patches above are needed to install custom themes and .themepack themes only require a double-click to install them.
@ sOliver
thank you for fast response.
i am usinng windows 7 home premium, but themes cannot be installed on double click, there is warning prompt that says i cannot install themes on my current OS. i really dont know why?
i also cannot see the personalize tab when i do right click on my desktop. the last tab was GADGET. Does this means that i have to patch it to be able to install themes? o is there something i have to turn off in my OS before installing.
This is really strange. Normally, you should be able to install themes just fine actually. Have you installed any fishy programs lately that might prevent you from installing themes? Also, try to temporarily disable programs that change wallpapers (if you have any).
Try this:
Please try to restart the themes service as described here:
http://windows7themes.net/cant-change-windows-7-theme.html
You can also try to fix the themes service by following this guide:
http://windows7themes.net/windows-7-themes-service-will-not-start.html
Tip: Also run the built-in Windows 7 troubleshooter that might help to solve the problem.
Could you send me a screenshot of that warning prompt? Also, you should be able to see the personalize tab when you right-click on your desktop and click on Personalize.
I will need some time to look into this, but I can notify you via mail if you want to.
good day…
i am currently using windows 7 home basic for my OS.
i am not aware that it does not support the full aero feature. when i’m installing themes it says that my OS does not support themes. is there any posibility that i can install and change my themes?
thank you in advance . . .
Windows 7 Home Basic does not allow you to install Windows 7 themes and it only supports the standard themes and basic themes. Very sorry about that. I’m not even sure if you can install shell themes on it.
How do i install this wow theme?…..
W64-bit.
and i’m totaly lost. never done this but was gonna give this a ty becuase i’m a such big fan of wow :/ help plz
WoW-Lover, double-click on the wow.themepack file and it will be auto installed for you. It’s not difficult, everyone can install them. Installing shell themes is the difficult thing.
i cant start the .theme
it says that (this edition of windows dosent support themes)
im using a windows 7 starter
xtian, you can’t install themes on Windows 7 Starter. If you want to change your desktop background please read the comments by judy here:
Change background theme in Windows 7 Starter
Hey sOliver, Very Kool looking pics, I had no problem installing this under Windows 7 Ultimate 32bit. I just read the read me… and then clicked the icon on my desktop to install it and Win 7 Ultimate did the rest & in 2 seconds flat it took me to my Display themes page and I clicked “select all” and then and went and looked at each one and unchecked the ones I didn’t want, clicked “save changes” and “poof” now I have some pretty kool desktop backgrounds where I set them to changes every day so now I have a different desktop background to look at each new day. I saved all of the landscape ones and a couple more….I really liked the “Windows 7” one.
Thanks and I look forward to more of your work.
I hope you had a Happy Thanksgiving…(if you celebrate that)…I do cause I live in Charlotte, NC USA
SO SWEET!!! Using blade theme for windows 7 64 bits. worked like a charm! I read your instruction and notepad inside a folder. worked like a charmed. Cheers!