Ever wondered if it’s possible to customize the Windows 7 taskbar and change the size of the taskbar thumbnail preview? I am talking about the AeroPeek thumbnails (you need to enable Aero for them to work):
Quick Links:
- Change thumbnail size manually via registry
- Download thumnail size registry keys (for beginners)
- Fully Customize Windows 7 Thumbnail Previews
Change Windows 7 Taskbar Preview Size via Registry
The thumbnails are a great feature, but unfortunately they are a bit small, so it would have been nice to change the preview size within Windows 7, but apparently this is only possible via a registry tweak. So, what we are going to do now is to change the taskbar preview size and customize the borders, spacing and margin. If you don’t know what all that means, no worries, I’ll show it to you.
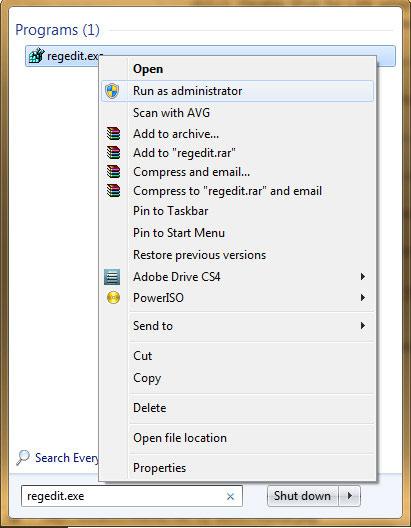
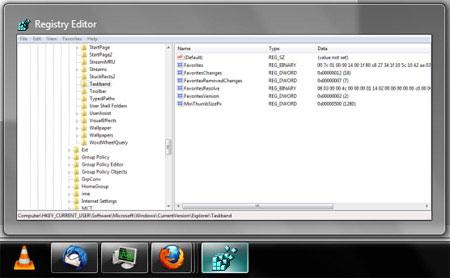
1. Step Open the registry (enter regedit.exe into search field)
2. Step Uncollapse: [HKEY_CURRENT_USER \ Software \ Microsoft \ Windows\ CurrentVersion \ Explorer \ Taskband]
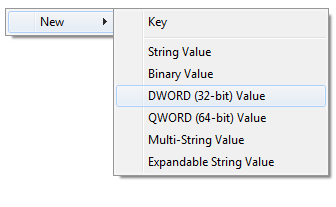
3. Step In the right pane, right-click and click on “New”, “Dword 32-bit Value”:
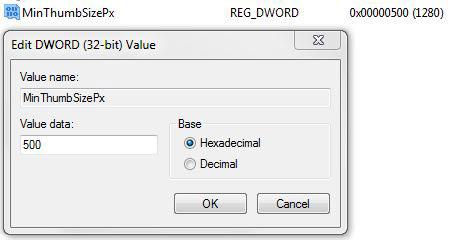
4. Step Name the DWORD key “MinThumbSizePx” and enter a value in Px (Pixel, e.g. 500):
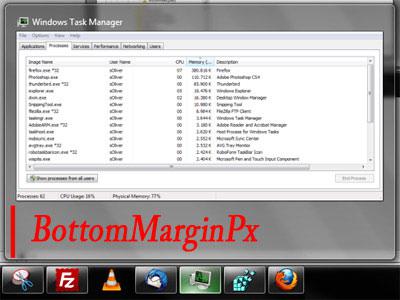
5. Step Restart the process explorer.exe or log off. When you log in again, you’ll have a much bigger taskbar preview size:
We successfully changed the taskbar preview size in Windows 7 to 500px! WoW, now that’s big! Ain’t it? If if it’s too big for you just keep tweaking the taskbar preview size until you come up with a size that you like. 500px is a very decent size because it allows you take a better look at things and actually preview them without having to switch to the windows via AeroPeek.
Download Taskbar Preview Size Registry Keys
You can also copy the following text into a notepad, save it with the extension .reg and execute it:
Windows Registry Editor Version 5.00
[HKEY_CURRENT_USER\Software\Microsoft\Windows\CurrentVersion\Explorer\Taskband]
“MinThumbSizePx”=dword:00000500
To change the actual taskbar preview size, change the number 500 at the end to another pixel value, e.g. 1000 if you want really big thumbnails or you want to make a PC more user-friendly for older persons.
Alternatively, you download our registry key files:
Download Taskbar Previe Size .Reg File (Value: 500px)
Customize Windows 7 Thumbnail Preview
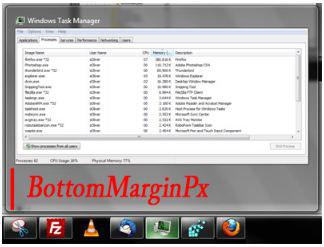
You can also customize the thumbnail preview with a few simple tricks! Let’s say you want a border at the bottom or the top for whatever reason, you can create the key BottomMarginPx and define a value in Px (Pixel) for the top or bottom border.
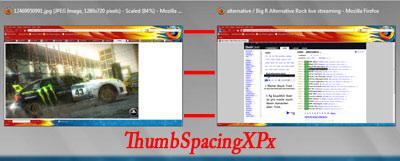
Margin is basically free space between the bottom, left, right or top and the actual thumbnail preview windows (see example above) If you need more space between the thumbnail preview windows, you will change the “spacing”.
BottomMarginPx:
ThumbSpacingXPx:
Thumbnails Size, Number and Text Height:
- NumThumbnails (Number of thumbnails)
- MinThumbSizePx (Minimum thumbnail size)
- MaxThumbSizePx (Maximum thumbnail size)
- TextHeightPx (Text height in Pixel)
Margin Thumbnail Size:
- TopMarginPx (Top margin in Pixel)
- LeftMarginPx (Left margin in Pixel)
- RightMarginPx (Right margin in Pixel)
- BottomMarginPx (Bottom margin in Pixel)
Spacing Thumbnail Size:
- ThumbSpacingXPx (Horizontal space between thumbnails)
- ThumbSpacingYPx (Vertical space between thumbnails)
Registry Examples:

You simply have to create more DWORD keys with the names above, e.g. ThumbSpacingXPx to change the spacing. It’s very easy and everyone should be able to do it. If you have any questions, leave a comment!


Perfect! just what I was looking for! (just remind the people to enter the values in decimal, not hex as shown in the image)
Also, is there a way to center the title text? Right now it is aligned left, and is screwing up the border size in my digsby previews.
Thanks
Text in border to copy into a notepad is wrong:
“MinThumbSizePx” = wrong
“MinThumbSizePx” = write
Yes the difference is in quotes.