 Running programs at startup in Windows is pretty easy, but there are actually several ways to do it, each of them being better suited for different purposes.
In this article, I’ll show you how to run software at Windows startup/boot using three methods.
Three ways to run Windows programs at startup
Running programs at startup is one of the most important parts of any modern OS – after all, many features that people need are provided by third party software, which needs to be initialized alongside with the OS itself or at least as soon as possible. In Windows (starting with XP), you’ve got three ways to do it, each of which could be used in different cases.
Running software at startup using the Startup folder
Using the Startup folder is by far the easiest way to run programs at startup in Windows. It can be done in two easy steps:
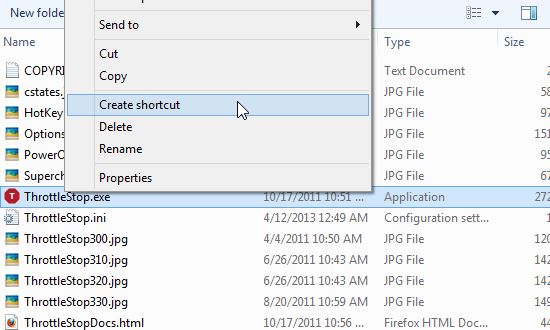
1. Step First find an existing shortcut or create one for the program you want to run at startup (you might need to find the right .exe file in the Program Files folder) and move it to the Startup folder. In my example, it’s Throttlestop:
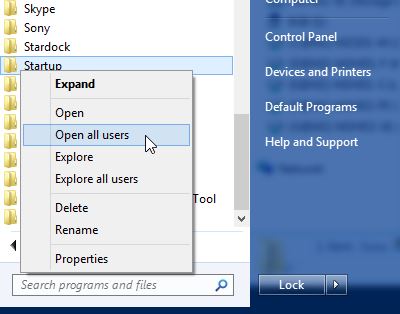
2. Step It’s best to open the “All Users” Startup folder, unless you specifically want to restrict this program to start only when you log into your profile. Find the folder in “Start Menu -> All Programs”, right click it and select “Open all users”:
Then just move or even copy the shortcut (not the main .exe file!) to the Startup folder and restart to test it.
But this method has a drawback if you’re running programs for other users – the shortcut may get deleted, either accidentally or if the system crashes (both of which happen surprisingly often with the average user). In that case, you might want to try another, more reliable method – use the Windows Registry.
Running software at startup using the Windows Registry
It might seem a bit risky, but it’s really not – you just create an entry in the registry that will start your program at boot. The way to do it is as follows:
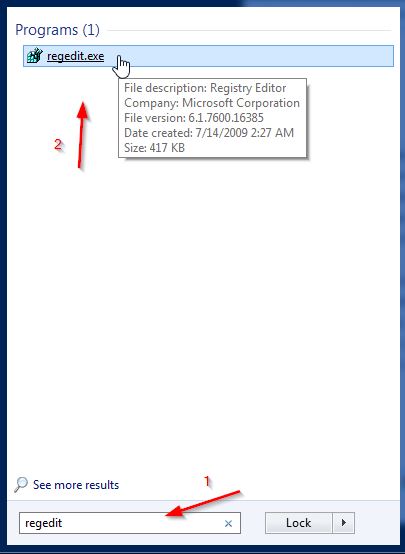
Step 1. Open Registry Editor by typing “regedit” into the “Search Programs and Files” field in the Windows Start Menu, and then clicking the Regedit.exe shortcut that will appear above:
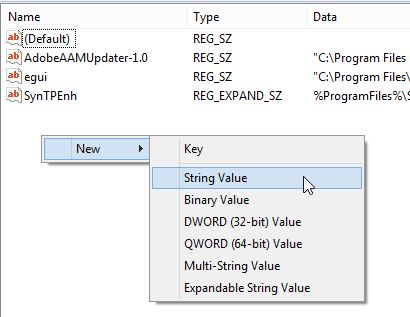
Step 2. Navigate to “HKEY_LOCAL_MACHINE\SOFTWARE\Microsoft\Windows\CurrentVersion\Run”. You might already see a few programs there that run at startup. Now, create a new string value (right click on the empty space, select “New -> String Value”):
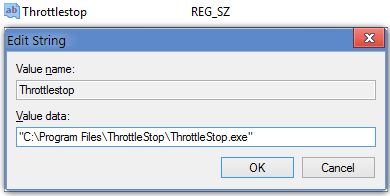
Step 3. Give your new string value a name, then right click on it and select “Modify”. The string itself is simple – you just add the address of the .exe file you want to launch, surrounded by double quotes. In my example, it will be “C:\Program Files\ThrottleStop\ThrottleStop.exe”:
That’s it – your program will boot at startup next time, for all users, and the only way to stop it is to delete the string or the original file. The registry is very resilient, so the only way to lose the entry accidentally is through a very serious crash or a very nasty virus.
Running software at startup using Windows Task Scheduler
If you want to make it simpler and more complicated at the same time, then Task Scheduler is for you. It’s suitable for most programs, can have a few advanced settings that are unavailable in the other two methods, but generally it’s slower at loading the programs because Windows needs to load the Scheduler itself, which then begins to process the tasks. It’s also susceptible when changing user names – it doesn’t find the tasks under the new name, so you have to move task files manually. But in general, it’s easy and safe to use Task Scheduler to start any program. Here’s how to do it:
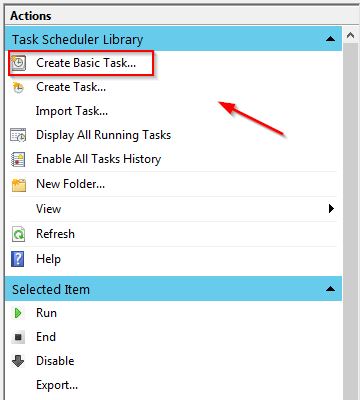
Step 1. Open Task Scheduler by typing “task scheduler” in the “Search Programs and Files” in the Start Menu and clicking the shortcut link. If not selected, select the “Task Scheduler Library” folder on the left side, then click on “Create Basic Task” on the right side:
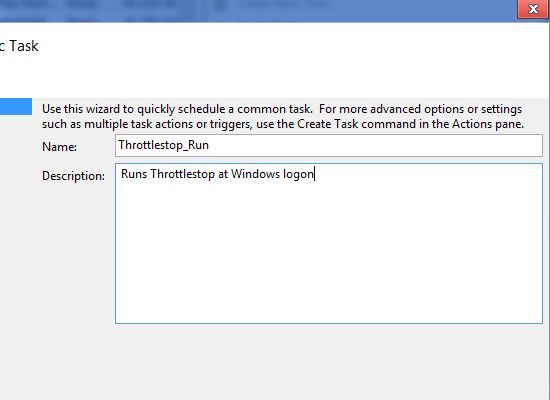
Step 2. Give the task a name and optionally, a description, then click “Next”:
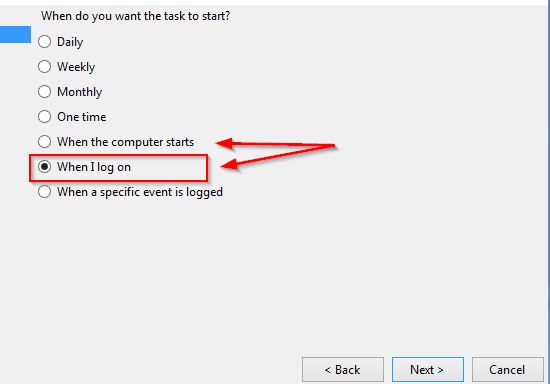
Step 3. Select when the task needs to run – you can select “When the computer starts” or “When I logon” – the latter will make the system start a bit faster, depending on what program you’re starting. For a non-vital program, I recommend starting it at logon:
Step 4. On the next screen select “Start a Program”, then click next and browse/type/paste the address to the desired .exe file:
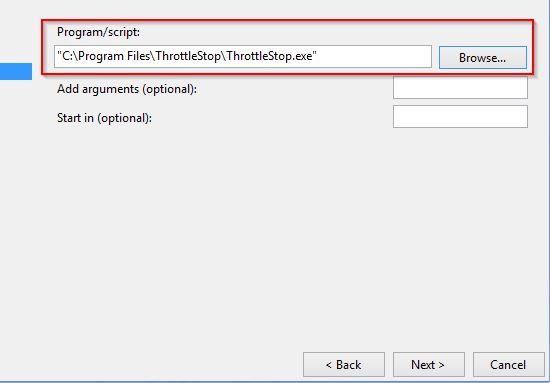
The “Start In (optional)” field is useful for starting command line (or .bat) files, by the way. Anyway, now you can click Next, then Finish and that’s it – your program will start at the next logon. You can browse the task library and edit tasks – in advanced settings, you can set to run the programs as Administrator, set more triggers, set error resolution and more, but those aren’t needed 99% of the time.
Conclusion
And here you go – three methods you can start programs at startup in Windows – if you ever need to start any program automatically when Windows starts, be sure to try any of them – they all work great!

