![]() Today, we received a question from Jonathan. He’s having issues with a library icon that changed for no reason. If you want to change the library icon(s) in Windows 7 or restore the original library icon, follow the instructions after the break.
Today, we received a question from Jonathan. He’s having issues with a library icon that changed for no reason. If you want to change the library icon(s) in Windows 7 or restore the original library icon, follow the instructions after the break.
Quick Links (Extensive Reading Material)
Before you start following this tutorial, you might also want to take a closer look at our other tutorials that are very closely related:
- Change Control Panel Icon in Windows 7
- Change Program Icons in Windows 7 (The Real Icons)
- Change Hard Drive Icon in Windows 7
- Change Desktop Icons
- How To Restore Library Icons
If you are having problems with your libary icons changing randomly like Jonathan, please scroll down for the last part of the tutorial or click here
Tip: If you want to modify the main library icon, follow this tutorial. If you want to change the icon of the different libraries (pictures, videos, documents, downloads, etc.) you should first check out the list of images stored in imageres.dll – in particular the icons 169-192. Then, you should download a resource editor for Windows 7 and replace the images stored in imagres.dll. Replacing the imagres.dll can be difficult, but with the help of our many tutorials (e.g. replace shell32.dll) this is doable.
Change Main Library Icon
1. StepOpen an elevated registry editor. To do that simply enter regedit into the search field and right-click on regedit.exe, then click on Run as administrator.
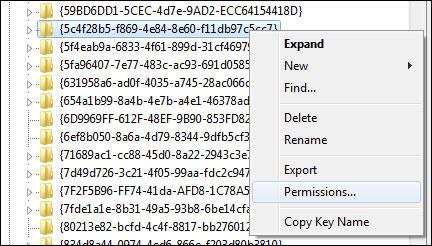
2. Step Uncollapse HKEY_CLASSES_ROOT\CLSID\{031E4825-7B94-4dc3-B131-E946B44C8DD5}\DefaultIcon
How to do that? Select HKEY_CLASSES_ROOT, then click on the black arrow. Enter CLSID on your keyboard (quickly or it wont work) and it will directly jump to that registry key. Then enter {031 and it will directly jump to it.
3. StepRight-click on the folder DefaultIcon and click on Permissions
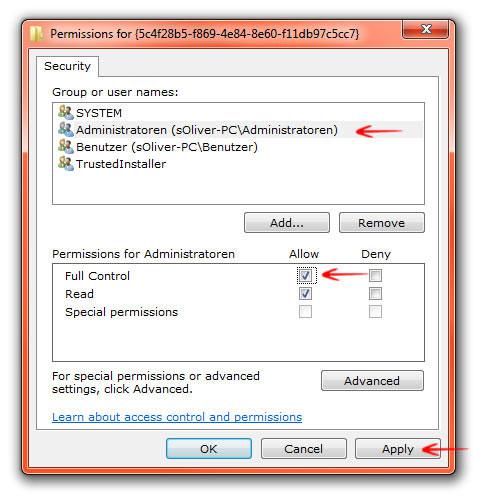
4. Step Select the user account Administrators (Administratoren) and check Full Control, then click on Apply
5. Step Repeat the step 4 for User (Benutzer)
6. Step In the left pane make sure the registry folder DefaultIcon is selected. In the right pane there should be an entry called (Default). Double-click on that entry Default:
![]()
7a) If you want to restore the original library icon insert the path %SystemRoot%\system32\imageres.dll,-1023
7b) If you want to change the library icon because the default library icon doesn’t fit your current shell style or you simply don’t like the look of it, you can simply enter a path to your icon, e.g. C:\Users\sOliver\Pictures\icon.ico
![]()
IMPORTANT: You need to use an .ico file for the icon and it needs to be pixel large. Also, you may NOT move the ico file or you will lose the library icon.
8. Step Restart the explorer.exe (kill process explorer.exe via task manager, then start a new explorer.exe instance via CTRL + R, simply enter explorer.exe) to refresh your library icon
9. Step If you are on Windows 7 64-bit follow the steps above for the registry key HKEY_Local_Machine\Software\Wow6432Node\Classes\CLSID\{031E4825-7B94-4dc3-B131-E946B44C8DD5}\DefaultIcon
Tried To Restore Default Library Icon? Didn’t Work? Try This
If you followed the instructions above and entered the path %SystemRoot%\system32\imageres.dll,-1023 to restore the original library icon, try this.
Tip: Please read all steps above again (very carefully) and make sure that the registry key Default actually changes after a Reboot. If it does not change the path, then it will not work.
1. Step First Reboot
2. Step After a reboot, make sure to clear the icon cache
3. Step Still no luck? Try to restore the original Windows system files using the command sfc.exe /scannow in a command prompt. For more information about sfc.exe, please read the article: Use sfc.exe to repair system files
4. Step Still no luck? Verify that the file imageres.dll actually was restored properly and contains the default library icon. You can look inside a DLL file by using a resource editor for Windows 7


It just keeps telling me “Error writing the value’s new content”
I was also wondering if you can get the image as the pinned icon too