If you want to use a VPN make sure to enable the correct protocols and forward the correct ports or you may end up receiving the connection error 809.
The Problem: Ports and Network Protcols
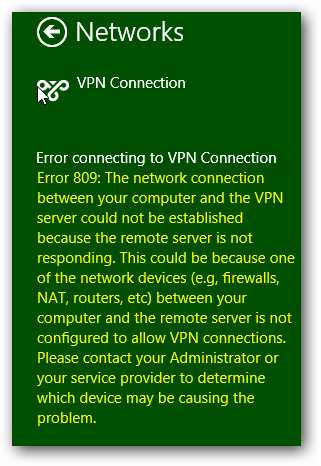
Error 809 reads: The network connection between your computer and the VPN server could not be established because the remote server is not responding. This could be because one of the network devices (e.g., firewalls, NAT, routers, etc) between your computer and the remote server is not configured to allow VPN connections. Please contact your Administrator or your service provider to determine which device may be causing the problem.
In general, that could either mean your router is blocking the VPN connection e.g. because you have a very restrictive firewall or no port forwarding at all. A simple solution could be to forward the port for VPN connections. If that is the case, read your router manual on forwarding ports (e.g. from cisco.com etc), however it could also mean you have not enabled all necessary network protocols for your VPN connections (Microsoft CHAP or others)
What Port is my VPN using? Forward Correct Ports
PPTP uses TCP port 1723, while for L2TP you need to forward UDP 500 and UDP 4500.
So:
- TCP Port 1723
- UDP 500
- UDP 4500
Network Protocol CHAP
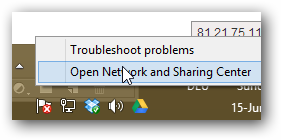
1. Step Open the Network and Sharing Center
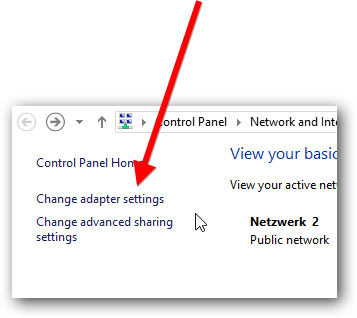
2. Step Now click on change adapter settings to your left-hand side:
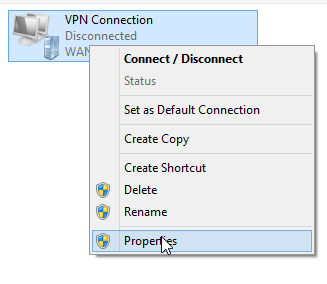
3. Step Now right-click on your VPN connection and click Properties, go to the tab Security
4. Step On the tab Security there is a checkbox called Allow these protocols, tick it, the default settings are fine (enabling Microsoft CHAP)
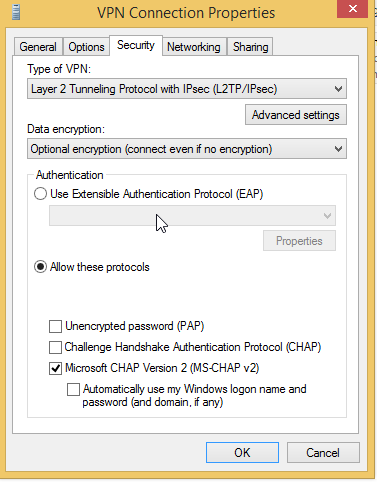
5. Step Confirm with OK and try again
Note: Some providers require you set the option Type of VPN to Automatic
Error 720: Connection Could Not Be Established
Ok, once you have fixed the errors above you may still end up running into error 720, which reads:
A connection to the remote computer could not be established. You might need to change the network settings for this connection.
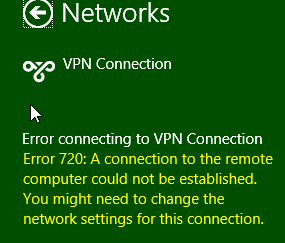
To fix this, make sure to check your credentials, temporarily disable your firewall and make sure to disable IPv6 for your VPN temporarily. Also make sure the VPN is getting assigned to the correct network as outlined in step 1 below:
Still No Dice Fixing 720? RESET TCP/IP Stack and Disable IPv6
1. Step Open the VPN network properties (follow steps 1 -3 above CHAP) and go to tab Networking, disable IPv6 and make sure the IPv4 protocol is using your local network address (if you dont use a DHCP, assign it manually!!)
2. Step Now open an elevated command prompt
3. Step Enter netsh int ip reset as outlined in our guide Reset Winsock via CMD
4. Step Reboot.
5. Step Done.
Last Resort: Registry Patch
L2TP via NAT might be considered insecure, so you have to apply a tweak to enable it:
Windows Registry Editor Version 5.00

[HKEY_LOCAL_MACHINE\SYSTEM\CurrentControlSet\Services\IPSec]

"AssumeUDPEncapsulationContextOnSendRule"=dword:00000002
Copy and paste it into a text file, select “All” from Save As dialog and add the extension .reg. When saved correctly a registry icon will appear (NOT a txt file icon!). Double click and apply the tweak

